Managing Entities in Central
Added in version v2022.3.
Entities in ODK let you share information between Forms so you can collect longitudinal data, manage cases over time, and support other complex workflows.
See also
Entities intro: similar information organized as a list of questions and answers
Without Entities, you can attach existing data during the Form creation process, often through choices sheets or .csv files. Once this data is loaded into the Form, you can use it as the source for selection choices, to prepopulate data fields in the Form, or validate new input. A list of districts, for example, can be used as choices for selection, and information about each district can then be shown to the user or checked against. If you are new to these techniques, you can learn more about them on the Form Datasets page.
This is wonderful if the data you want to use is already known when you are publishing your Form, and if it doesn't change over the course of your project. In many cases, however, the data being collected today for the project is the data you need tomorrow for the same project. Think about seeing a patient for the first and then second time, or registering and then revisiting a survey site for a follow-up. These kinds of workflows are called multiple encounter or longitudinal workflows.
If you have this kind of workflow, you can use the registered data items in a follow-up Form without using Entities, but it requires some work. You can download the Submission data from the registration Form, and then you can attach that data to a follow-up Form, as described above. However, the data available to devices in the field is only as current as your latest follow-up Form update. Some people write programs that automate this process over the API but this requires technical skills that many projects don't have. Now there is a way to automate this process from within Central itself.
Introducing Entities
To give you a quick sense of the end-to-end process, below is a video that shows a simple survey with baseline and follow-up data collection.
Note
The forms in the above video show a simple survey with baseline and follow-up forms. The follow-up form shows three possible ways to look up an existing participant. Download the XLSForms: Add participant and Participant follow-up.
First, some definitions: each item that gets managed by an ODK workflow is called an Entity. Entities can be physical (e.g., a tree) or abstract (e.g., a site visit). Entities of the same type are organized in Entity Lists.
Note
In Central versions prior to v2023.4, Entity Lists were called Datasets.
Next, a new feature. You can now tell Central that some of your incoming Submission data should create Entities in an Entity List created and managed for you by Central. This Entity List can then be attached by that name to your follow-up Forms, exactly like you would manually attach a CSV document. You can attach an Entity List to any number of Forms, even to a registration Form.
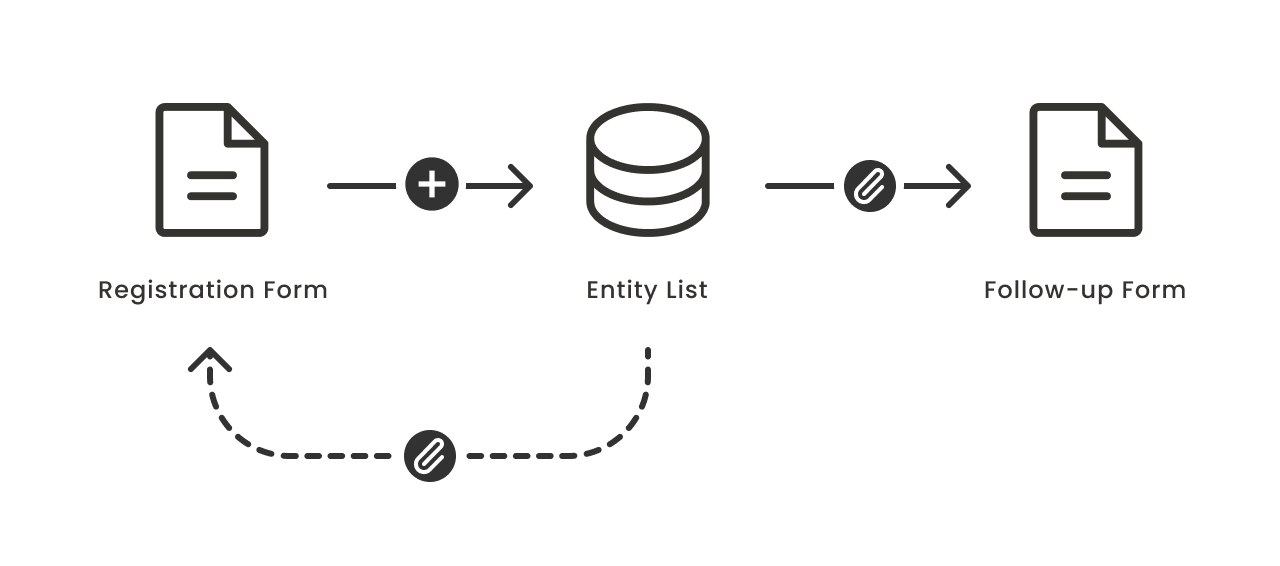
Using this functionality, you don't have to create and upload Entity Lists yourself. When Central receives submissions (or they are approved, see the settings section), new Entities are automatically created. As soon as users of the Follow-up Form(s) get Form updates, they can interact with the new Entities.
If you are interested in seeing how Entities can fit into your workflow right away, we recommend following the Quick Start guide below, where you will upload a tree registration Form and a tree follow-up Form we have created already and see how trees are created by one Form and appear in another.
If you would prefer a more personalized introduction, request a demo at https://getodk.org.
Roadmap and limitations
See also
Entities are a big new concept that open up a lot of new possibilities. While we think many workflows can benefit from Entities today, they have some limitations that you should be aware of.
What's available now:
Create an Entity with a registration Form (automatically or after project manager approval)
Use multiple different registration Forms targeting the same Entity List (e.g., registration at school vs. registration at home)
Use or update Entities in one or more follow-up Forms
Create or update Entities offline using Collect v2024.3 or later
Create or update multiple Entities with a single submission using Central v2025.4.3 and Collect v2026.1.0
Bulk create many Entities by uploading a .csv data file into an existing Entity List
Download Entities into Power BI, Excel, Python, and R
Important limitations:
All devices will always download all Entities which may be a privacy concern
Entity properties may only be strings. Submission values saved to an Entity are converted to strings.
We expect all of these limitations to be addressed over time. The roadmap at getodk.org/roadmap has what we're working on now and what's coming next.
Quick Start
We recommend watching the video below once or twice to get an overview of how Entities work in Central. Once you have that context, proceed with the steps below to try it yourself!
Note
In Central versions prior to v2023.4, Entity Lists were called Datasets. The video below was recorded with Central v2022.3 so many small improvements have been made since.
You may also want to see the community reporting tutorial for another Entity-based workflow.
In this Quick Start, you will upload two Forms we have already authored for you: the Tree registration Form and the Tree follow-up Form. You will step through the registration of a new tree and the process of following up on that tree in a later Form.
First, let's prepare the Forms for use with Central.
Create a new Project, if you can. It can be easier to see what's going on without other Forms in the way.
Upload the Tree registration Form. Notice how Central knows from the Form definition that the Form creates Entities in an Entity List, and populates three Entity Properties.
Publish the Form. As the dialog says, this action creates the
treesEntity List within the Project you created.Now, upload the Tree follow-up Form.
See the Attachments section before you publish this Form, and notice how the Form wants a data file called
trees.csv, but that Central has already linked the Entity Listtrees(created when you published the registration Form in step 3) and you don't need to upload any data here.Publish this Form. Because this Form only consumes
trees, it does not make any changes to any Entity Properties.Now, create an App User within this Project, allow it to access both of these Forms, and load them up into Collect or some other ODK-compatible client.
Next, let's see these Forms working together.
First, fill out and submit the Tree registration Form. Be sure to choose a species and specify a Tree circumference. Use 100 if you are not sure what to fill in.
Go back to Central and click on
treesin the Entities tab in your Project.Click on the Data tab and you should see your new tree! If you don't, you can wait a second or two and refresh.
Now go back to Collect and update your Forms to fetch the new data.
Next, fill out the Tree follow-up Form.
Your tree is here! Choose it.
Report a new circumference that is smaller than the old one. This is probably not a good idea for a tree. See how the Form warns you about this problem, based on the data you'd put into the registration Form.
Correct the circumference to a larger number, and submit the Form.
That's it! The follow-up Form creates normal Submissions, so you can access the data it collects like any Form.
Creating Entity Lists
Note
If you skipped the Quick Start above, we suggest you go back and give it a try. You will learn hands on with Central a lot of what will be described below.
There are two ways to create an Entity List: by Form definition, or by creating it directly in Central.
If you have Forms already authored which reference your planned Entity Lists, you can upload and publish those Forms and Central will create the lists automatically. If you are still planning your project, or if you have a bulk data file you want to upload into your new Entity List, it is often easier to add them directly in Central.
Creating an Entity List in the Central Interface
To create an Entity List directly in the Central web interface, first navigate to the Project which should contain this Entity List. Open the Entity Lists tab. At the top of this page, you will see a New button you can click to create a new Entity List. You will only be asked for its name. Because Entity List names are used as identifiers throughout ODK, there are some restrictions on what you can choose as the name. If Central keeps rejecting your name, it is best to stick with basic letters and numbers.
Once your Entity List is created, you can define the properties it should have so that you can upload Entities from CSV to populate your new list. To add a new property, click on the New button on the Properties tab.
Creating an Entity List by Uploading a Form
When you start a new form draft with a form definition that creates Entities, Central recognizes the Entity List declaration and prepares to create it when the form is published. On the draft page, you'll see information about the list(s) and properties that will be created.
When you publish this Form, the new Entity List and new Entity Properties will be created for you automatically.
Note
By default, Entities are created immediately when the server receives the Submission. If you want to require a review step before Entities are available for follow-up, you can configure this in each Entity List's settings.
To see this new Entity List and download data from it, visit the Entities tab on the Project page.
To use an Entity List in a Form, you can refer to it in a select_one_from_file question as NAME.csv where NAME is the name of your Entity List. When you first create a draft for a new form, all references to CSV files that match Entity List names will automatically be linked to the corresponding Entity List. If you edit an existing form to add a reference to an Entity List, you'll need to click the Link Entity List button.
Testing Forms with Entities
Checking that your Forms are working together the way you expect is challenging with Entities. You can create a Draft of a Form and use it as a safe space to try out Form definitions and see resulting Submissions. But Entity Lists reach across Forms. They live alongside Forms within the Project. How do Form Drafts related to the same Entities connect together?
Drafts currently don't handle this question very well and a future version of Central will provide better answers.
For now, you can only create Entity Lists and Entities from published Forms and Submissions. The creation of Entity Lists or new Entity Properties only occurs at the moment you publish the Form. Only real form Submissions create Entities. This means that you can't test the usage of Entities in follow-up Forms until real Entities have been created.
To try the end-to-end workflow across multiple Forms, we recommend creating a temporary Project just for testing. You can publish all the Forms, create Entities for testing, and make sure that all the Forms work well together.
You can also try a follow-up Form Draft by manually creating a CSV of sample Entities and then attaching it to your Draft, as described in Forms With Attachments. When you have verified the logic of the follow-up Form and are ready to publish it, you can change the link from the CSV to the desired Entity List.
Importing CSVs into Entity Lists
Added in version v2024.1.
In a lot of cases you already have data sitting around that you would like to load into your Entity List. Starting with Central v2024.1, you can do this directly in Central.
To get started, navigate to the Entity List you'd like to load your data into, and select the Data tab. At the top of that screen, click on the Upload button.
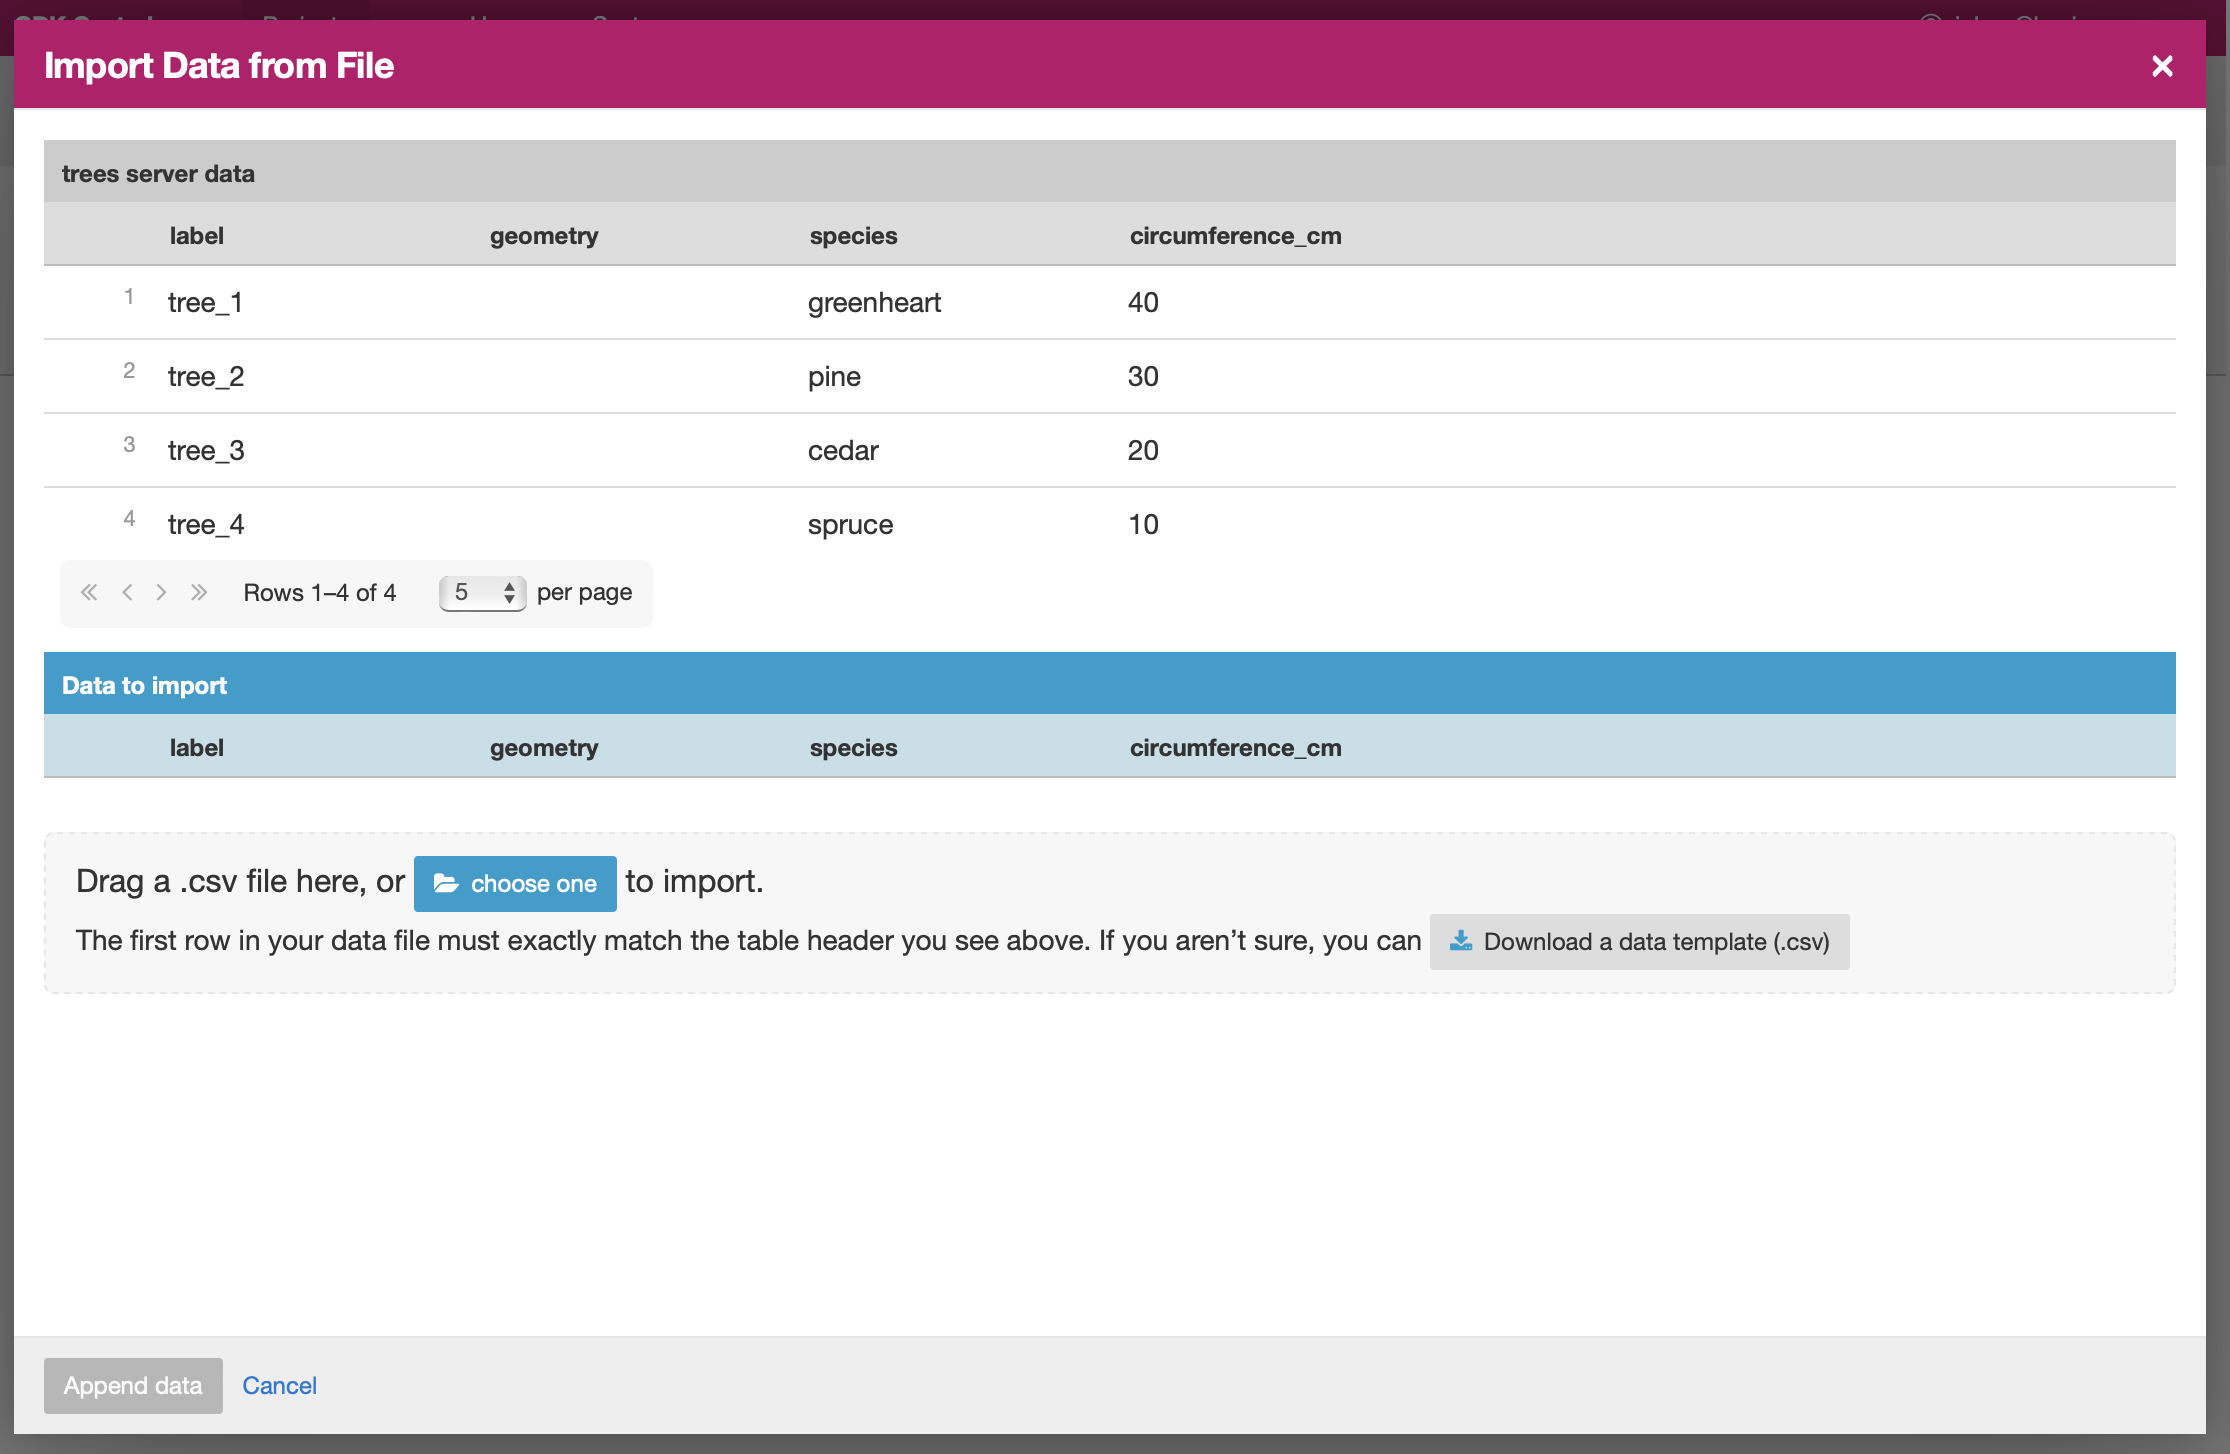
You should see a screen that looks similar to the above. You can see data tables with column headings matching the properties in your Entity List. If you have any Entities in this Entity List already, you will see a preview of them in the table above.
To add your new data to this Entity List, you will first need to convert it into a .csv file if it is not already. You can use common spreadsheet applications like Excel, Google Sheets, or OpenOffice Calc to do this.
There are some additional requirements on this data file:
The first row (and only the first row) is a header row labeling each of your columns.
Your header row must exactly match your Entity List properties.
In addition to your Entity List properties, you must also include a
labelcolumn, where you can provide the name for each Entity that is used when displaying the Entity in Central and Collect.
If you're not sure what this should look like, you can download a sample template .csv file by clicking the Download a Data Template button.
Note
What if my Entity List doesn't have any properties yet? Can't you just read them from my file?
Not yet. Please let us know if this is something you would like to see! For now, you will need to add the properties manually. The quickest way to do this is in the Entity Properties section in Central.
Once you have a .csv file that meets these requirements, you can select it for upload either by dragging it over the box, or by clicking on the choose one button. If your file doesn't meet the above requirements, or if Central can't understand how to read the file, you will see an error message appear. Otherwise, you will see a preview of the data that Central found in the file and how it will load into the Entity List.
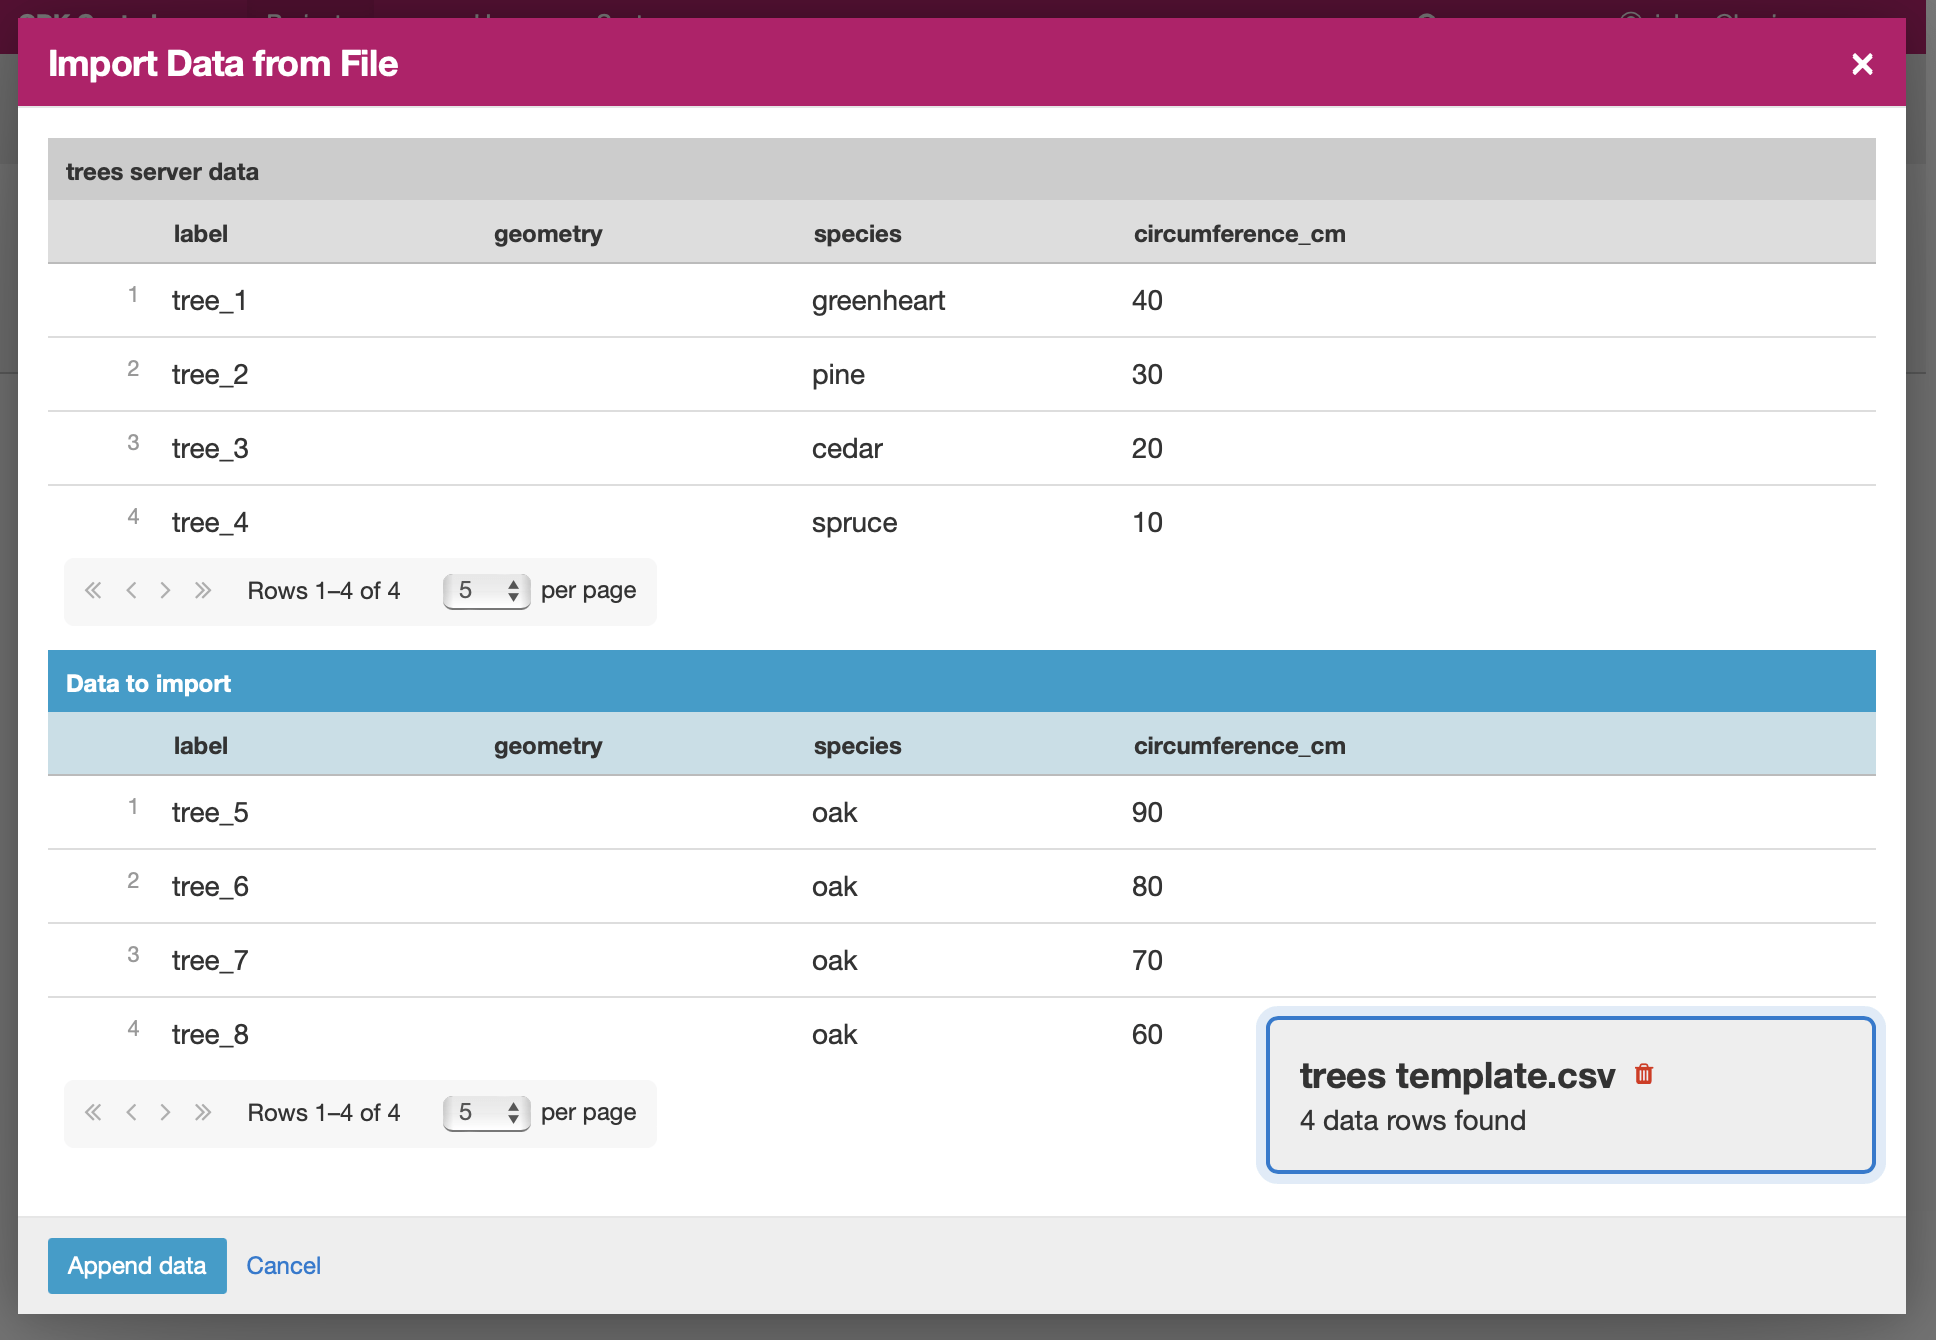
Looking at this view, you can match up the columns and ensure your data is loading into the correct places. You can also verify that the number of records in your file matches the number of Entities Central found to import. It is also often a good idea to check at least the last few rows of your import data in the preview table in addition to the beginning. If there is anything Central is worried about, you will see warnings above your import data. Warnings at this point mean that Central is able to import your file, but is not completely sure it has interpreted your file correctly. If you don't see any problems looking over the preview, you can feel safe to ignore the warnings.
Click on the Append data button to import your data into your Entity List. Be sure you are ready to proceed: there isn't currently an easy way to undo an import.
Creating Entities manually
You can create Entities directly in the Central web interface, in addition to creating them through form submissions or CSV import.
This is useful for adding a small number of records, correcting missing entries, or testing workflows. There is no validation when editing this way. If you would like to specify constraints or other relationships between values, create an update form that uses dynamic defaults.

To manually create an Entity:
Go to the Entities tab
Click New Entity
Enter values for the required properties
Click Create
Creating Forms to use Entities
Central does a lot of work to help you manage Entities, but at least for now the only way to ask it to do so is to create a Form that describes how.
In the following section, we describe how to author Forms that create new Entities, also known as registration Forms. After that, we discuss Forms that use Entities, also known as follow-up Forms.
Build a Form that creates Entities
You’ll start by building a Form that creates new Entities in an Entity List called trees. When you publish this Form, a trees Entity List will be created for you. When a Submission to this Form is received, an Entity will be created in the trees Entity List from data in the Submission. These types of Forms are often referred to as registration, enrollment, intake or discovery Forms.
Define the structure of the Entity-creating Form
Start by defining the structure of your Form in XLSForm using the standard Form building blocks. For example, this form is used to register trees:
XLSForm
type |
name |
label |
|---|---|---|
geopoint |
location |
Tree location |
select_one species |
species |
Tree species |
integer |
circumference |
Tree circumference in cm |
text |
intake_notes |
Intake notes |
Test your Form to make sure it works and collects the data that you need.
Specify the Entity List the Form should save Entities to
Add a new entities sheet to your XLSForm. This is where you will specify your Entity List name, under list_name.
The Entity List name will be used by Central to uniquely identify that Entity List. If an Entity List with the name you specify already exists in Central, this Form will create Entities in that existing Entity List. If Central doesn't yet have an Entity List with the specified name, it will be created.
Each Entity must have a label to identify it on Central and for use in follow-up Forms. The label field on the entities sheet is where you provide the expression to define the label for each Entity. This is very similar to the instance name specified for a Submission. The label expression can use any field in the Form, including ones that aren't saved to Entity Properties.
XLSForm
list_name |
label |
|---|---|
trees |
concat(${circumference}, "cm ", ${species}) |
Specify the Form fields that are saved to Entities
If you think of your Entity List as a spreadsheet, each row represents an individual Entity and each column specifies an Entity Property.
You define Entity Properties by adding a save_to column to your XLSForm. You then put an Entity Property name in the save_to column for each Form field that you would like to save for use in follow-up Forms.
XLSForm
type |
name |
label |
save_to |
|---|---|---|---|
geopoint |
current_location |
Tree location |
geometry |
select_one species |
species |
Tree species |
species |
integer |
circumference |
Tree circumference in cm |
circumference_cm |
text |
intake_notes |
Intake notes |
If you'd like to check your work, you can compare with this example form, with the entities sheet and save_to information.
When you publish this Form on Central, the trees Entity List will be created for you.
Build a Form that uses Entities
Your trees Entity List can now be attached to any Form using select_one_from_file or csv-external.
XLSForm
type |
name |
label |
calculation |
|---|---|---|---|
select_one_from_file trees.csv |
tree |
Please select a tree |
|
calculate |
prior_circumference |
instance('trees')/root/item[name=${tree}]/circumference_cm |
|
integer |
circumference |
The circumference was previously measured as ${prior_circumference}cm. Please enter the current circumference in cm. |
You can see the full XLSForm here.
The same Entity List can be used in many different Forms. The concepts and patterns described in the data collector workflows and the Form Datasets sections apply to Entity Lists as well.
Updating Entities from Forms
Added in version v2023.5.
You can use Forms to update Entity information. These Forms can be authored to, for example, update previous observations to new values or change the status of an Entity. Just like Entity creation through Forms, you can specify which properties on which Entity instances will be updated when the Form's Submissions are uploaded to Central. The data in Submissions uploaded by Entity-updating Forms are applied to the Entity data saved on the Central server. These updated Entity values are then distributed to data collection clients once they synchronize with Central.
Note
Entity updates from form submissions open up the possibility of two data collectors attempting to update the same Entity at the same time. This case is detected by Central and shown as a conflict. If your workflow involves many updates to the same Entity, especially from data collectors who are offline for a long time, be sure to read the section on Entity conflicts.
Building a Form that updates an Entity
Updating an Entity with a form submission is similar to creating a new Entity. You'll also specify the list_name in the entities sheet and will also have to specify the entity_id of the specific Entity instance you want to update. You can optionally update the label as well.
XLSForm
list_name |
entity_id |
|---|---|
trees |
${tree} |
In this example, a tree in the trees Entity List will be updated when Submissions based on this Form are created. The particular tree to be updated must be given in the entity_id column, which here is a reference to the tree form field. That form field could be a select_one that lets the user choose a specific tree, a QR code scanning field, or any other field that will hold the value of a specific tree's ID.
Once you have this update information set up, you can add save_to rules to your Form questions as with Entity creation:
type |
name |
label |
save_to |
|---|---|---|---|
select_one_from_file trees.csv |
tree |
Select the tree |
|
text |
description |
Your qualitative assessment of the tree |
|
integer |
circumference |
Tree circumference in cm |
circumference_cm |
date |
today |
Today's date |
latest_visit |
text |
notes |
Notes |
Here, the circumference and today questions have been set up to update the circumference_cm and latest_visit properties of the Entity, while the description and notes questions don't update any Entity properties. Given the entities sheet above, the tree question's value will be used to determine which tree will be updated.
Updating the Entity Label
To update the label of an Entity from a Form, fill in the optional label column in the entities sheet as you would when setting the label on Entity creation.
XLSForm
list_name |
entity_id |
label |
|---|---|---|
trees |
${tree} |
concat(${circumference}, "cm ", ${species}) |
Setting conditions under which an Entity is updated
You can limit a Form to only update an Entity under certain conditions, based on an expression. The Entity is only updated when the expression evaluates to True.
XLSForm
list_name |
entity_id |
update_if |
|---|---|---|
trees |
${tree} |
${approval} != "" |
In this case, the Entity will only be updated if the value of the approval field in the form is non-blank. If the approval field has a blank value, the submission will still be sent but it will have no impact on the corresponding Entity.
Creating AND Updating Entities with one Form
You can give both a create_if and an update_if rule for the same Form. If only one of these expression evaluates to true or 1, then only that operation will be carried out. If both rules evaluate to true or 1, the Entity will be created if it does not exist (as identified by the entity_id expression), and updated if it does. If neither rule evaluates to true or 1, no Entity changes will occur.
See a sample form here.
Managing Entity Lists
To browse all Entity Lists in a Project, go to the Entity Lists tab. You'll see all Entity Lists created by Forms in that Project. Click any Entity List to view its Entities, properties, and settings.

Entity List Settings
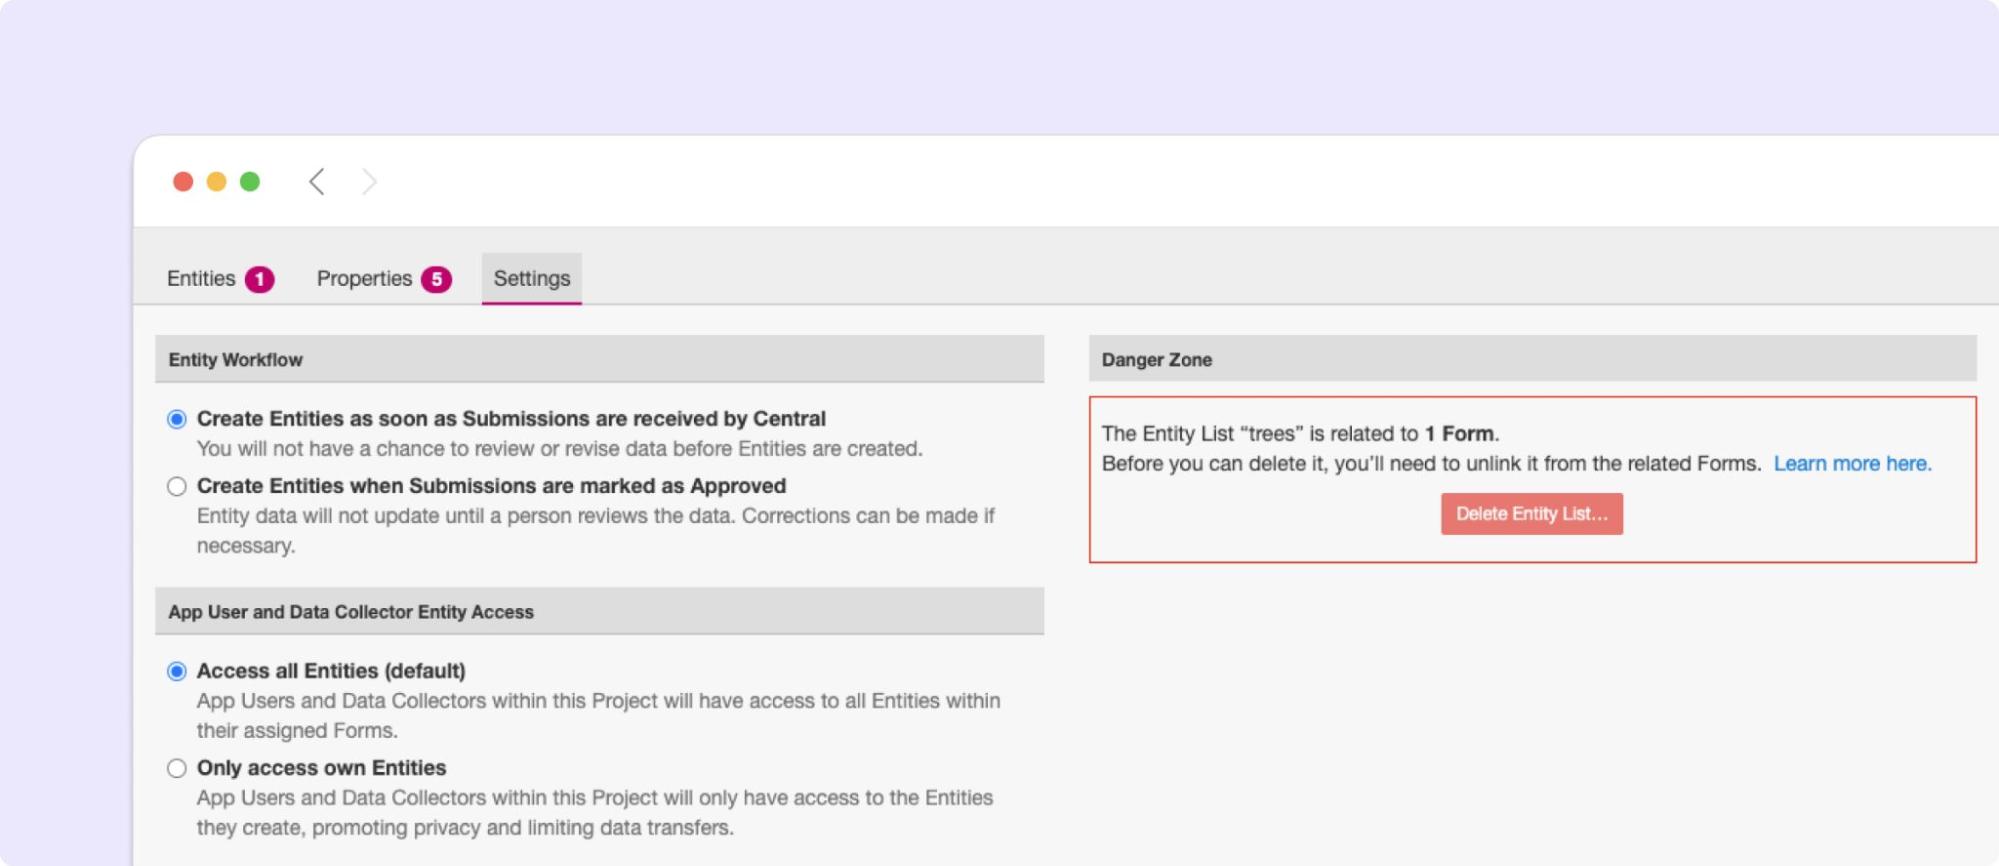
On the Settings tab, you can choose whether Entities are created immediately when they are first received by Central, or if Central should wait until the Submission is approved before creating any Entities from it.

Note that only one of these two behaviors can be chosen at a time. If you change the setting from "on approval" to "when received" but you still have unapproved Submissions, Central will not ever be told to make Entities out of these Submissions. If this is the case for you and you try to make this setting change, you will see a special message and you will have the option to convert all pending (not approved or rejected) Submissions into Entities right away.
Select either option and you should see a confirmation the setting has changed.
You can also select whether App Users and Data Collectors receive access to all Entities, or only the ones they create.
Deleting Entity Lists
You can delete an Entity List that is no longer needed if it is not linked to any Forms. If the list is currently in use, unlink it from all Forms before proceeding.
To unlink a Form from an Entity List, you must edit the Form's definition.
If a form uses Entities from the list you want to delete, you can remove the question(s) that reference the list or replace the list with a CSV. If a form creates or updates Entities in the list you want to delete, you must delete the row on the entities sheet of your form definition that references that Entity List.
Once you have made the necessary changes to your Form(s), publish your draft(s) and then proceed to deleting the Entity List:
Go to the Entities tab in your Project.
Select the Entity List you want to delete.
Open Settings.
Click Delete Entity List.
Confirm the deletion.
A deleted Entity List will be available in the trash for 30 days and then will be permanently deleted. You can't restore an Entity List from the trash but you can download its contents to upload into a new list.
Managing Entity Data
From the Entities tab, you can preview or download your Entity data.

Similar to the Submissions data page for a Form, you will see overall metadata like the create and update time on the left side of the table, and the actual data values on the right. You can press Refresh to fetch the latest data, or use any of the options at the top right of the table to export the data to a file or an analysis tool.
To see, edit, and manage additional details about a particular Entity, hover over its row in the table and click on More to go to the Entity Detail page. Alternatively, you can click on the pencil icon to edit the Entity data immediately.

By default, you see all Entities in the Entity List. If an Entity has a conflict warning attached to it, you will see an alert in that table row. You can filter down to only Entities that do or don't have conflict warnings using the filter above the table. On the row of any Entity with a conflict warning, you can click on the red Review Parallel Updates button to see more information about the warning, make any edits needed to correct problems, and dismiss the warning if desired. You can also click through to the Entity Detail page to do these things with a little more information.
If you're looking for a specific Entity, you can search for a specific property value, label or creator.
You can also view your Entity data on a map by switching to the Map view using the toggle in the upper-right corner. Each Entity is plotted based on its geometry property, if one is defined.

When many Entities appear close together, they are automatically clustered to make the map easier to read. As you zoom in, clusters break apart to show individual Entities. The number shown in each cluster represents how many Entities it contains.
Seeing Entity Detail
The Entity Detail page provides a complete look at the data and history of a particular Entity, and gives tools and options to manage it. You might arrive here by clicking on the Entity name somewhere else, like in an update feed, but you can always find the Entity you want in the Entity Data table and click on the More button.

Similar to the Submission data detail page, the Entity detail page has some basic information about your Entity on the left, and an Activity Feed showing you the history of the Entity on the right.
You can see the actual data stored in the Entity in the bottom left under the Entity Data section, and you can edit that information by clicking on Edit right there.

When there is a conflict warning active on the Entity, you will see a notice above the Activity Feed. Here you can see a summary table of all the Entity updates that might be conflicting with each other. In the feed below, updates that are possibly in conflict will be highlighted. If you want a broad look at the updates in concern, the table is a great summary, but sometimes it can help to look at the changes described in each update in the Feed to really see what's going on.
You can dismiss the conflict warning by pressing Mark as Resolved underneath the summary table. When you do this, the warning is dismissed. All values about this Entity currently in Central are now considered non-conflicting. Therefore, you may wish to Edit the values using the button on screen before marking the warning as resolved.
Editing Entity Data
To edit the data stored for an Entity, you can locate the Entity in the Entity data table and click on the pencil icon that shows up on top of its row, or you can click on the Edit button if you are already looking at the detail page for the Entity.

A dialog will appear with all the Entity data listed. You will see the name of the field in the first column, the currently saved value for each field in the second column, and an edit field you can use to update the data in the third column.
The very first row labeled Entity Label * is not part of the Form data collected. Rather, it is the title of the Entity, which is computed from the Entity data when the Entity is first created using rules set by the Form author. You can change it to any value here.
As you type, Central will highlight any fields you have changed so you can see the changes you've made.
To complete the process press the Update button to save your changes to the Entity. You will see a confirmation that the save succeeded. If you don't like your changes, you can click on the x or the Never mind link to close the dialog.
Deleting Entities
You can delete individual Entities by hovering over their row in the Entity data table and clicking the trashcan icon.
You can also delete multiple Entities at once directly from the table.
Select one or more Entities by clicking the checkboxes in the leftmost column of each row.
Once at least one Entity is selected, an action bar appears with a Delete button.
Click Delete, then confirm the action in the dialog that appears.
When deletion is complete, a success toast confirms that the Entities were deleted, and the table refreshes automatically.
Once an Entity has been deleted, it will remain in the Trash for 30 days before being permanently deleted. Only users with permission to manage Entity Lists can delete Entities.
Managing Entity properties
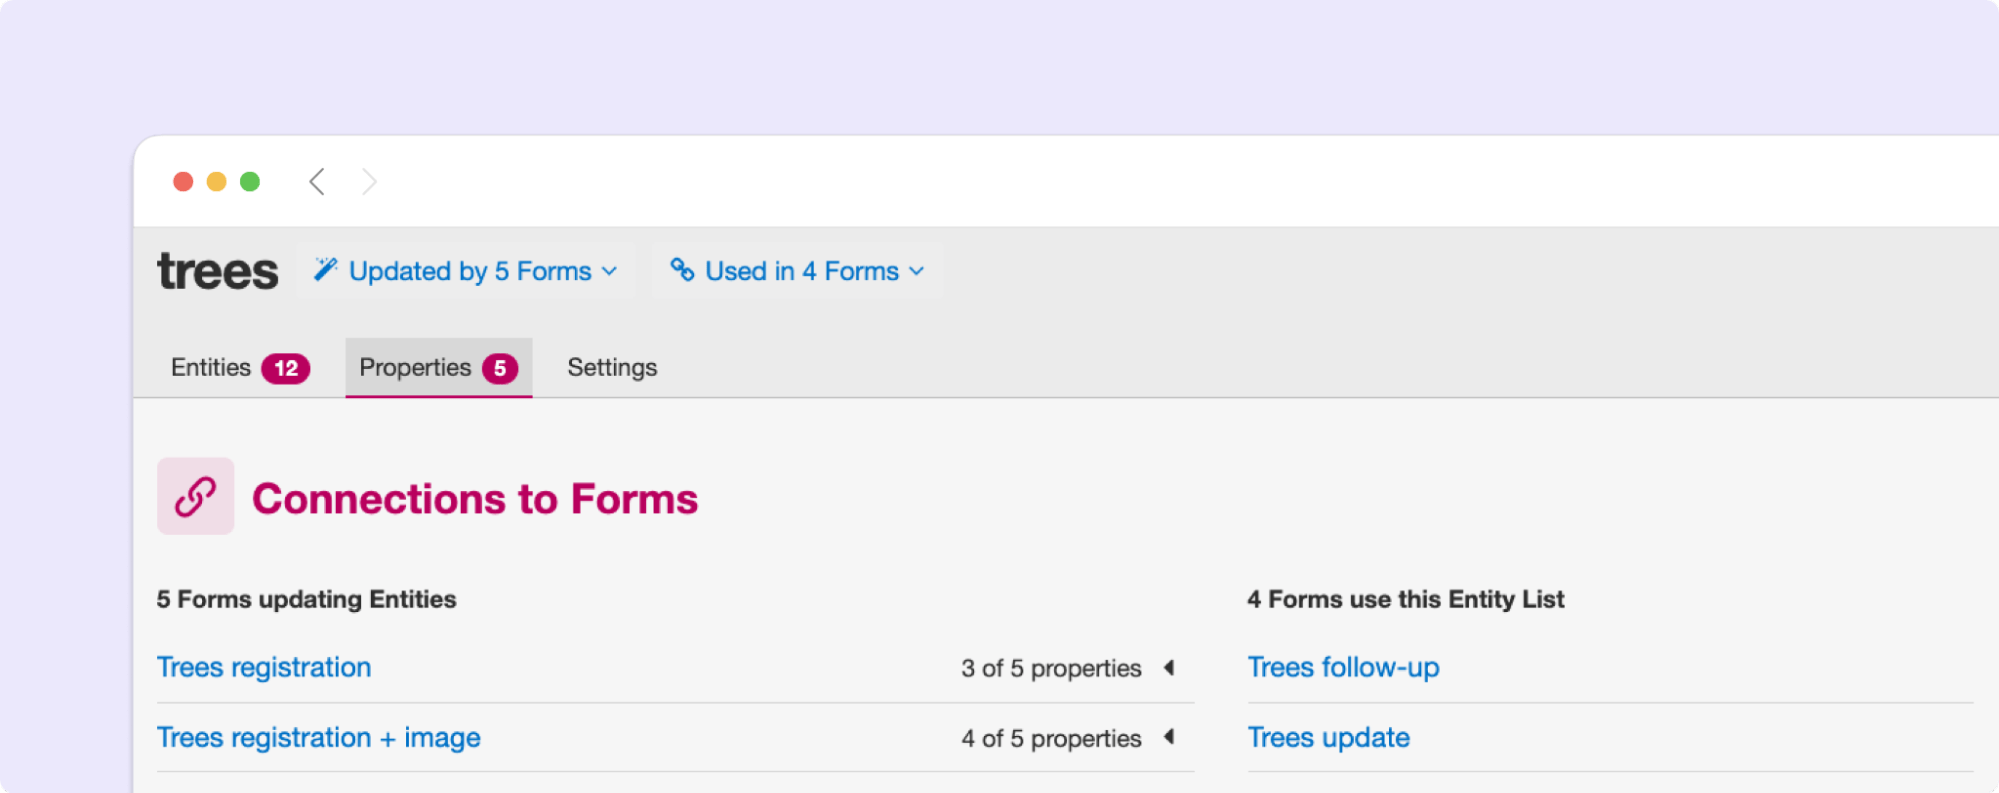
On the Properties tab, you can see how this Entity List relates to other incoming data in your Project: which Forms contribute to the Entity List, which ones read data from it, and which fields are being read or written, as well as a list of Properties and the forms that update it.
Deleting Entity properties
You can delete a property from an Entity List if it is no longer needed.
A property can only be deleted if its value is not set in any Entities. If its value is set in some Entities, you must edit each Entity to clear the values. Property deletion is currently intended to be used during the workflow testing phase. If you need to clear many Entities' values, you can use the API.
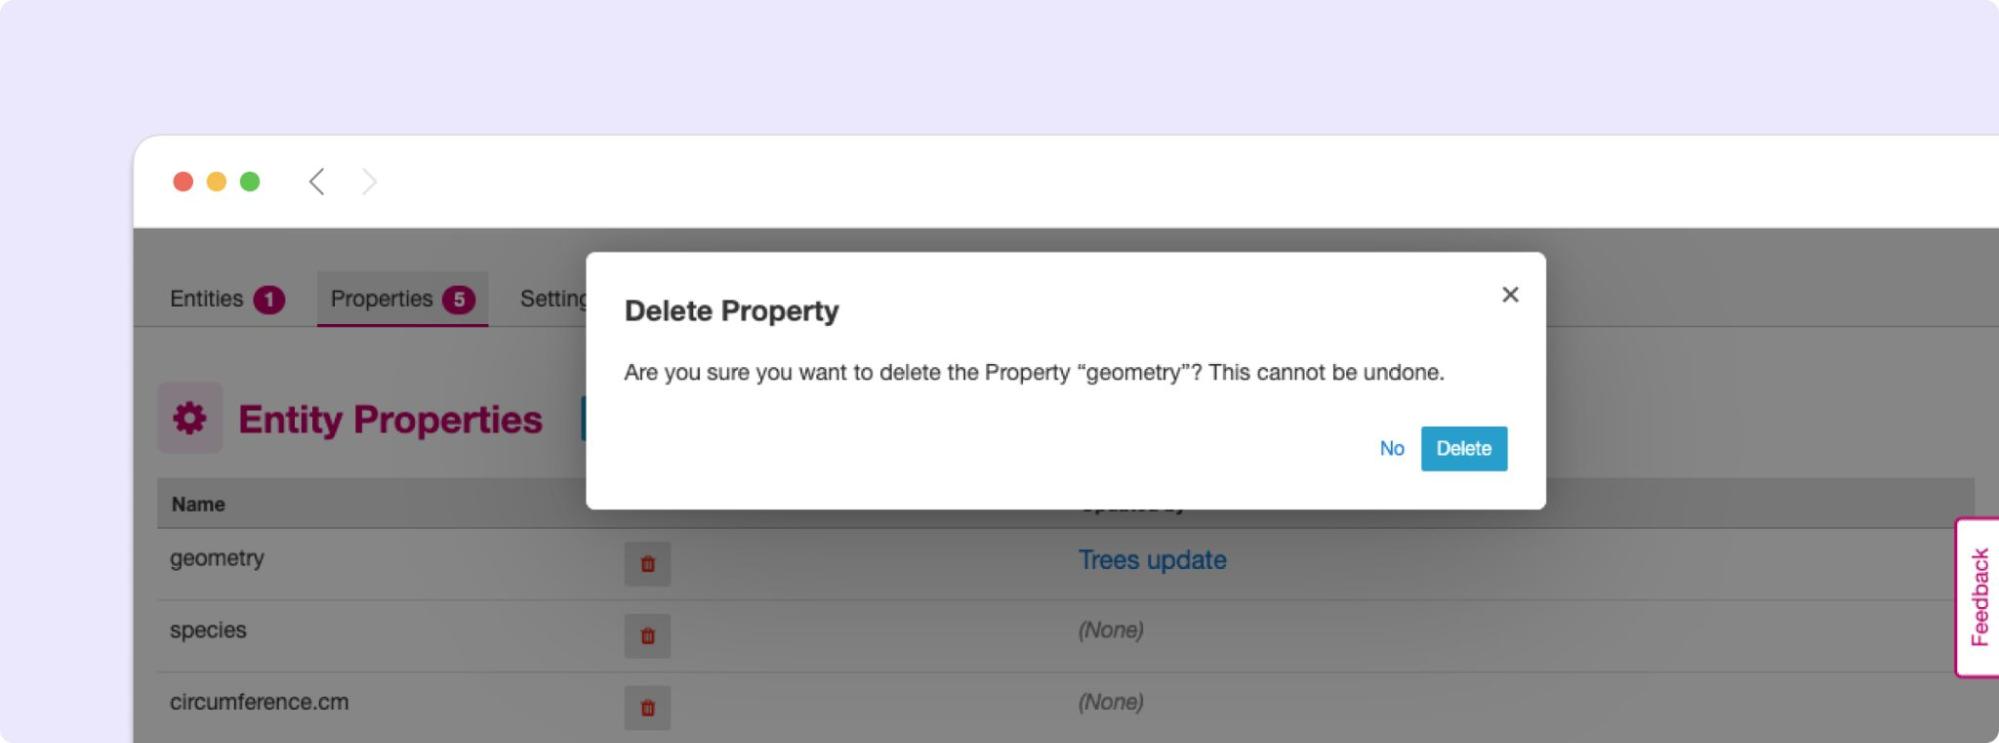
To delete a property:
Go to the Properties tab
Locate the property you want to delete
Click the delete icon
Confirm the deletion
Managing Entity conflicts
It's possible for two people to attempt to update the same Entity at the same time. Central always applies all updates it receives in the order they are received and if it detects that two updates to the same Entity were made in parallel, it marks that Entity as possibly being in a conflict state. When an Entity is in a possible conflict, Central will raise the issue in many places throughout the management panel: in the homepage Entity Lists tables, in Entities tables on Project pages, in the Entity Data table, and on Entity Detail pages.
You can review and dismiss conflicts from the Entity table, or from the Entity Detail page. When you dismiss a conflict warning, the warning goes away and whatever values are currently recorded in Central are considered correct.
If you can, try to organize work so that conflicts are unlikely. For example, you can use choice filters to only show each data collector the Entities that they are assigned to. You can filter based on Entity properties that represent regions, departments or even individual data collectors.
Some special cases that can occur when an Entity is updated multiple times while offline are also marked by Central as conflicts.
If you are able to prevent or reduce the risk of conflicts and don't expect chains of offline updates, you can skip this section. If your workflow is highly dynamic with the same Entities being periodically encountered or if your data collectors spend long periods of time offline, you will likely need to understand conflicts.
What are Entity conflicts?
Every time an Entity is updated, a new version of that Entity is created. This process is the same whether the Entity is updated by direct edits from Central, through the API, or by a Submission upload. While direct edits can only be submitted if they're based on the latest version available, updates by Submission or through the API can be based on older Entity versions. These updates based on older versions are called parallel updates.
Here's an example of how parallel updates can happen:
Alice gets a form update to her device, including an update to a
treesEntity List with a brand new tree Entity called "Zach's backyard tree". This new Entity has version 1.Bob also updates his device and gets the same
treesEntity List with version 1 of "Zach's backyard tree".Alice fills out a Form that updates "Zach's backyard tree" with new measurements.
Central receives Alice's Submission and applies it to "Zach's backyard tree". Central applies the update to create version 2 of that tree Entity.
Bob also visits "Zach's backyard tree" and fills out a Form to update its measurements.
Central receives Bob's Submission and applies it to "Zach's backyard tree". Central applies the update to create version 3 of that tree Entity. Because Bob based his update on version 1, just as Alice did, his update is considered a parallel update.
In the example above, Bob was still working off version 1 of the tree, resulting in a conflict. Two updates were created based on version 1 because Bob didn't know that Alice had already made the changes resulting in version 2. Alice and Bob were both looking at version 1 and trying to create version 2. Central applied Bob's update to create version 3 and marked "Zach's backyard tree" as being in a state of conflict.
In a "clean," not-conflicting update Bob would have received the latest trees data before visiting "Zach's backyard tree" so that he would have version 2 on his device. When he made his update, it would have been based off of version 2 and Central would have applied it on version 2 to create version 3.
Addressing parallel updates
Central's behavior when there are parallel updates is basic: it always applies any changes it receives at the time and in the order it receives them. This means that in the case above, Bob's changes will always "win" over Alice's because they are submitted last (this is sometimes called a last-write-wins strategy). Central has simple, predictable behavior that attempts to always use the latest available data. It also detects and shows conflict cases so that you can resolve them in more sophisticated ways as needed. If there are Entities in a conflict state, there will be a conflict warning in several places in the Central management panel so Project managers can see that a problem might have occurred.
How often and how severely conflicts create real consistency problems with Entity data will depend on the design and complexity of your data collection process and your Forms. When looking at a specific Entity, any versions that were created from a parallel update will be labeled as either a Parallel update or a Conflict. These two conflict levels are intended to help Project managers determine the severity of those conflicts.
An Entity version with the Parallel update label was created from an update based on an older version but it only updated properties that were not involved in the other parallel update(s). For example, in the example above, Alice might have updated the circumference of the tree's trunk, while Bob only reported that moss is now growing. These two changes are totally compatible and it doesn't matter that Bob based his update on an outdated version of "Zach's backyard tree" so the conflict can be quickly dismissed. In some workflows, this kind of parallel update is expected. Central surfaces it because in many contexts it can point to a process failure. For example, Alice and Bob may have been supposed to go to different regions on the day they both visited "Zach's backyard tree."
An Entity version with the Conflict label means that this version was created from an update based on an older version AND one or more of the parallel updates modified the same properties. In the example above, maybe Alice and Bob both updated the circumference to different values. This kind of conflict almost always means that something went wrong. You should carefully review the Entity history and make any edits needed to the latest Entity version before dismissing the conflict. You may need to get in contact with the individuals who made the conflicting updates to figure out which value is correct. The Conflict label is also used in certain special cases related to offline Entity updates.