Managing Forms in Central
Forms are at the heart of ODK. Once fetched onto a mobile device from ODK Central, they define the questions, validation, and logic to be presented during data collection. They also serve to organize the data coming back from mobile devices.
Forms in ODK Central
In ODK Central, there are four important tasks you'll perform while managing a data collection project:
Form drafting is where you design the Form itself, laying out many details like the questions and acceptable responses. ODK Central itself does not help with form design: instead, please take a look at the introduction to form design for help creating your form. Central does, however, help with testing your design, with Form Drafts. When you first upload your Form, it will be a Draft to which you can connect a mobile device and submit test data. If you are not satisfied with the Form, you can adjust the design and upload a new version in place of the old Draft. Once you are satisfied, you can Publish the Form to make it ready for use.
Form lifecycle settings allow you to control who can access and submit to particular Forms. These tools can help manage user permissions, but they can also help phase out outdated Forms as they come to the end of their life. You can control these using the Form Access tab on the Project.
Data extraction and analysis can occur either at the end of the project, or continually as the project runs. Either way, ODK Central provides several different methods for extracting and analyzing your submission data. This is covered in the Form Submissions article.
Form updates allow you to make changes to a Form while it is already in use. Central allows you to create a new Draft of any Form at any time. As with initial Form creation, this Draft allows you to test your changes in a staging environment where it will not affect the live Form or its data. When you are satisfied with the Draft, you can again Publish it, and it will replace the live version.
Drafting and version updates are new as of Central 0.8. We will cover all of these topics in the sections below.
Uploading a form to ODK Central
As mentioned, ODK Central does not feature a built-in form design utility. Please take a look at the introduction to form design for help creating your form.
As of version 0.7, Central will accept either XForms .xml or XLSForm .xls/.xlsx files. If you have written your own .xml file, we strongly recommend that you first double check that it is valid using ODK Validate. If you upload an XLSForm spreadsheet, Central will convert it to an XForm for you, and it will be automatically validated as part of that process.
Once you have your form file, the next step will be to upload it into ODK Central. To do this, navigate to the Project you want to add the form to by clicking on its name from the ODK Central homepage:
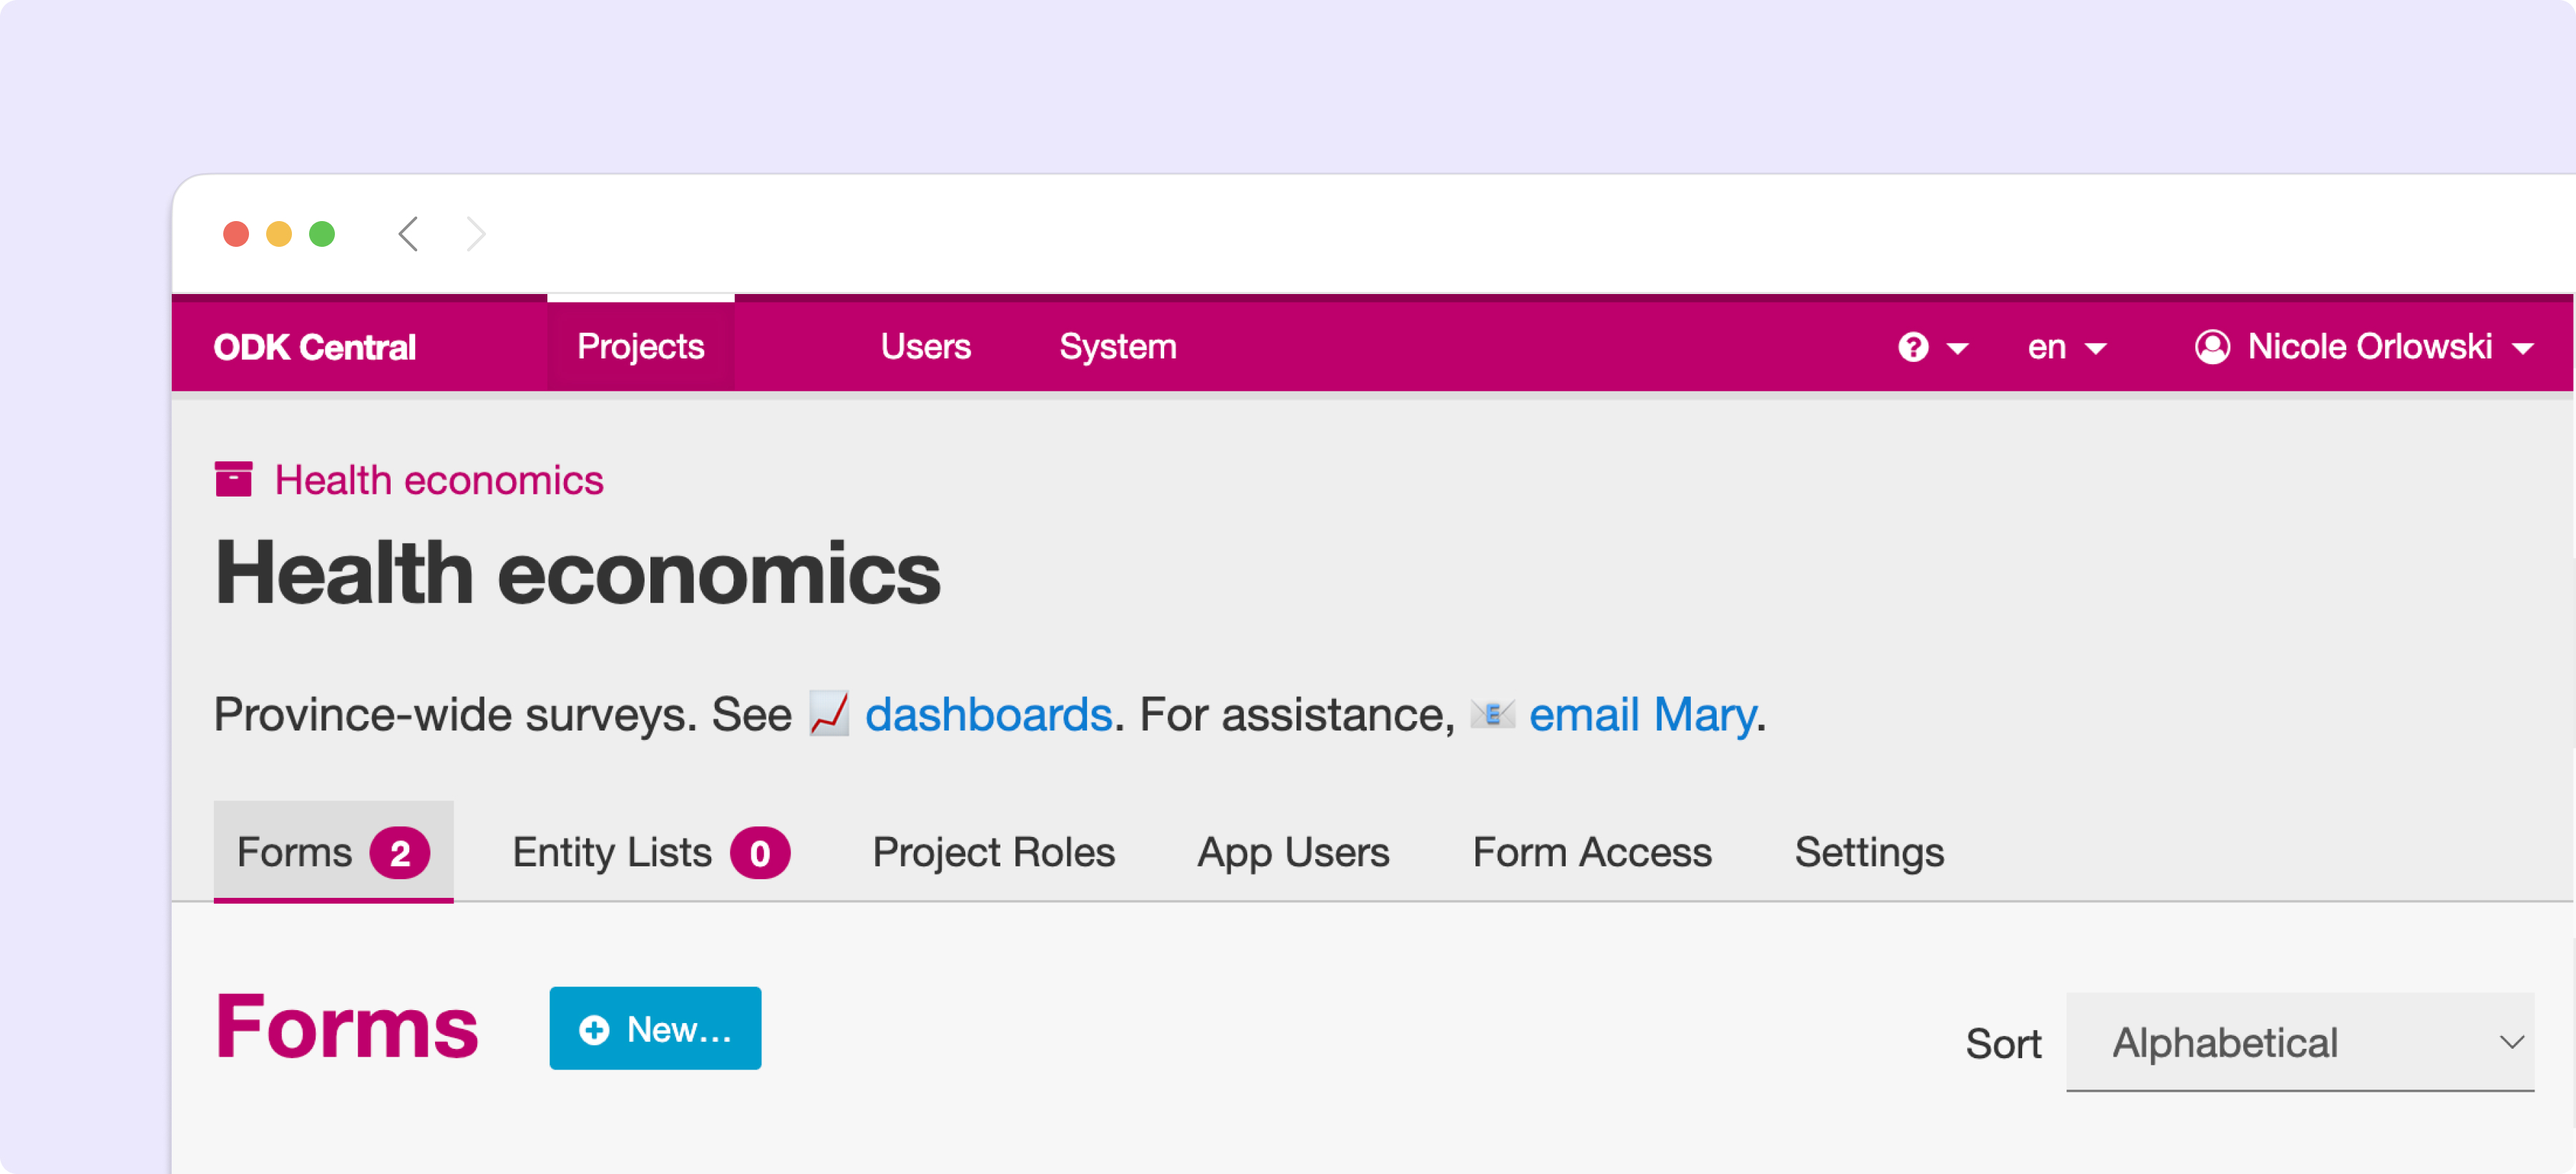
From there, click on the New button next to the section header, and you should see a popup appear:
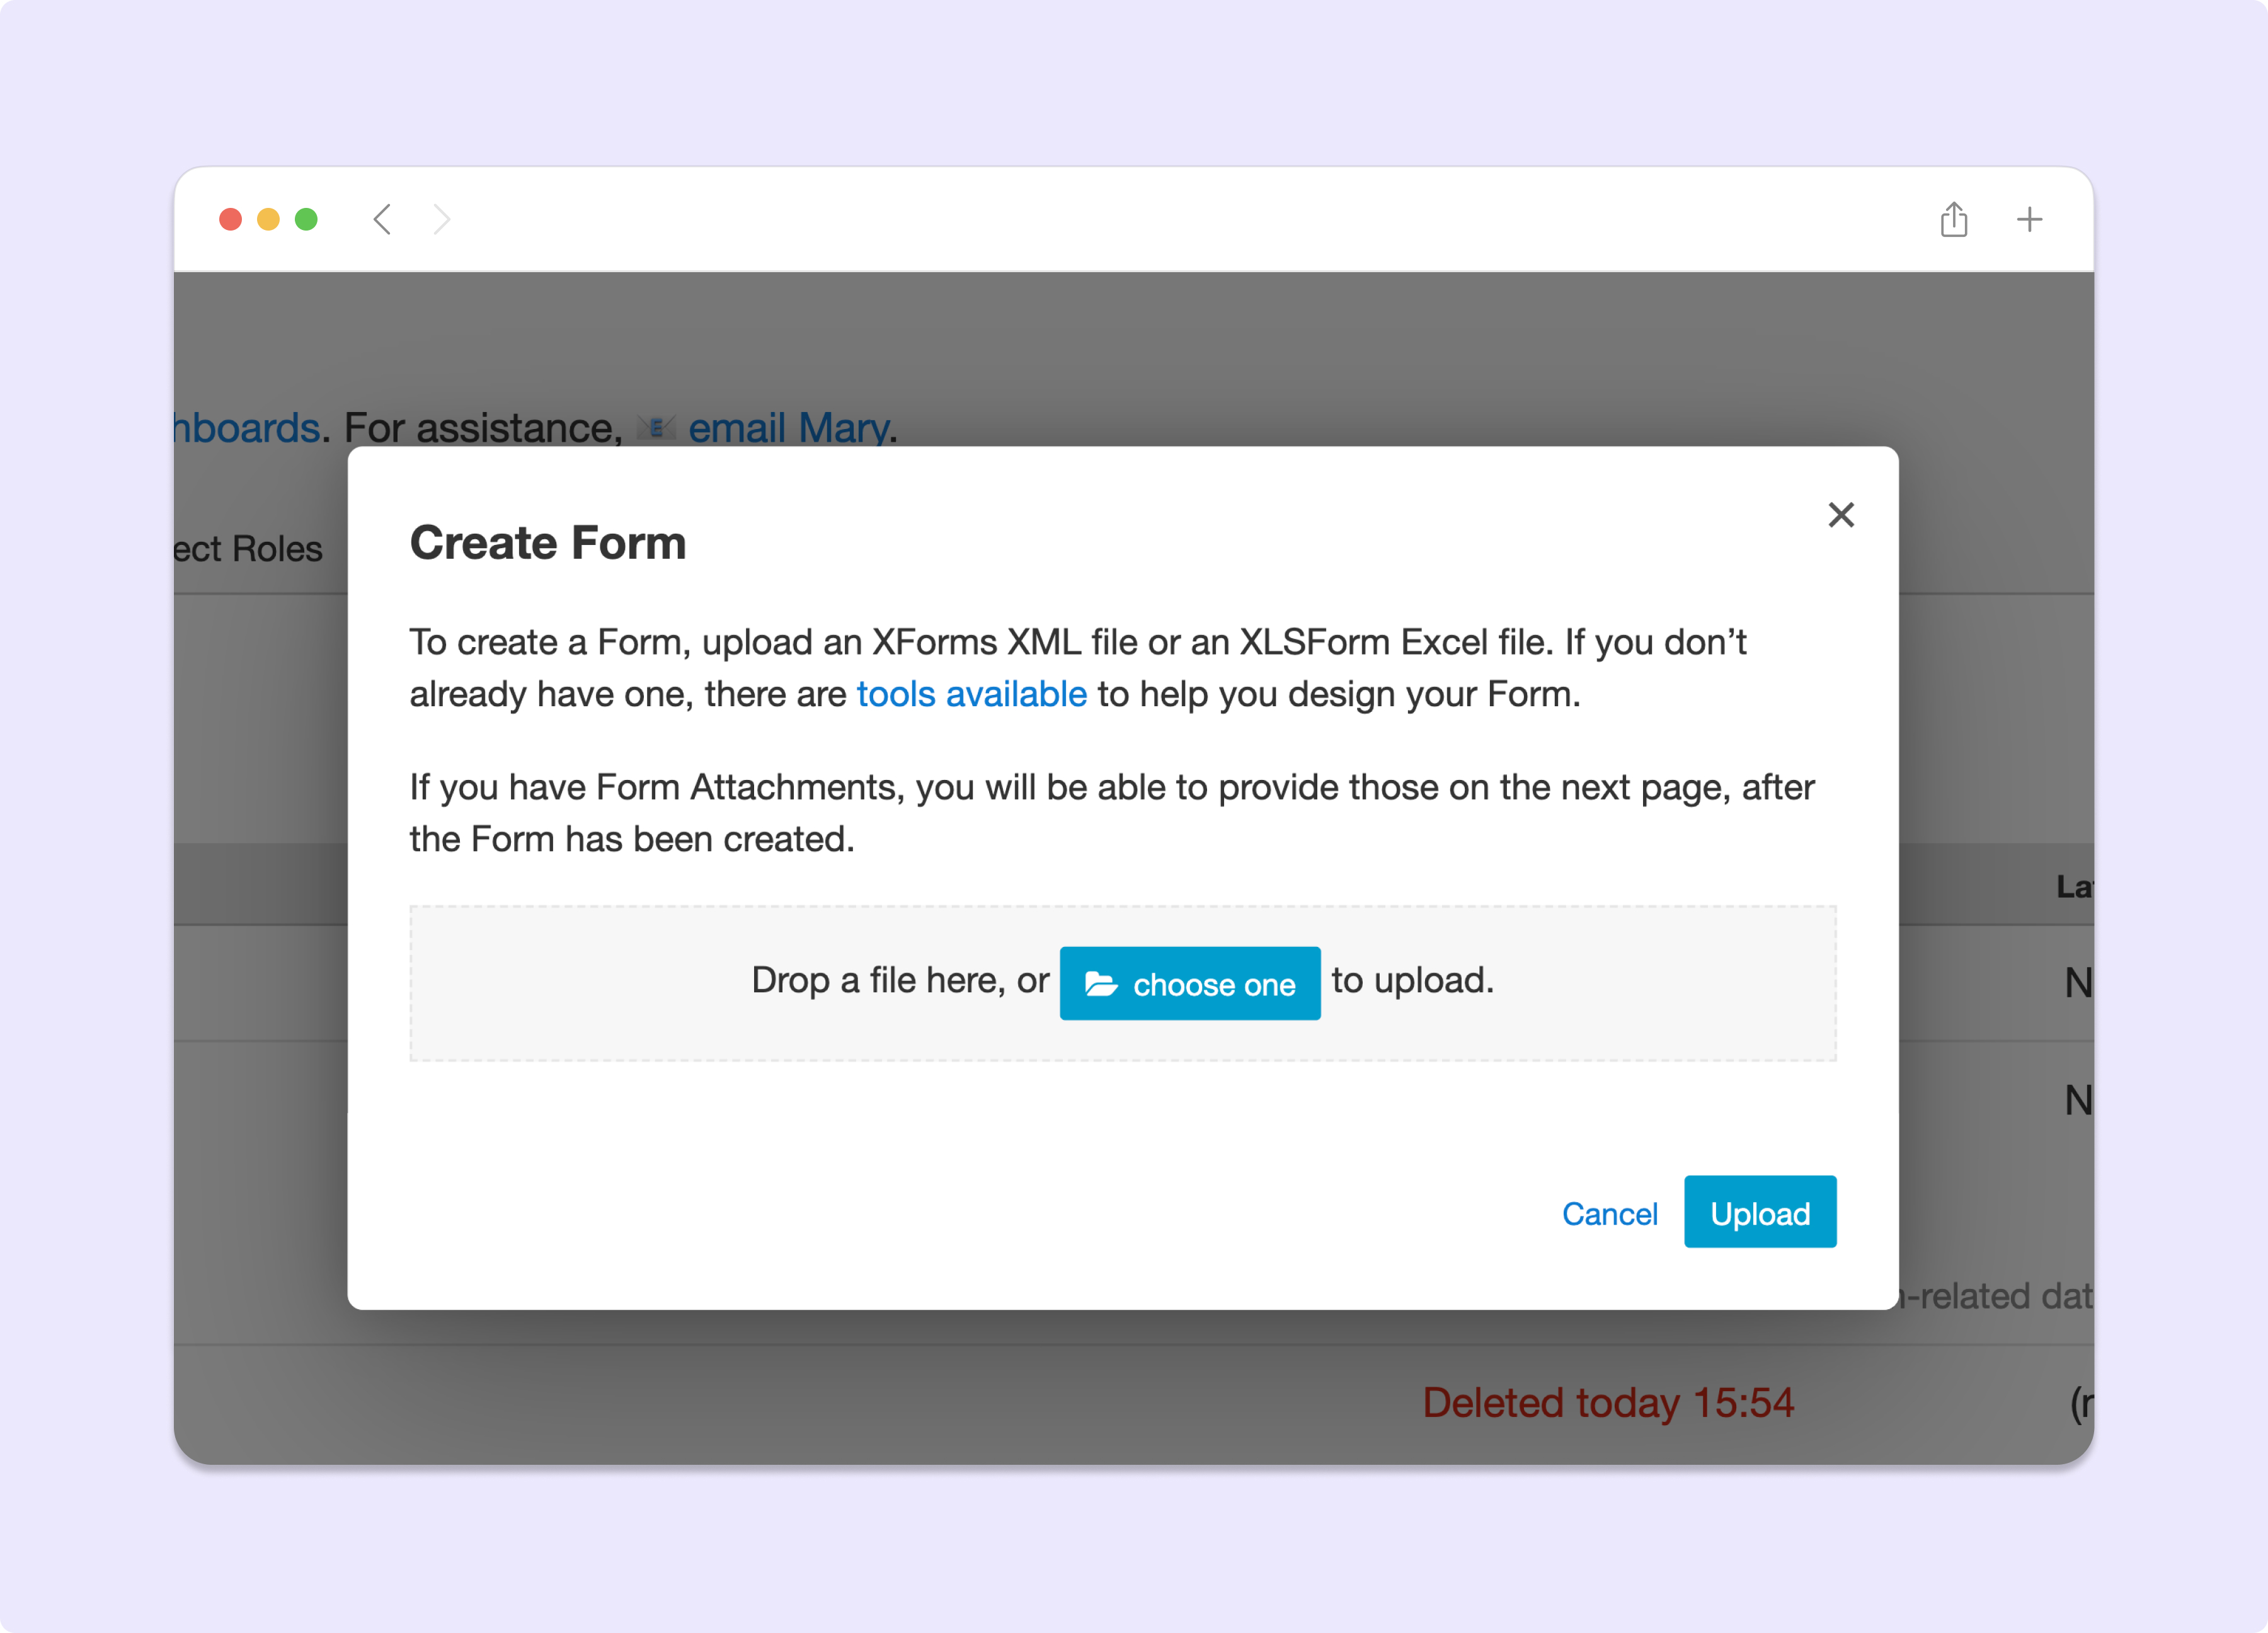
You can either click on the choose one button to browse for your .xml, .xls, or .xlsx file, or if you already have it handy somewhere, you can drag it over the gray box and drop it to choose it. Either way, once you have chosen your file (you will see the name of your file at the bottom of the gray box when you do), you can click on the Create button immediately below to upload the form.
Some errors you may see:
If you are uploading an XLSForm, and the converter flags warnings with it, your form will not be immediately created. You'll be shown the warnings, and given the option to either ignore them and create the form anyway, or else you can fix the issues and start over by uploading a new file.
You may see a message that reads A resource already exists with xmlFormId value(s) of xyz. If you do, there already exists a form within this project with the same unique designation. If you are using XLSForm, try changing the name of the file or the
form_idin the settings sheet. If you designed the form by hand, please check theid="…"attribute immediately inside the<instance>tag.You may see a message that says A form previously existed which had the same formId and version as the one you are attempting to create now. To prevent confusion, please change one or both and try creating the form again. This means there once was a form within this project that has since been deleted that has exactly the same formId (see the previous bullet point) and version designation as the one you are now trying to upload. Central won't accept the new form, because this conflict could cause confusion with mobile devices that still have the old form sitting around. To upload this form, change either the formId (again, see the previous bullet point) or update the version and try again.
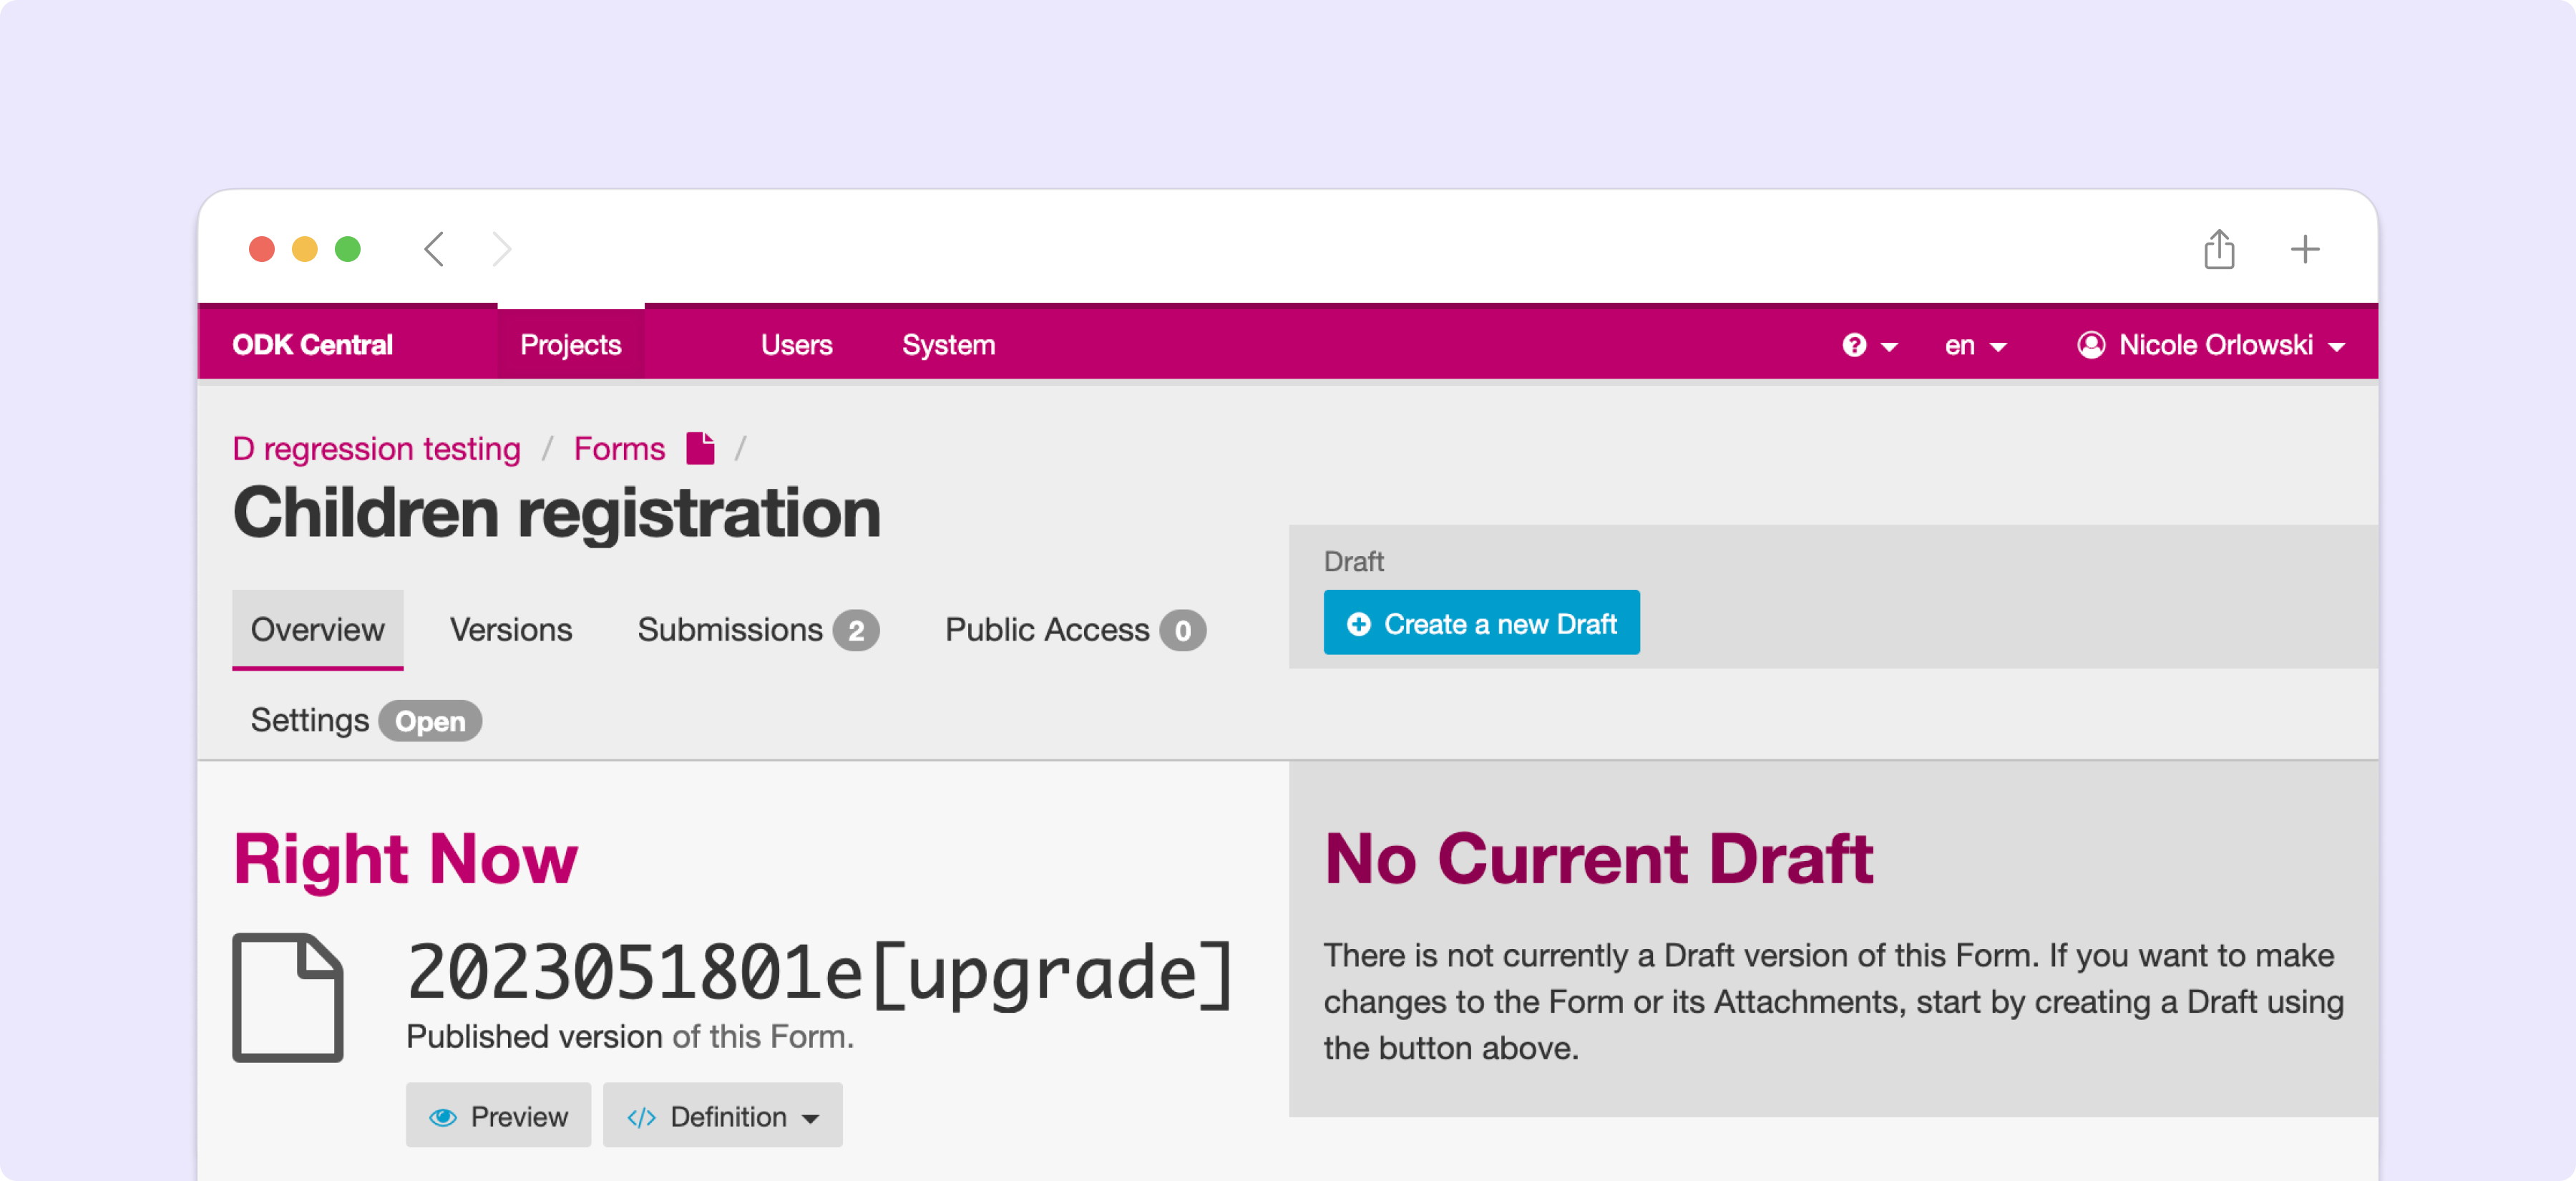
Once the form is successfully uploaded, you will be taken to the Form Draft page. It will not be accessible to data collection clients until you publish the Draft, which we will cover in the following section.
Working with Form Drafts
Note
Drafts have moved. In versions of Central older than v2025.1, drafts were accessed from a section to the right of the tab controls for a Form:
Form Drafts provide a way to safely and easily verify the design of your Form before you make it available for use. Drafts are accessible only to privileged Project staff. Each Form Draft has a unique access token so you can configure Collect and send test submissions to the Draft. These test submissions disappear automatically when the Draft is published. Once a Draft is published, it is available for use according to the access rules you have specified in the Form Access tab on the Project.
The Edit Form tab gives insight into the current status of your Draft, and provides controls for managing it:
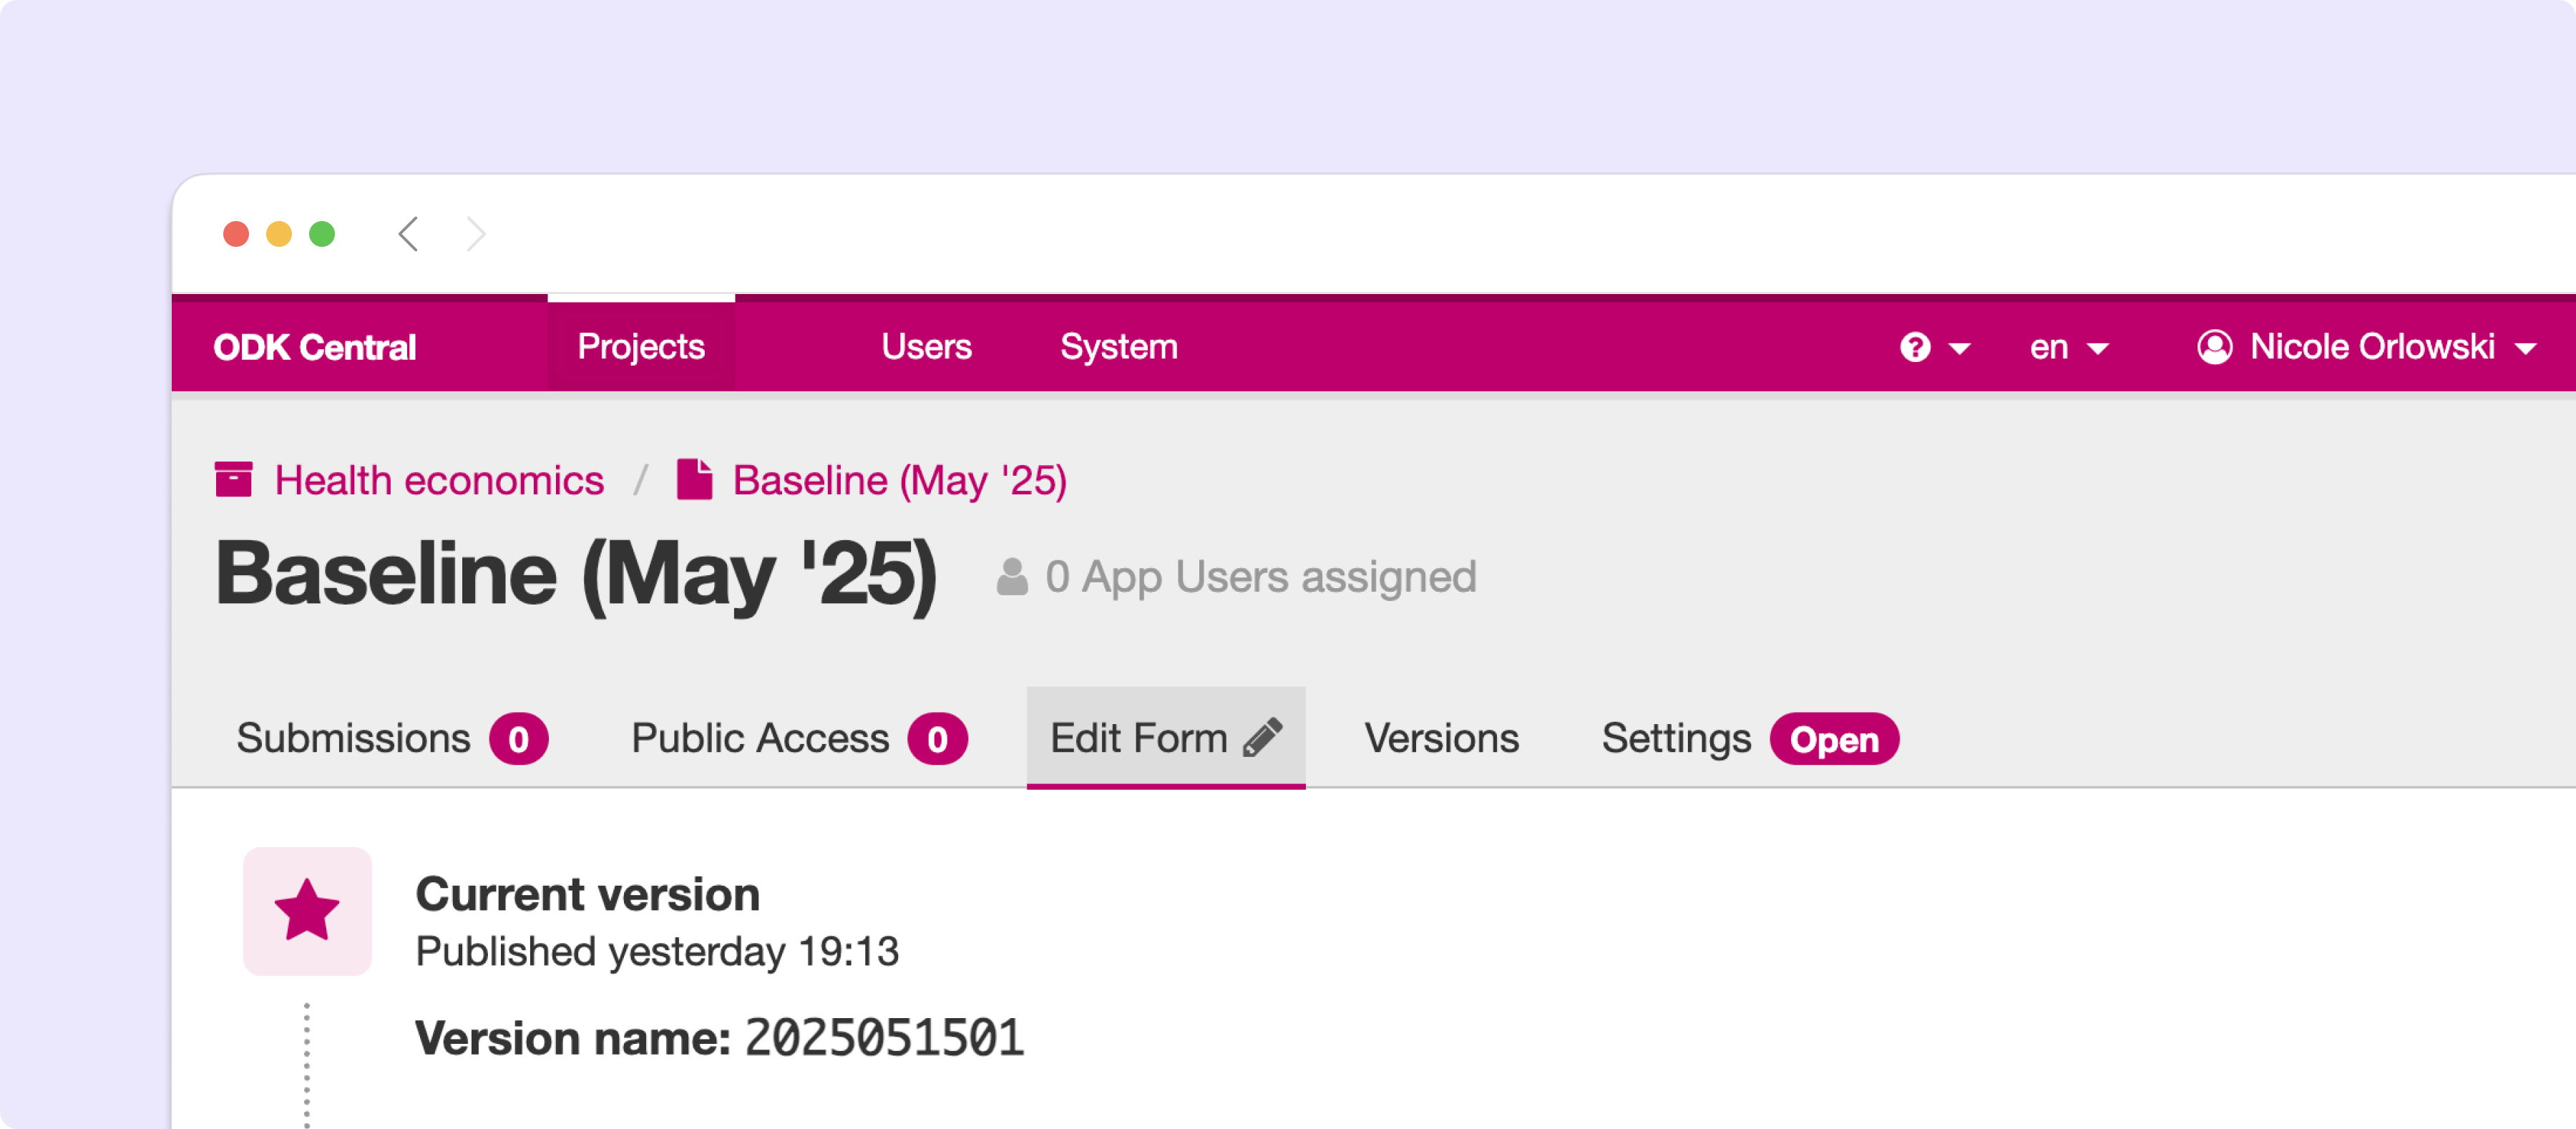
When you first create a Form, it exists only as a Draft. You'll see information about the currently uploaded Draft version of the Form, including its current version string, and actions you may take on the Draft:
The file upload area will allow you to upload a new Form definition, which will replace the current Draft version. When this happens, all test submissions will be erased. If you have uploaded Media Files, Central will attempt to preserve any that match the new definition.
The Publish Draft button will publish the Draft, making it available for use according to the access rules you have specified on the Form Access tab on the Project. Any test submissions you have made will be erased.
The Abandon Draft button will delete the Draft. When there is not yet a published version, this will delete the entire Form. If the Form has been published, only the Draft will be deleted.
Tip
When a form is first created, none of the existing App Users on the project will be able to access it for download or submission, even once the Form is published. Once you are ready to allow App Users to access the form, use the Project Form Access tab.
When you first create a new Form, navigation tabs other than Edit Form will not be accessible. They are for the published version of the Form, and will become available once you publish your Draft.
If your Draft requires files or Entity Lists to be attached, there will be a section asking you to attach them. See the next section Forms With Attachments for more information about uploading and managing attachments.
The Testing section shows buttons for making test submissions and a table with any existing Draft submissions:
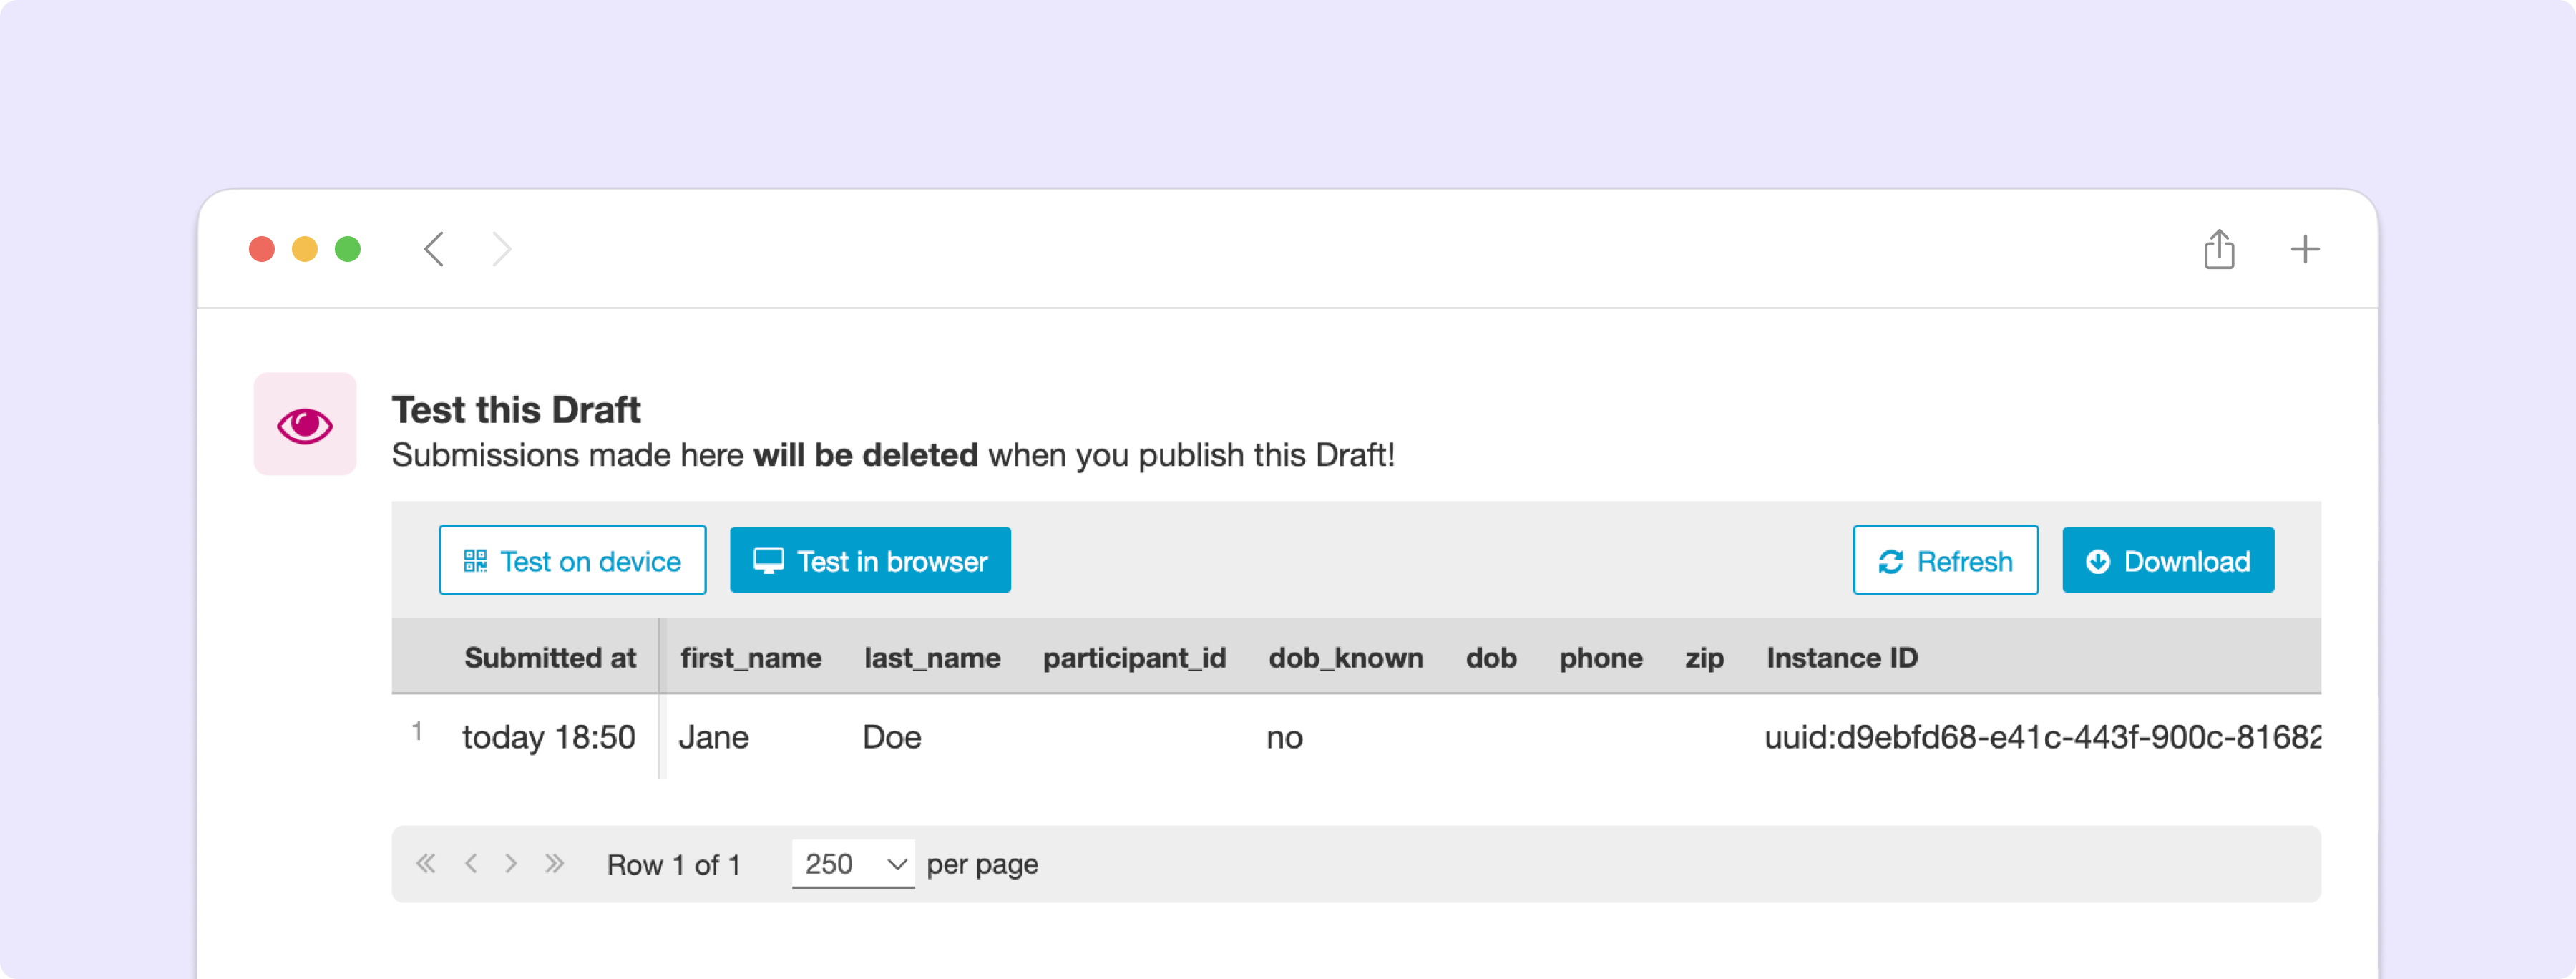
To make web-based submissions, click the Test on device button. For Collect-based submissions, click the Test on device button and you will see a Collect configuration QR code just for this Draft. For help configuring a mobile device, please see importing settings into Collect. We recommend only using this QR code while iterating on form design and then deleting corresponding Collect project when you publish the Form.
The table in this section contains any test submissions that have been made to the current Draft. For help with this table or exporting test data, please see Form Submissions in Central.
When you are ready to publish your draft, you will be given the opportunity to write notes to describe the changes in this version. These notes will be visible from the Versions list
Forms With Attachments
If your Form Draft references any external files (images, audio, or video included as part of your question prompts, or data lookup files used to populate selection lists), Central will see this and open up some additional displays and controls you will need to provide those external files:

If you see this extra Attachments section, then this form uses attachments that you can upload.
This form design references 7 files that we'll need to provide. You can see the name and expected type of the file in the table, as well as when the file was last uploaded. You can click on the name of any uploaded file to download what Central has for it. To upload a new one, you can drag-and-drop one or more files onto the table.
Central does not validate file contents
While Central will detect the type of file the form design expects, and will verify that the name of any uploaded file matches one that is expected, Central will not double-check the type of the file, nor the contents of the file for you. So, just because Central accepts your file does not necessarily mean that it will work correctly. Make sure you try the form to confirm it works as expected.
Attachments can only be added or changed for a form Draft. If you need to change the Attachments for a published form, first create a new Draft.
Bulk-uploading Many Attachments At Once
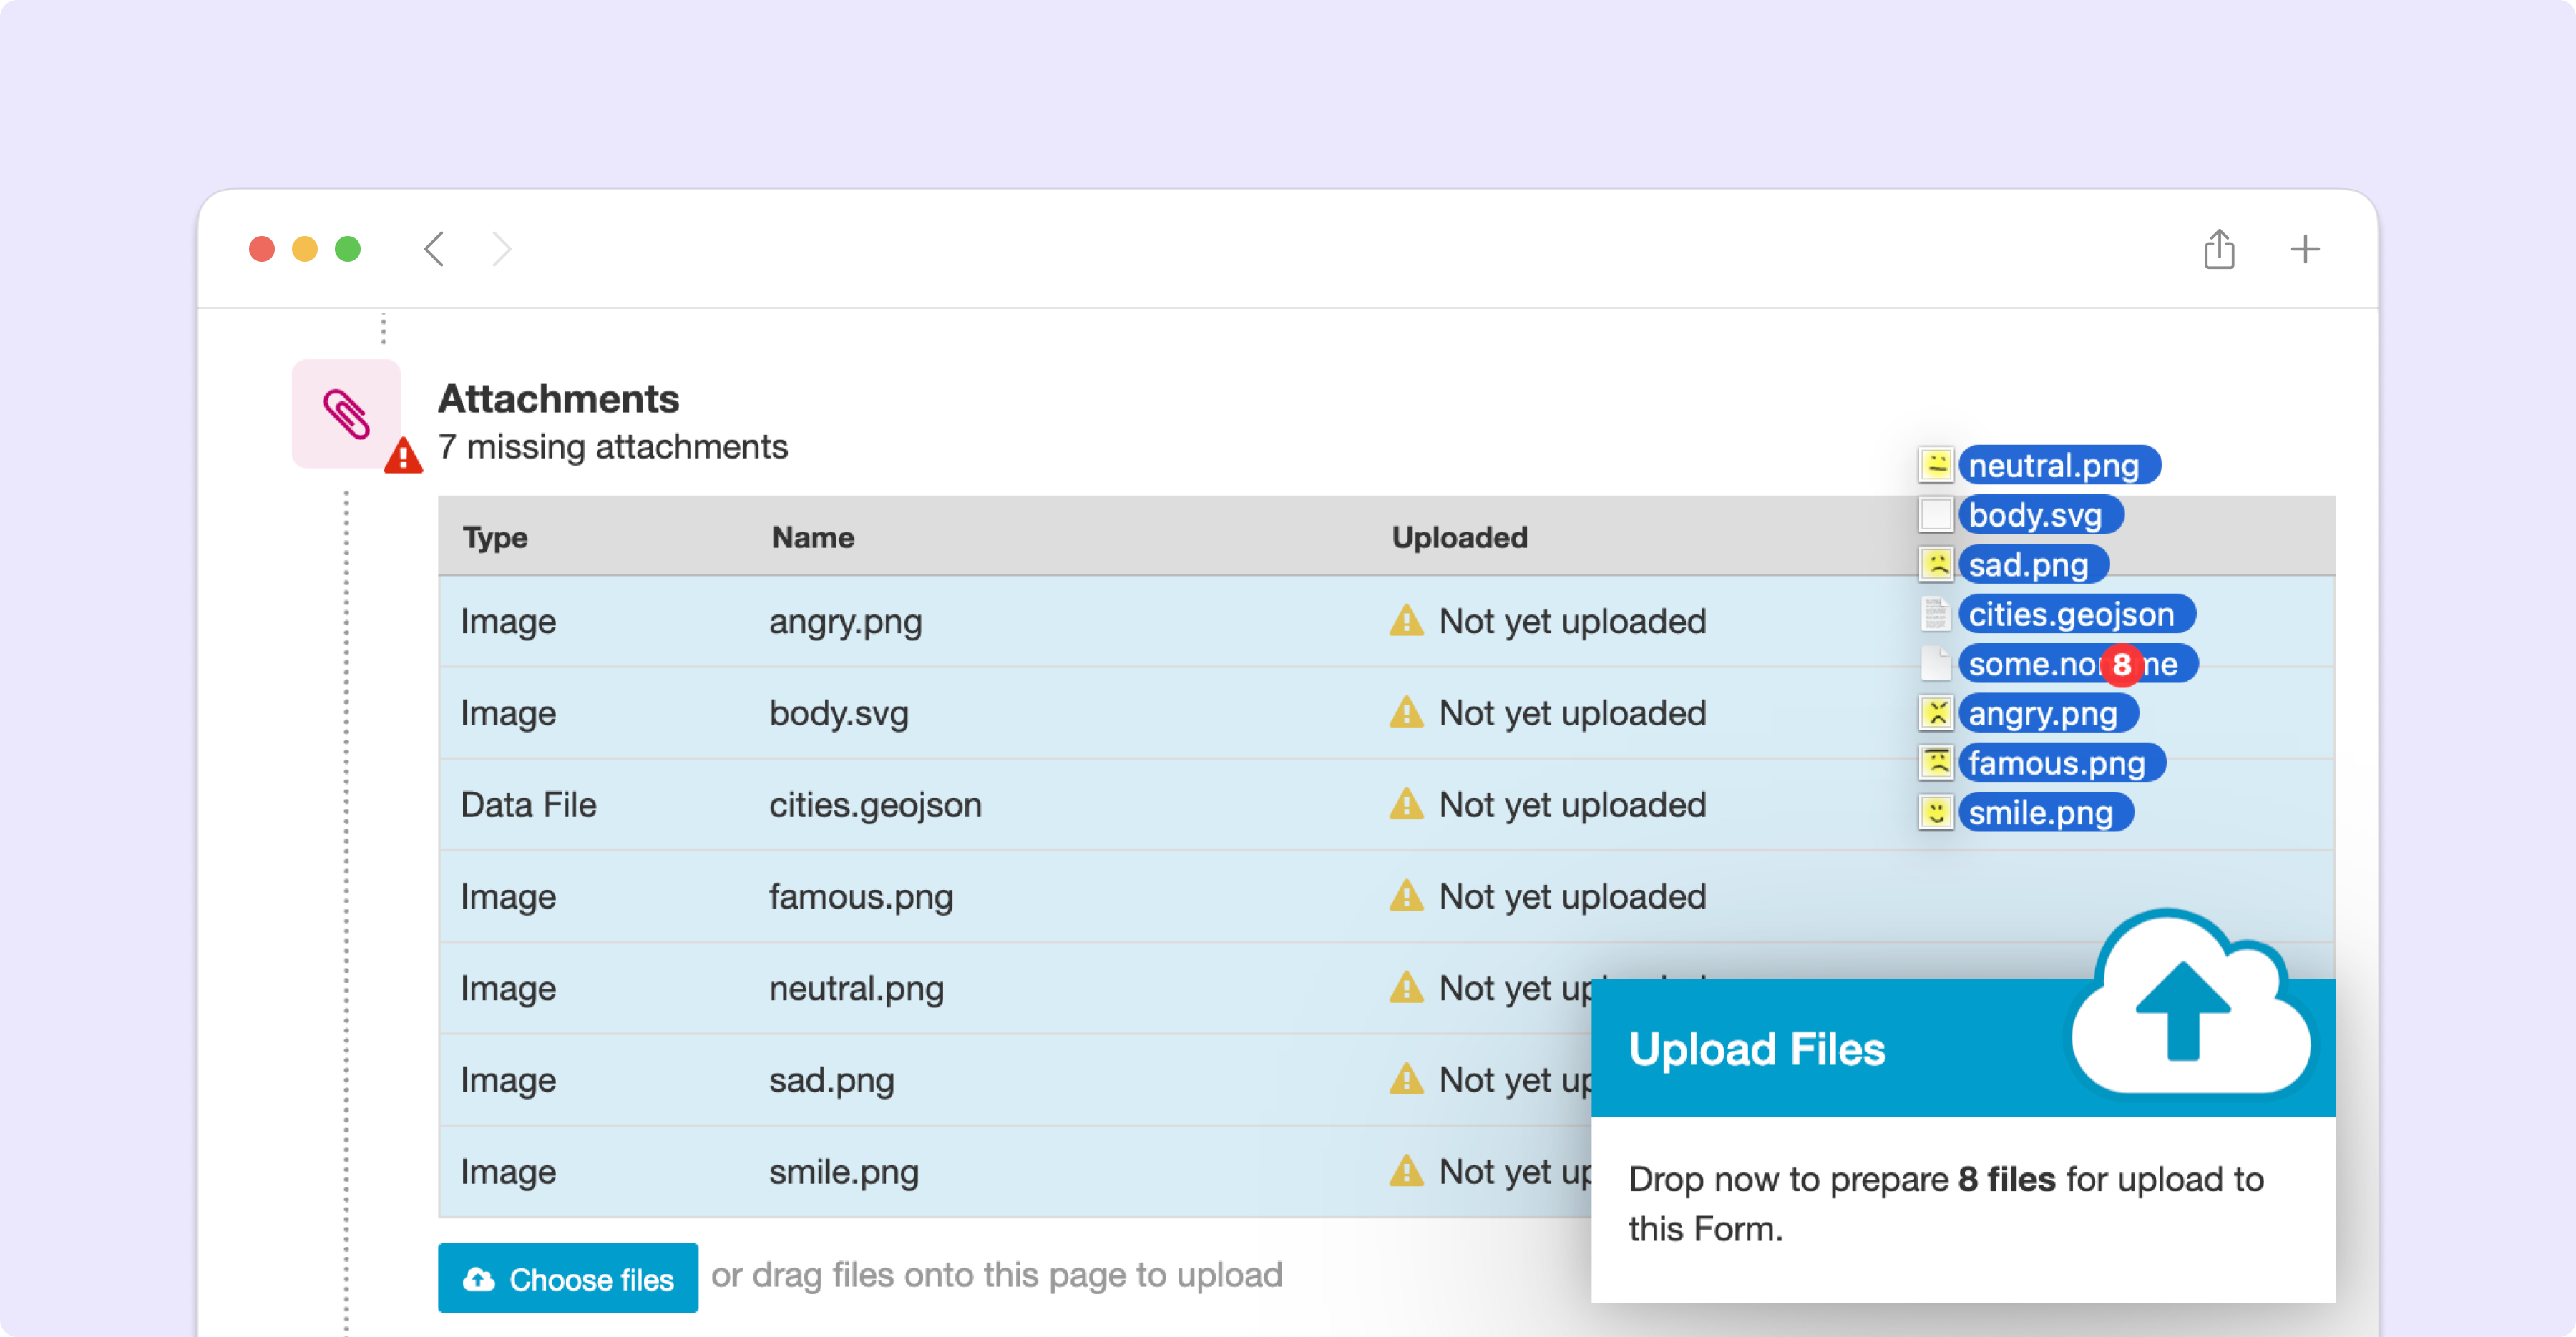
If you select and drag many files at once onto the table, Central will automatically try to match each file with a name in the table. You'll have a chance to see what it came up with and confirm that things look okay before the upload begins. You will see a warning if one or more of your dragged files don't match any of the expected names.
Uploading One Attachment
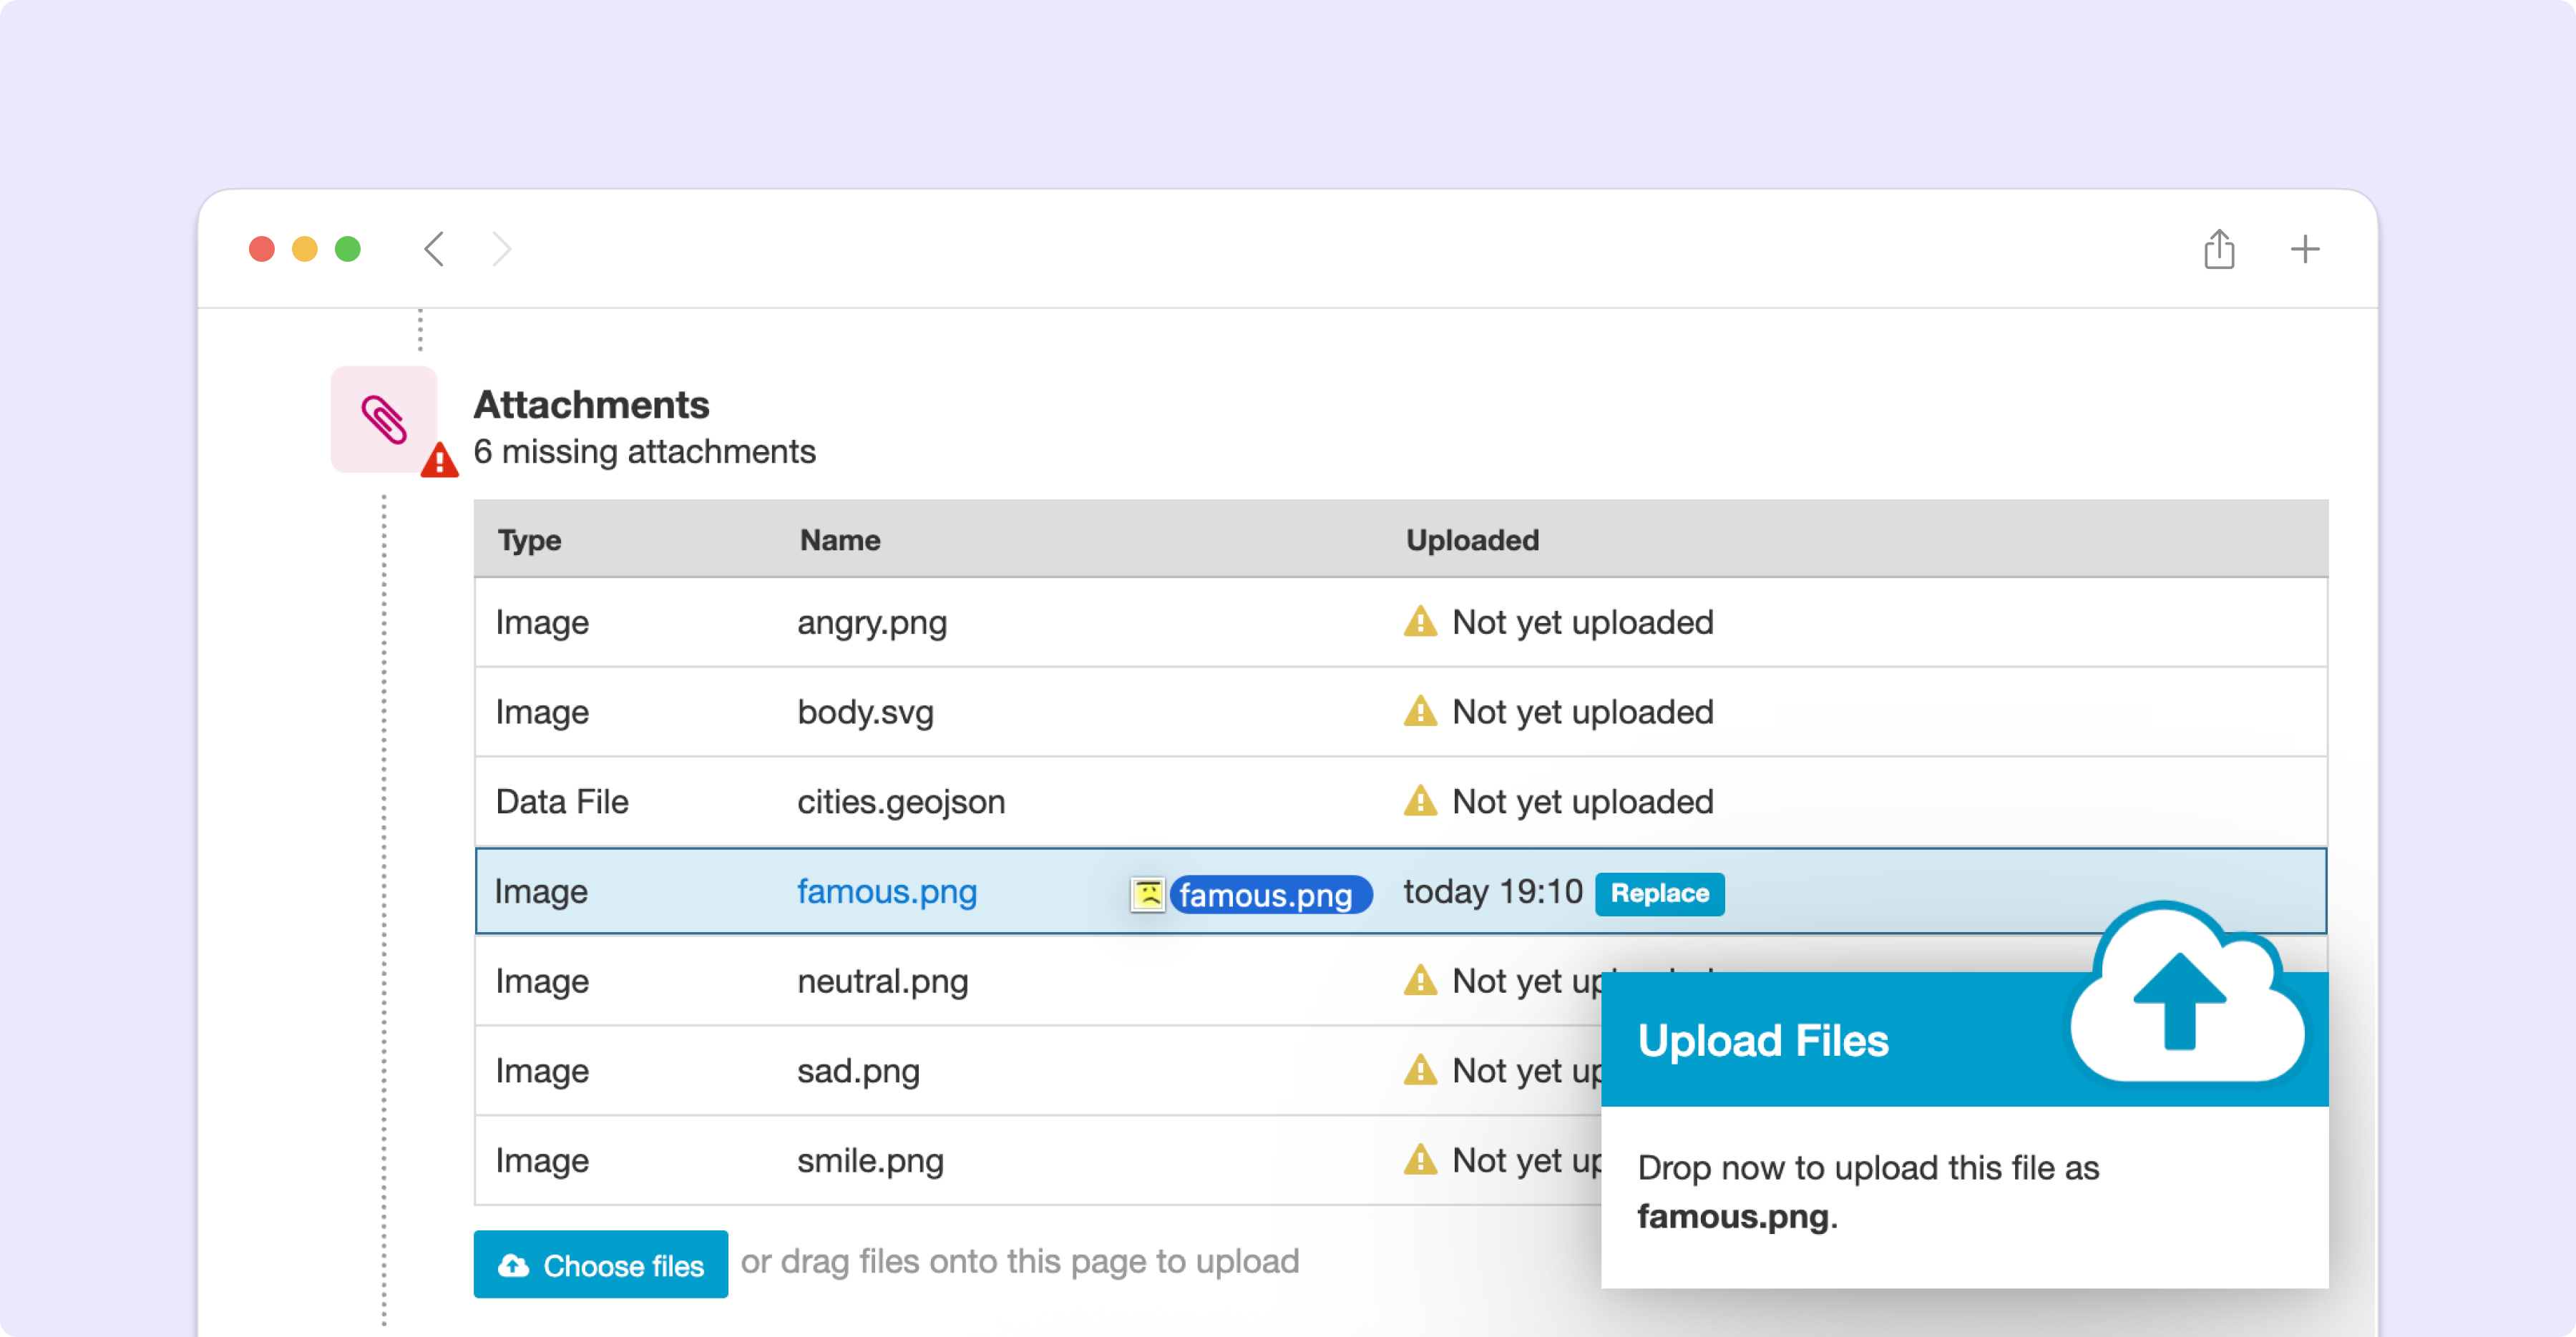
If you drag a single file onto the table, you'll have the option of which table row you'd like to upload that file into. This way, if the file isn't named exactly what Central expects, you can still upload a file into that slot without having to rename it on your own computer. But if the file does have the appropriate name, you can drop it somewhere other than a specific slot (for example, just below or just above the table) to have Central match it up with the correct slot automatically.
Seeing Form Submissions
To see the current submissions uploaded to Central for a form, you can click on the tab below the name of the form. Here, you will see a summary table and map of all known submissions, and you will find multiple options for downloading and analyzing your submission data. This page and these options are covered in more detail in the Managing Submissions in Central article.
Managing Public Access Links
Public Access Links allow broad web-based distribution of a Form for direct responses from subjects. They can be used to conduct large remote self-administered data collection campaigns, or allow direct surveying of the public at large. Respondents will fill the Form directly in their web browser.
For more information, please see the relevant section in the Submission article.
Managing Form Lifecycle
Forms can be in one of three lifecycle stages: Open, Closing, and Closed. All forms start in Open state when they are first created. You can see what each of these means below:
State |
Available for download to apps |
Accepts new submissions from apps |
Open |
yes |
yes |
Closing |
no |
yes |
Closed |
no |
no |
As you can see, you can use the Closing state to prevent further distribution of a form while still allowing the final few submissions to come in, while the Closed state effectively turns the form off completely. You can always set the form lifecycle stage to whatever you want: you can always, for example, re-open a closed form.
To set the form lifecycle stage, go to the Form Access tab for the Project, under the name of the Project at the top of the page. You may have to navigate back out of the Form first by clicking on the name of the project at the top of the page. Here, you will find the three possible stages in a dropdown for each Form on the left side of the page. Select the ones you want for each Form, then click Save at the top-right to save the changes.
You can find more information about the Form Access page here.
Updating Forms to a New Version
Sometimes requirements change during data collection or a form design error is discovered that needs to be fixed. In those cases, Central lets you update a published Form with a new definition, or new Attachments, and to test these changes before they are applied to the Form in use.
Warning
Changing a form definition while it is in use will likely complicate analysis and may significantly impact results. Make sure that it's acceptable for your context and make a plan for how you will take those changes into account before you publish them.
Once a field is defined in a published Form version, the field's Data Type cannot be changed. It's always okay to add or remove fields but if any field reuses a previously existing name, it must have the same Data Type as it did before. There is one exception to this rule: you can change any field's type to text because all other types can be easily converted to it.
Note
If a field is removed, it will not be included in exports by default. You can ask for all fields that were ever referenced in previous Form versions when you export data. Renaming a field is the same as removing a field and then adding a new one.
You can also put a relevance of false() on the field so that it's still included by default in data exports but no longer shown to data collectors.
You can generally make improvements to the form without removing fields or changing their type. For example:
if a question would be better displayed to the user as a different type (e.g., from decimal to integer), you can introduce a new field with that new type and change the old field to a calculate with a calculation that pulls the new field's value in. That way, your analysis can continue on the old field. This is only appropriate if the old and new questions have the same meaning.
if a question is found to be easier to understand when framed as its negation, its field can be changed to a calculate that negates the response to a new question. This can impact results so carefully consider whether it is appropriate.
if a field has an implied value after a certain point in time, it can be changed to a calculate with a default value.
To begin the process of updating a published Form, click on the Edit Form tab in the Form navigation. You can learn more in the drafts section.
Initially, the new Draft will have the same definition as the published Form. If you only want to update Attachments, this means you don't have to upload a definition: you can go straight to the Attachments section and upload the changed files.
You can replace the Draft definition, Attachments, and make test submissions as with the initial Form Draft before the Form was first published. Test submissions will not interfere with published Form submissions.
Once you are satisfied that your updated Form is ready to be published for immediate use, you can click on the Publish Draft button at the bottom of the page.
Form Version naming
If you did not change the definition, or your updated definition did not change the version of the Form, Central will not be able to publish the Form as-is. This is because the version must change in order for data collection clients to understand that they should update. You can upload a new definition with a changed version, or else Central will offer to change it in-place for you.
Once the Draft has been published, it becomes the version in use and there will no longer be a Draft associated with the Form.
What happens to my submissions?
When a new Form version is published in place of an old one, all the previous submissions remain unchanged, and will export along with all your data. However, by default, only the current Form definition will be used in exports: if, for example, you have deleted a field that used to exist, that field will not appear in the export. You can configure this when exporting data.
Draft testing submissions will never export with your final data, and only exist as long as the Draft does. If you delete, publish, or replace your current Draft, all test submissions will be cleared away.
Accessing Older Form Versions
If you have published multiple version of a Form, you can see each of them under the Versions tab.

Each published version of the Form will be listed, along with any version notes written and actions to download the definition of each Form.
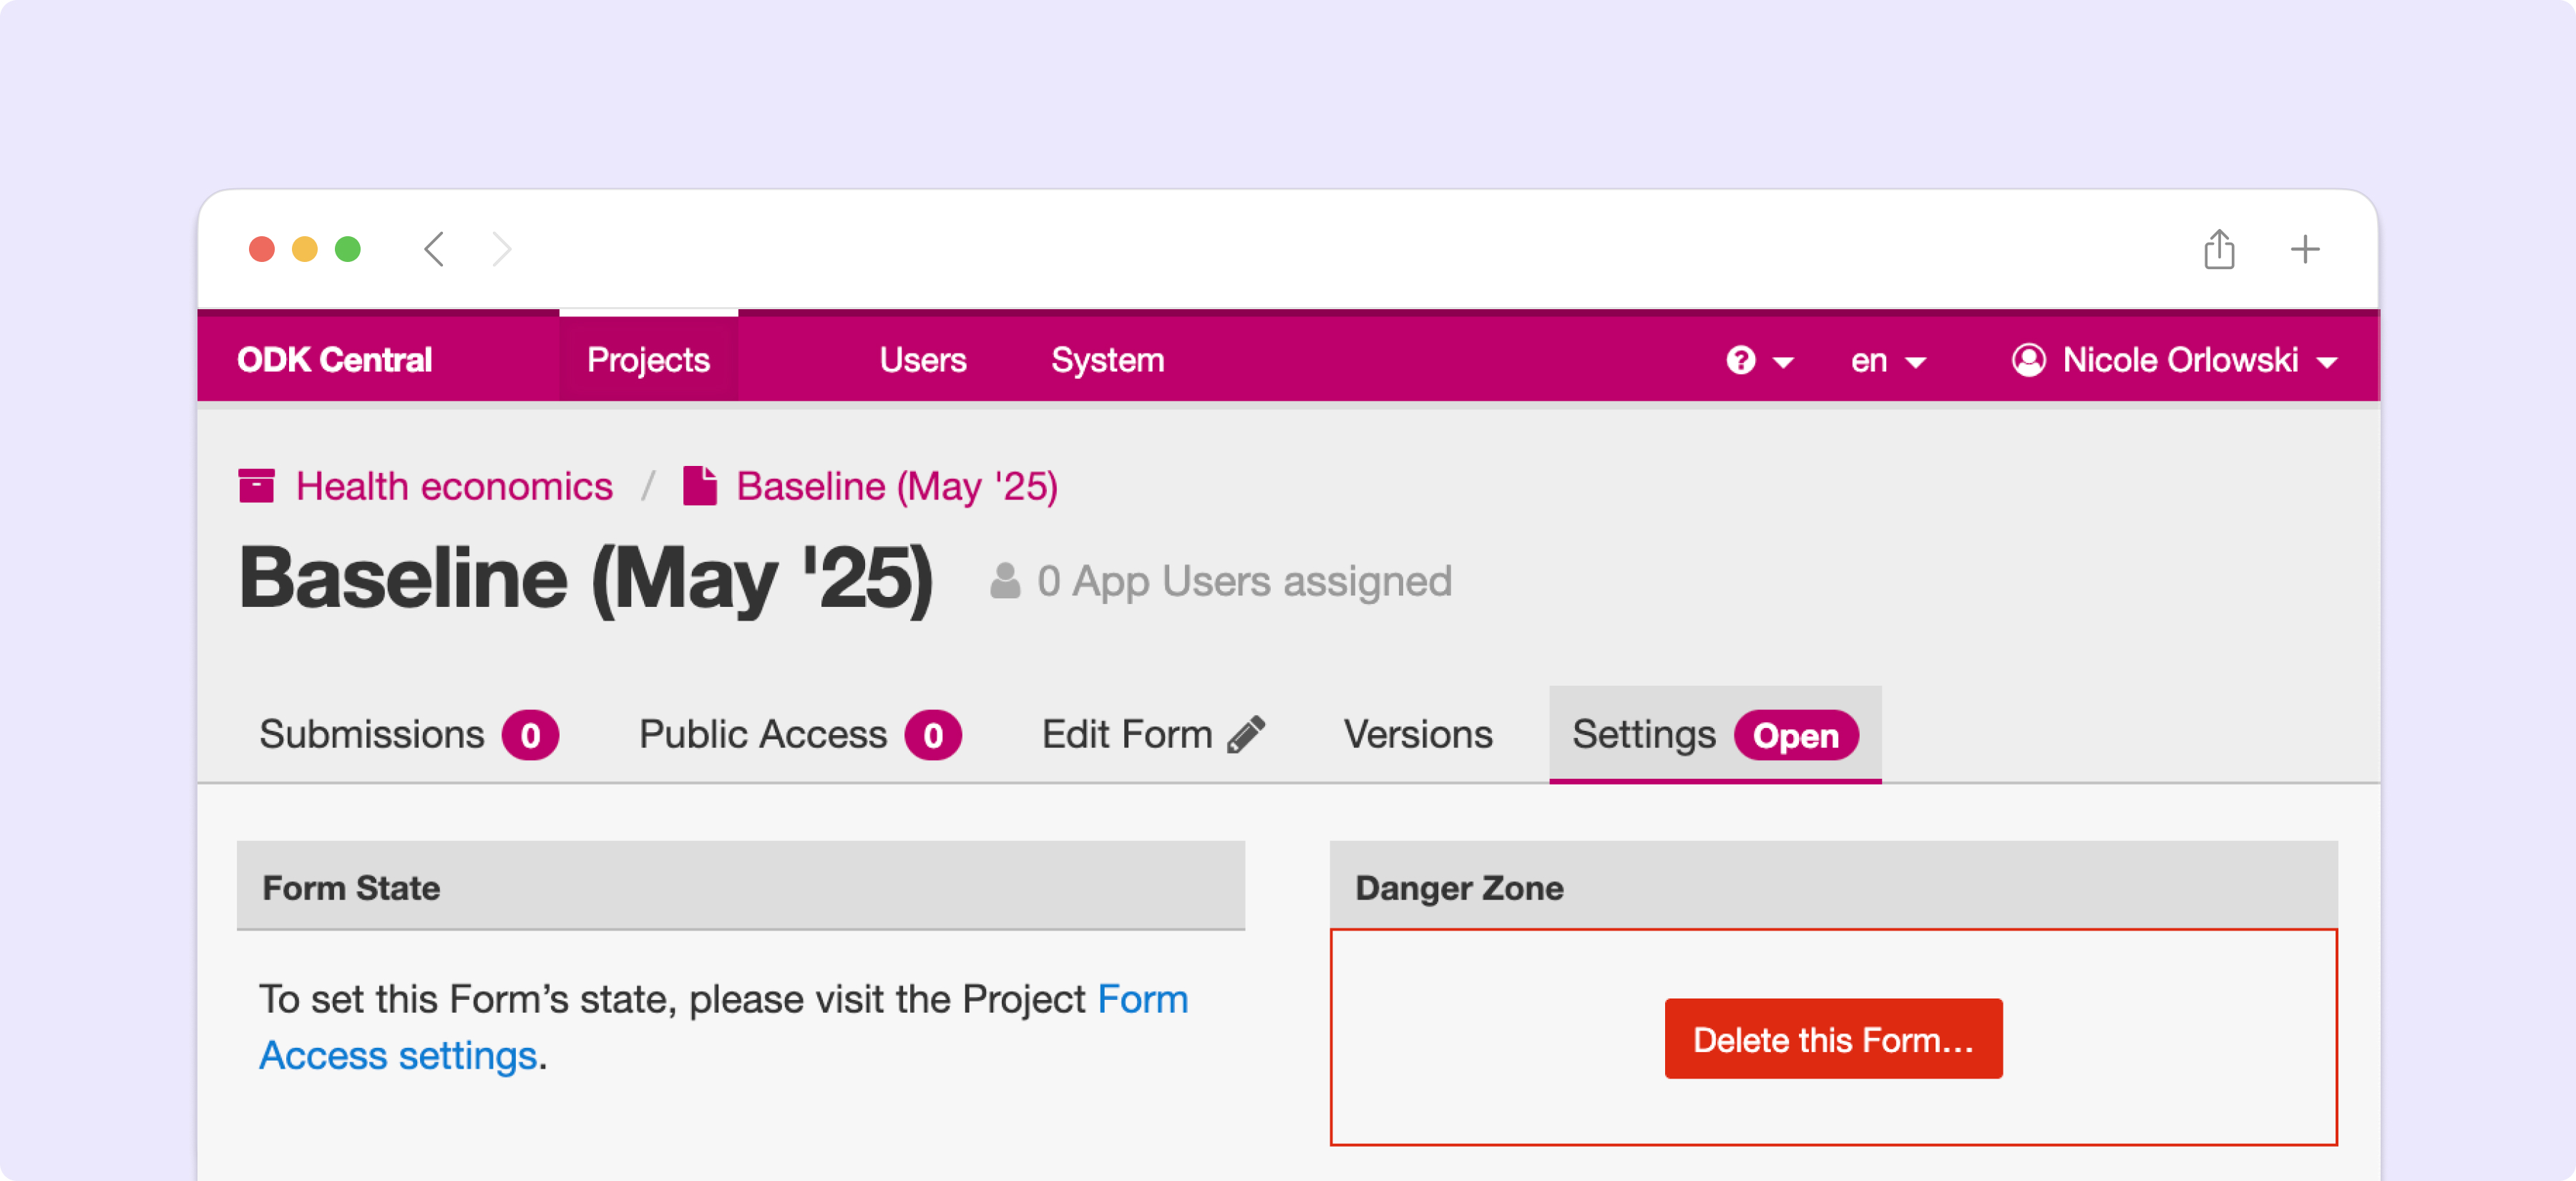
Deleting a Form
Tip
If you only want to turn the form off so that it doesn't appear to users of mobile data collection apps, we suggest using the form lifecycle controls explained above.
If you are certain you wish to delete a Form, you can find the option on the Form Settings page: click on the tab under the name of the form at the top of the page. On the right side of this page, you will find the Delete this form button.
Once a Form has been deleted, it will remain in the Trash for 30 days before being permanently deleted. You can find the Trash on the Project page, under the Forms list. Here, you can restore a Form using the button on the right. Restoring a Form will restore it exactly as it was when deleted.
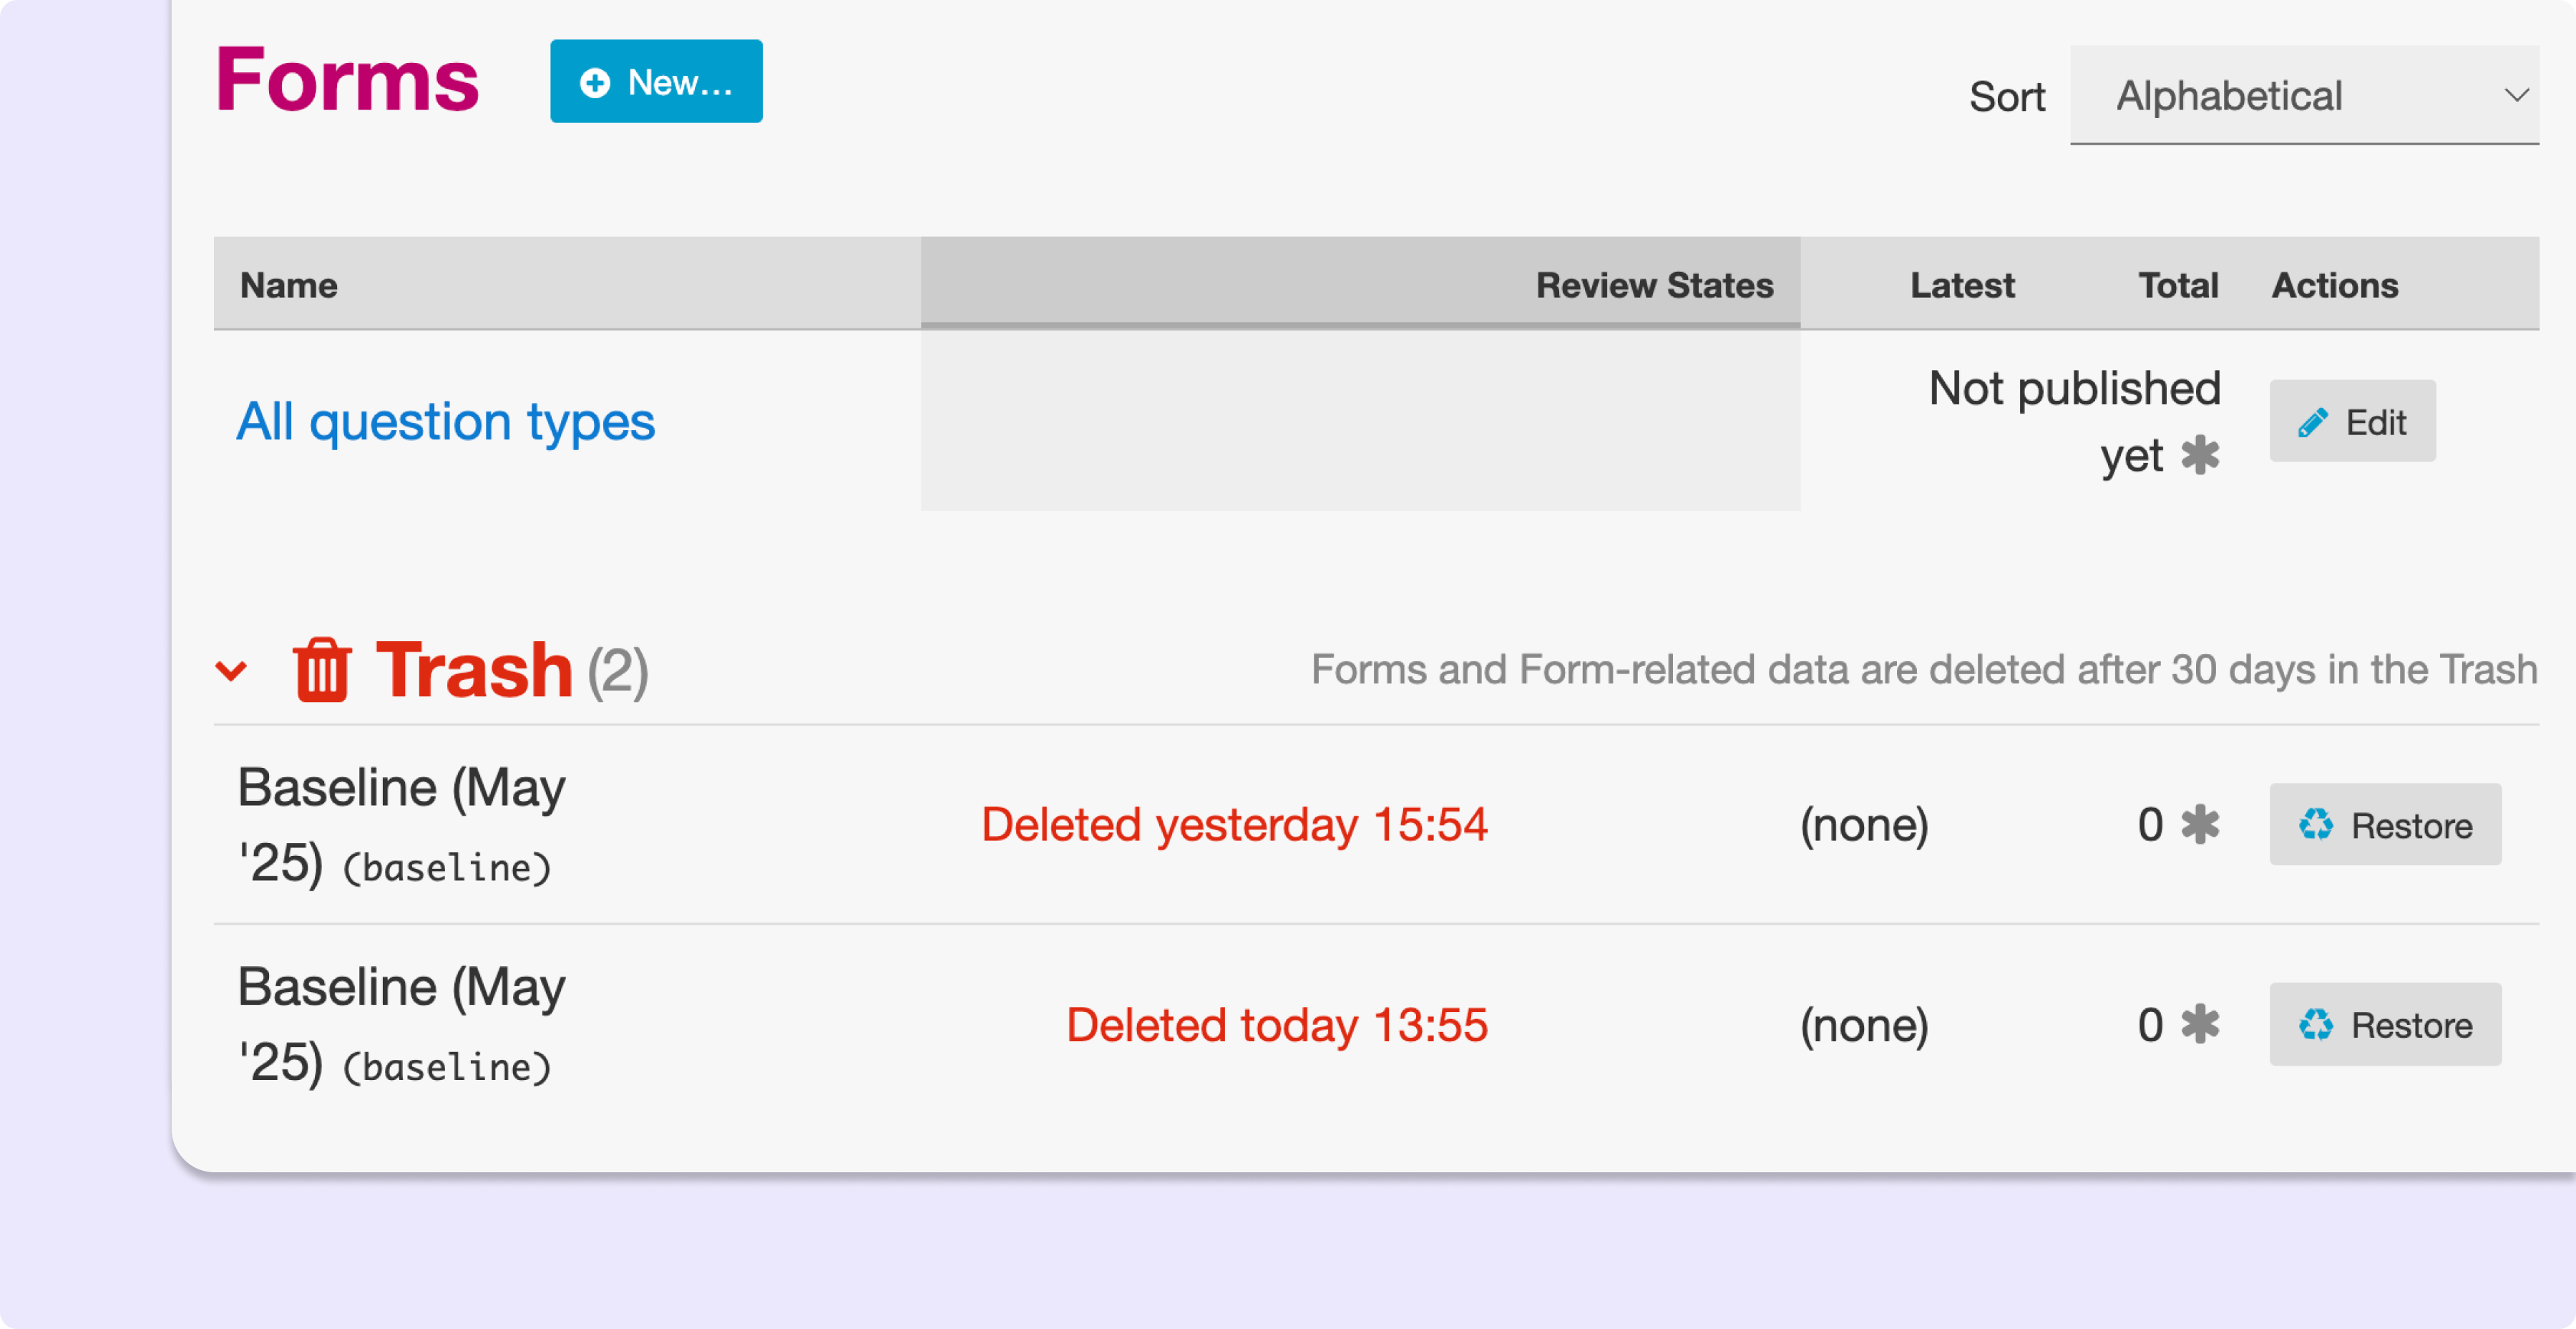
After 30 days, when a Form is permanently deleted, the data will be removed from the system completely.
You can create a Form with the same form_id as a Form in the Trash. If you do this, you won't be able to directly restore the Form in the Trash with a matching form_id. However, you can delete all Forms with the same form_id and then choose one to restore. There can only be one active form with any given form_id but there can be many deleted ones.