Managing Submissions in Central
When users fill out forms and submit them, Central receives Submissions. Central users with the right roles can then manage those Submissions directly in Central, download them, or connect to them from an external tool like Excel.
Making Submissions from the web
In general, we recommend using the ODK Collect Android application when doing enumerator-mediated data collection, especially in offline conditions or when using multiple forms for a single project. To do this, you will need to connect to Central from your mobile device, and then you will be able to send submissions back to Central. However, there are many scenarios in which web forms may be more appropriate:
Self-report. Use single-submission Public Access Links that participants can fill out from any device.
Public surveys. Use Public Access Links and share them on a poster as a QR code, by email, etc.
Non-Android mobile devices. You can give enumerators Data Collector roles in your project or send Public Access Links for them to bookmark.
Data entry from paper forms. Web forms can be used at a computer with a keyboard to quickly transcribe data collected on paper.
ODK Central bundles Enketo to enable editing, previewing and submitting forms directly from a web browser.
Note
Enketo does not always behave exactly like Collect, or support all the same features. The XLSForm template provides compatibility information and we recommend testing your form as you expect users to interact with it.
Tip
The ODK team is working on ODK Web Forms which will eventually replace Enketo in Central. Starting in Central v2025.1.0, you can try it out!
Any authorized Web User may fill out a Form directly from the browser, as will be described in more detail below. Additionally, ODK Central offers Public Access Links which grant anybody in possession of the link the ability to submit to a Form on your server. You can control whether each respondent can submit more than once, and revoke access from any Link at any time. It is also possible to make Enketo web forms usable while offline.
Direct Web Browser Submissions
Web Users who are Administrators, Project Managers, or Data Collectors can directly fill Forms in the web browser from the Central administration website. This functionality is provided by Enketo, which does not always behave quite the same as Collect, or support the same features.
Administrators and Project Managers can begin a survey by going to the Submissions tab of the Form, and clicking on the New button next to the Submissions header. This will open a new tab which will load the Form in Enketo.
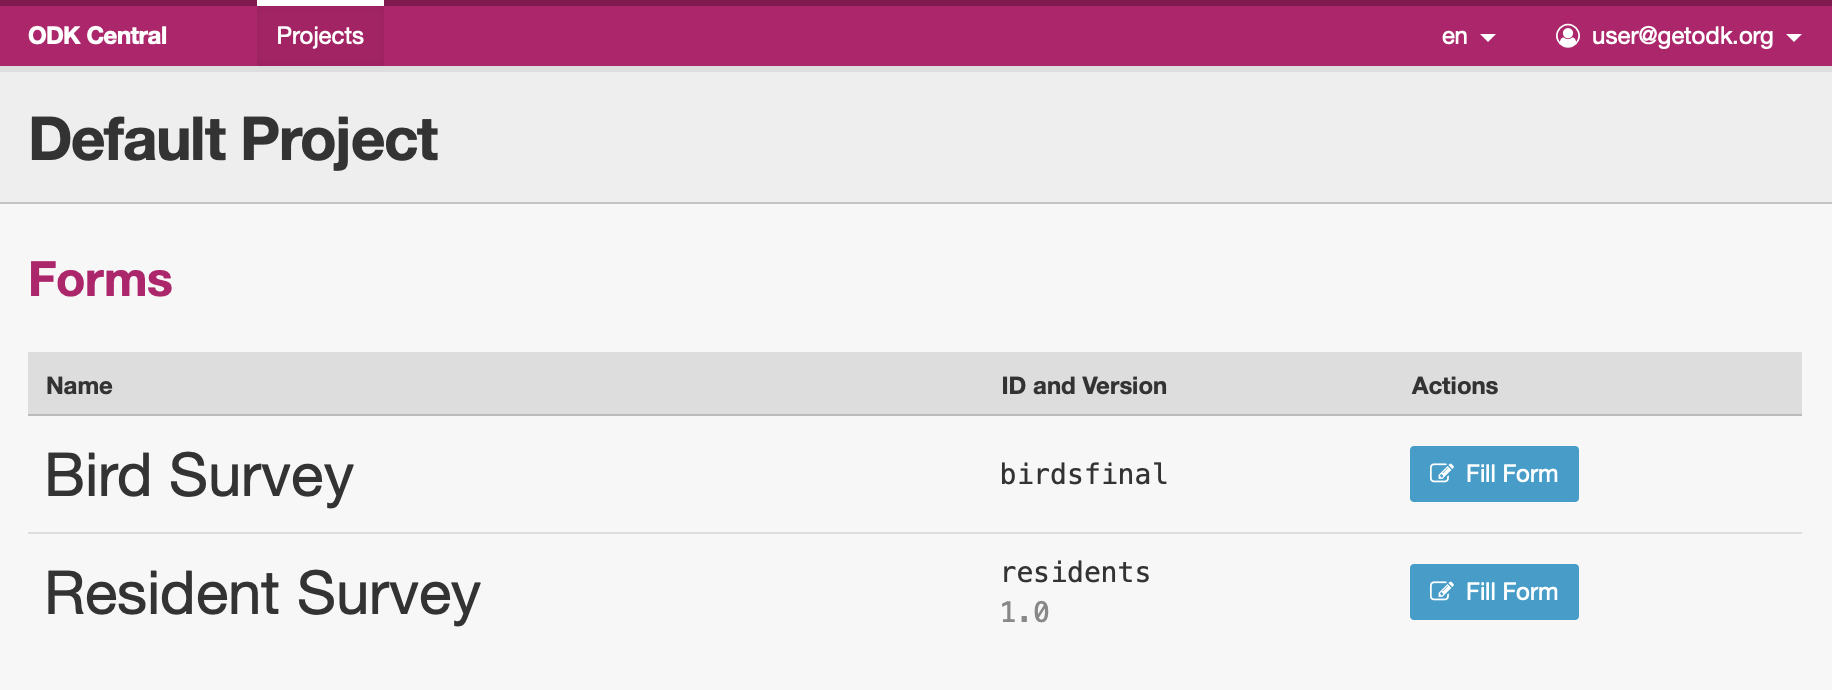
Data Collectors do not have access to the detailed Form management pages. Instead, they will find a Fill Form button next to the Form name in the list of Forms on the Project Overview page.
Public Access Links
ODK Central allows the distribution of surveys to a broad or open respondent group using Public Access Links. These Links take recipients directly to the Form in their web browser, administered by Enketo.
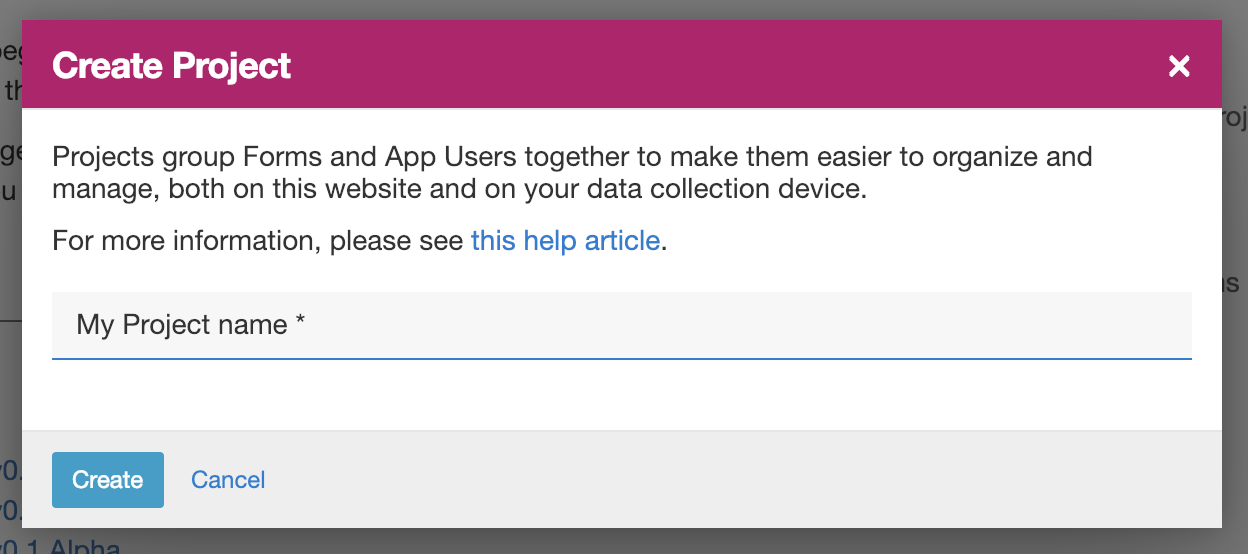
To create a Public Access Link, go to the Form's Public Access tab. Click on Create Public Access Link… to begin.
In the window that appears, you'll need to name the Link. This name is for your own identification purposes in the administration website, and is not displayed to respondents.
You'll also need to decide whether to allow multiple submissions per respondent. Normally, respondents filling a Form through a Public Link will be redirected to a thank you page after sending a Submission. Pressing the back button will not bring them back to the Form but they could send in another Submission by visiting the Link again. Checking the Single Submission checkbox enables basic protection against more than one Submission being made from the same browser.
Single submission enforcement
In Enketo, the enforcement limiting each respondent to a single response is done with in-browser tracking. This means that a user could submit multiple times using different devices or browsers, or distribute the link beyond the intended group.
Also because of this tracking method, respondents will only be able to respond once per Form, not once per single-submission Link. Future versions of Central may change how this works. Please leave feedback on the community forum if this is something you'd like to see.
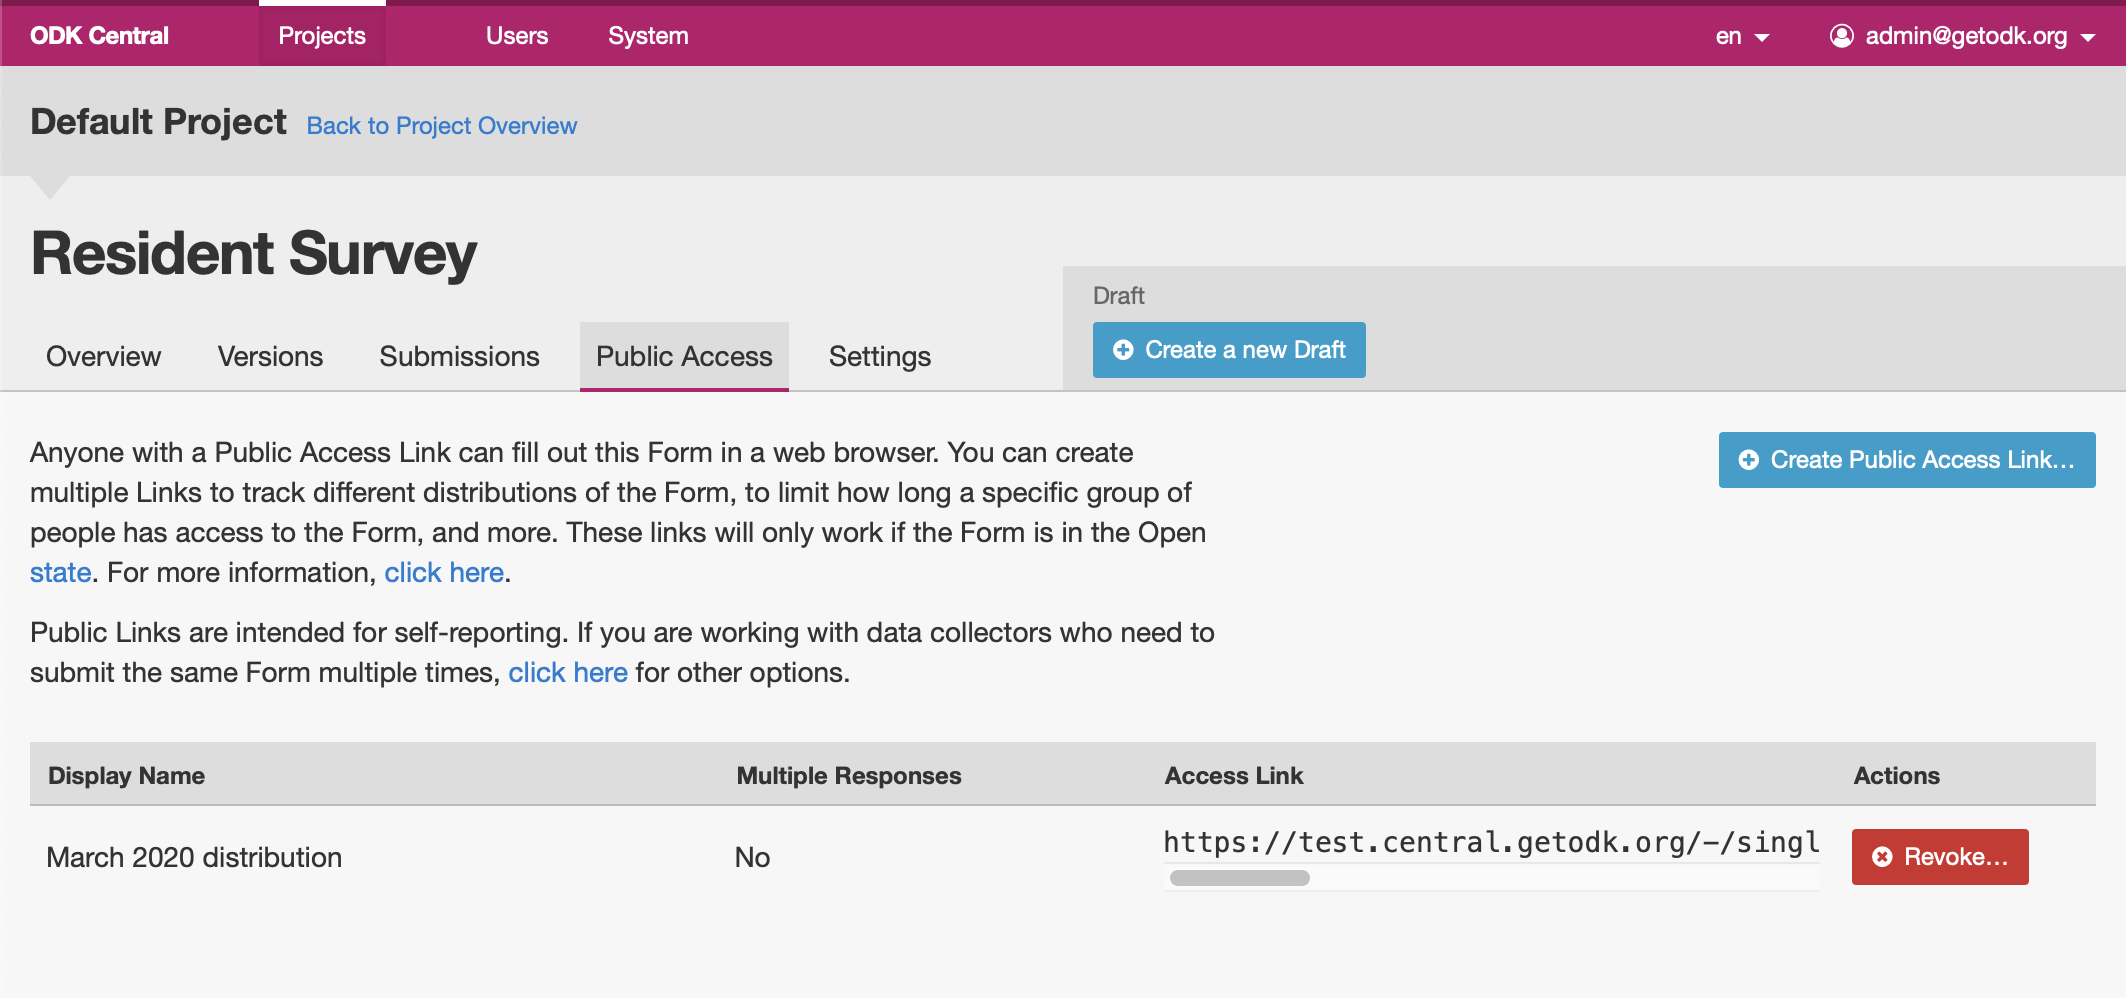
Once a Link is created, it will appear in the table, along with a web address you can copy and paste to distribute the Link to respondents.
You cannot yet edit any of the details of a Public Link.
Revoking a Link
You can revoke a Link at any time to prevent any further Submissions through it. Once a Link is revoked, all Submissions will be immediately denied, and new attempts to load the Form using the Link will result in an error instead.
To revoke a Link, click on the Revoke button in the Link's row in the table. You will be asked to confirm the action. Once a Link is revoked, there is no way to restore it.
Accessing Submissions
To find the Form submissions page, first find the form in the Form listings page () and click on it. You will be taken to the tab and will see your submissions.

The table preview you see here will at first show you the first ten fields of your survey and their results, with the latest submissions shown closest to the top. Any downloadable files will appear with a green download link you can use to directly download that media attachment. The submission's instance ID will always be shown at the right side of this preview table.
If your form has more than ten fields, you can show more columns by accessing the Columns shown dropdown and checking the columns you wish to see. While the Columns shown pane is open, you can use the search box along its top to search for a particular column name if you have many.
In the State and actions column, you will see the current review state of each submission and the number of edits that have been made, if any. If a submission is missing expected media uploads, you will see a warning here. When you hover over a row (or tab to it with your keyboard) you will see controls in this column to edit the submission, or see more details about it. You can read more about review states and the submission detail page below.
You can limit the rows that appear by the submitter, the date, and the review status. These filter controls are available just above the submission table.
Seeing Submissions on a map
You can also view your Submission data on a map by switching to the Map view using the toggle in the upper-right corner. Each Submission is plotted based on the first geo field in the form definition that is not in any repeat group.
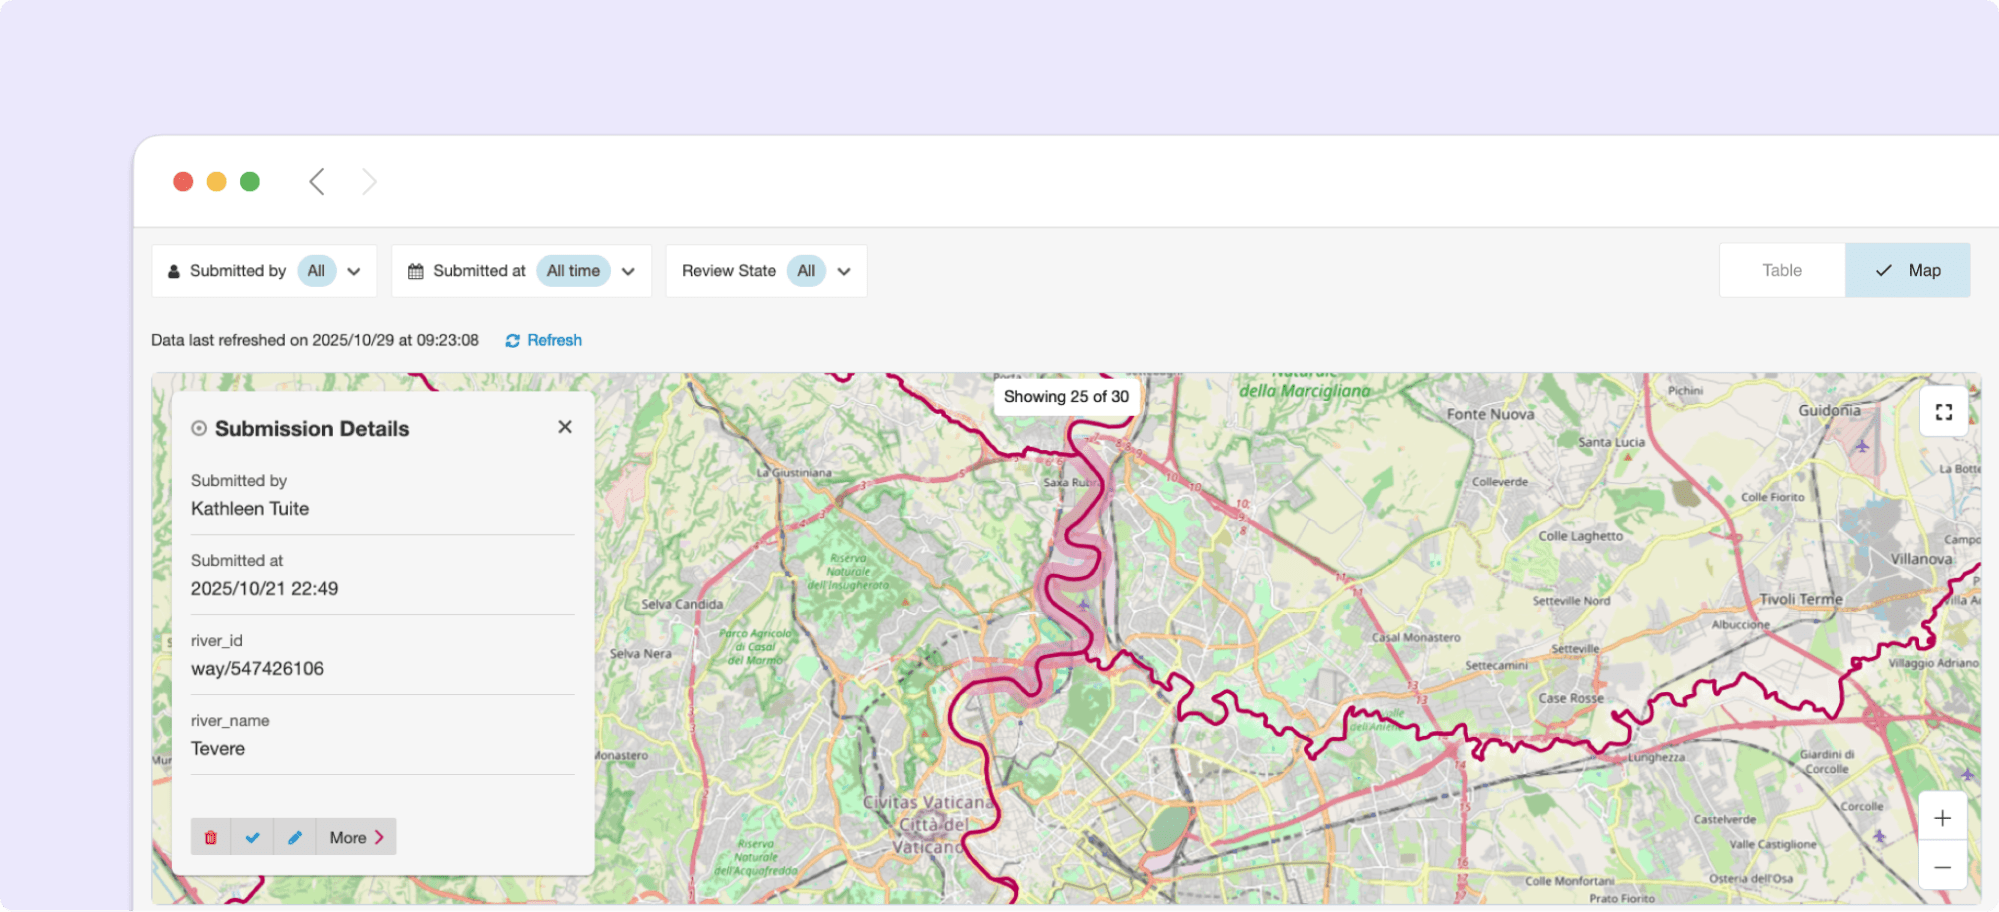
When many Submissions appear close together, they are automatically clustered to make the map easier to read. As you zoom in, clusters break apart to show individual Submissions. The number shown in each cluster represents how many Submissions it contains.
Tip
If the geo field you want this summary map to use is different from the one you would like to show to your form users first, add a calculation near the start of the form that references the geo form field to be mapped. You may also sometimes need a calculation to look up geometry from another type of data.
For example, if your form asks users to select a feature on a map, you will need to add a calculation to look up the geometry based on the selected id. If the choices are stored in a list called museums and the select_one field is called location, the calculation to get the geometry would be
instance('museums')/root/item[name=${location}]/geometry
Downloading Submissions
To work with your data, you can download it from the Central submission table. Any filter you apply to the submission table also applies to the download button. Right now, you can download data in one of two ways:
The CSV Download option will get you a
.zipfile containing one or more.csvtables, along with any multimedia submitted to the form. This is a good option if you already have custom tools you wish to use, or you want to import it into an offline analysis tool like SPSS or Stata.The OData connector allows you connect a live representation of the data to OData-capable tools like Microsoft Power BI, Microsoft Excel, Tableau, and others. This option has some advantages: the data is transferred more richly to maintain more data format information, and the feed is always live, meaning any analysis or reports you perform in your tool over an OData connection can be easily refreshed as more submissions come in.
Learn more about these options below:
Downloading Submissions as CSVs
To download all submission data as .csv tables, click on the Download all # records button on the right side of the listing page:
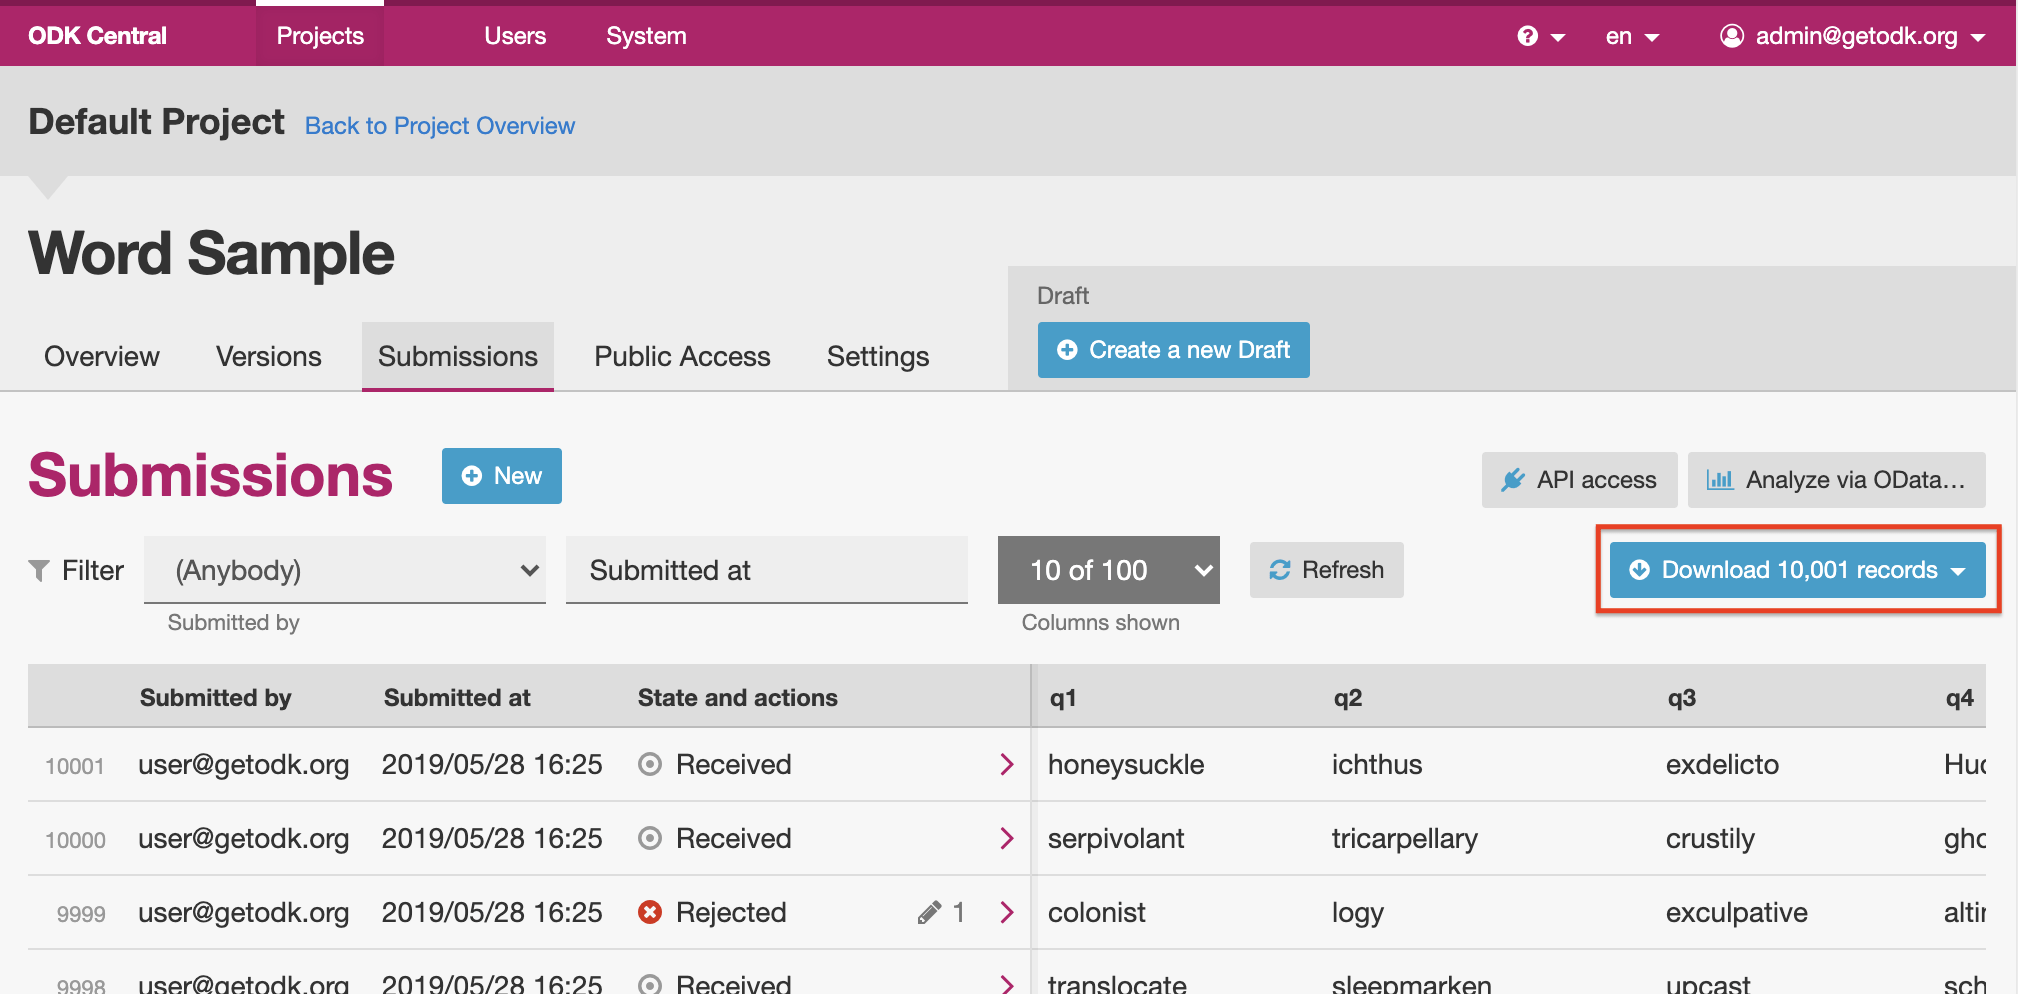
If you have any row filters applied to the submission table, those filters will be applied to your download as well. You can use this to, for example, download only submissions from a particular month, or only approved submissions.
Export options
Once the download dialog opens, you'll be given some additional export options.
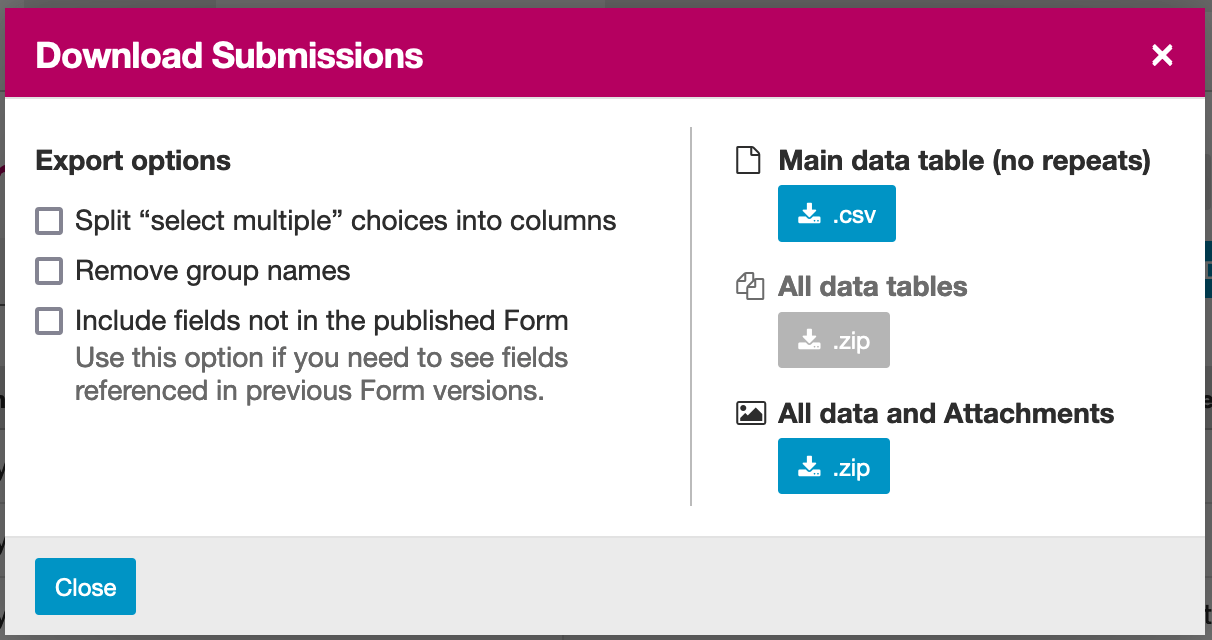
Some of the options may be disabled if they do not apply to your data, or if they are not available due to features that you have enabled (such as managed encryption).
The option to split select multiple choices will create a new column in the export
csvfor each unique known value in each select multiple field. These columns then indicate whether each submission checked each option.The remove group names option takes out the prefix usually added to groups in the header: so for example,
meta-instanceIDwould become justinstanceID.Finally, the option to include previously deleted fields will include every known previously deleted field in any version of the Form in the export, along with any data found for those fields. See Updating Forms to a New Version for tips on updating a form without changing its fields.
Click on one of the format options on the right to start the download.
Once the .csv or .zip completes downloading, you will find one or more files when you extract it:
A root table
.csvnamed after your Form title.Join table
.csvfiles representing any repeats you may have in your form, with join columns on the left of each table relating each row to its counterpart in the parent table. Each join table is named to reflect its relationship with the others. If there is only one.csvfile, then your form has no repeats.A folder named
fileswhich contains subfolders, each named after aninstanceIdof a submission. Each subfolder then contains a set of file attachments relating to that submission. If nofilesfolder exists, then no multimedia attachments have been submitted to this form.If you have enabled Client Audit Logging on your form, and log events have been submitted to the server, then you will find a file that ends with
- audit.csv. This file combines all the logging data from all submissions to the form into a single table.
Tip
Excel will not import CSVs with Unicode characters like ã, ß, and 箸 correctly if you double-click the file or open it from the File menu. You must instead use Power Query. Go to the Data tab, and in the Get & Transform Data group, click From Text/CSV.
Rather than downloading CSVs manually, you can also connect Excel directly to Central via OData and get a live-updating spreadsheet with auto-detected data types and Unicode support.
Downloading submissions with Power BI or Excel
Central provides an OData feed that Power BI or Excel can use to easily download submissions into a dashboard for visualization or into a spreadsheet for analysis.
See also
See our mapping households tutorial for step-by-step guidance on using Power BI with ODK.
See connecting Excel to ODK for instructions on using Excel with ODK.
Power BI and Excel uses the same underlying technology (Power Query) to connect to Central's OData feed. Try both of the above resources to maximize your learning. You can also follow along with this video:
To download submissions with Power BI or Excel, follow these steps:
Find a link to the OData feed by clicking on the Analyze via OData button on the right side of the Submissions page of your form.
Start the Get OData feed action.
In Power BI, select the Home menu, then Get Data, then OData feed.
In Excel, select the Data menu, then Get Data, From Other Sources, then From OData Feed.
Leave the feed type as Basic (not Advanced), then copy and paste in the link from Central and then select OK.
Change the authentication type to Basic (not Anonymous), enter your Central email address and password, and then Connect.
The Navigator window will now appear. Select Submissions, then Load.
Tip
If you are having trouble getting Power BI or Excel to connect, and especially if you see error messages about permissions or authentication, clear your cached permissions and try again.
Downloading submissions with Python, R, and more
If you use Python, we recommend pyODK for downloading submissions via an OData feed into Python. pyODK is the official Python client for Central and it makes common data analysis and workflow automation tasks simple.
If you use R, we recommend ruODK for downloading submissions via an OData feed into R. ruODK is developed and supported by ODK community members.
You can also access the OData feed yourself. The OData feed is an easily consumable JSON data format and offers a metadata schema, some filtering and paging options, and more. To learn more about the OData feed, click the API Access button or see the API documentation directly.
Accessing submission media from external tools
It can be tricky to access submission media files while using external tools like Power BI or Python for data analysis or visualization. Using an external tool to fetch submissions from Central does not mean it can or knows how to get associated images, video, and other media.
In the OData feed, you will see media files given by their filename. If you want, you can construct a link within your analysis tool that will download any media file with your web browser. You can do this by gluing together pieces of text into a URL. Often this gluing operation is called concat or concatenate. You'll need to make it look like this:
https://DOMAIN/#/dl/projects/PROJECTID/forms/FORMID/submissions/INSTANCEID/attachments/FILENAME
Where the uppercase words need to be replaced with the appropriate values. The easiest way to get the DOMAIN, PROJECTID, and FORMID is to open the Form in your web browser in the Central administration website and just copy the values you see there. The two web addresses are quite similar. Then you have to add the INSTANCEID and the FILENAME, both of which you can find in the OData data itself.
Here is an example of a completed address:
https://my.odk.server/#/dl/projects/1/forms/forest_survey/submissions/uuid:20bcee82-4a22-4381-a6aa-f926fc85fb22/attachments/my.file.mp3
This location is a web page that causes a web browser to download a file. It cannot be used directly to embed images or video on any website or application.
Submission Review States
As of version 1.2, Central allows Project Managers and Administrators to review submissions and assign them certain states. This feature lets you perform verification and follow-up data editing within Central itself, if you need this kind of a workflow. The available states are:
State |
Assigned by |
Description |
|---|---|---|
Received |
System |
The default state for all incoming submissions, assigned automatically by Central |
Edited |
System |
Automatically assigned by Central whenever a submission is edited by any user |
Has Issues |
User |
Can be assigned by project staff if a submission has problems |
Approved |
User |
Can be assigned by project staff to approve a submission |
Rejected |
User |
Can be assigned by project staff to reject a submission |
The Received and Edited states are automatically set by Central any time a submission is uploaded or edited. The other states are assigned by project staff. We suggest some meanings for these states above, but they don't cause anything to happen automatically. For example, rejected submissions will still be included in your data exports unless you filter them out yourself. So, you are free to use these states however you'd like.
Once submissions have been reviewed, the submission table download and the OData connection both allow submissions to be filtered by review state. This lets you, for example, download only all the approved submissions.
Viewing Submission Details
Each submission has its own detail page which provides basic information about the submission, an activity history of action and discussion on that submission, and tools for updating the submission review state and data itself.
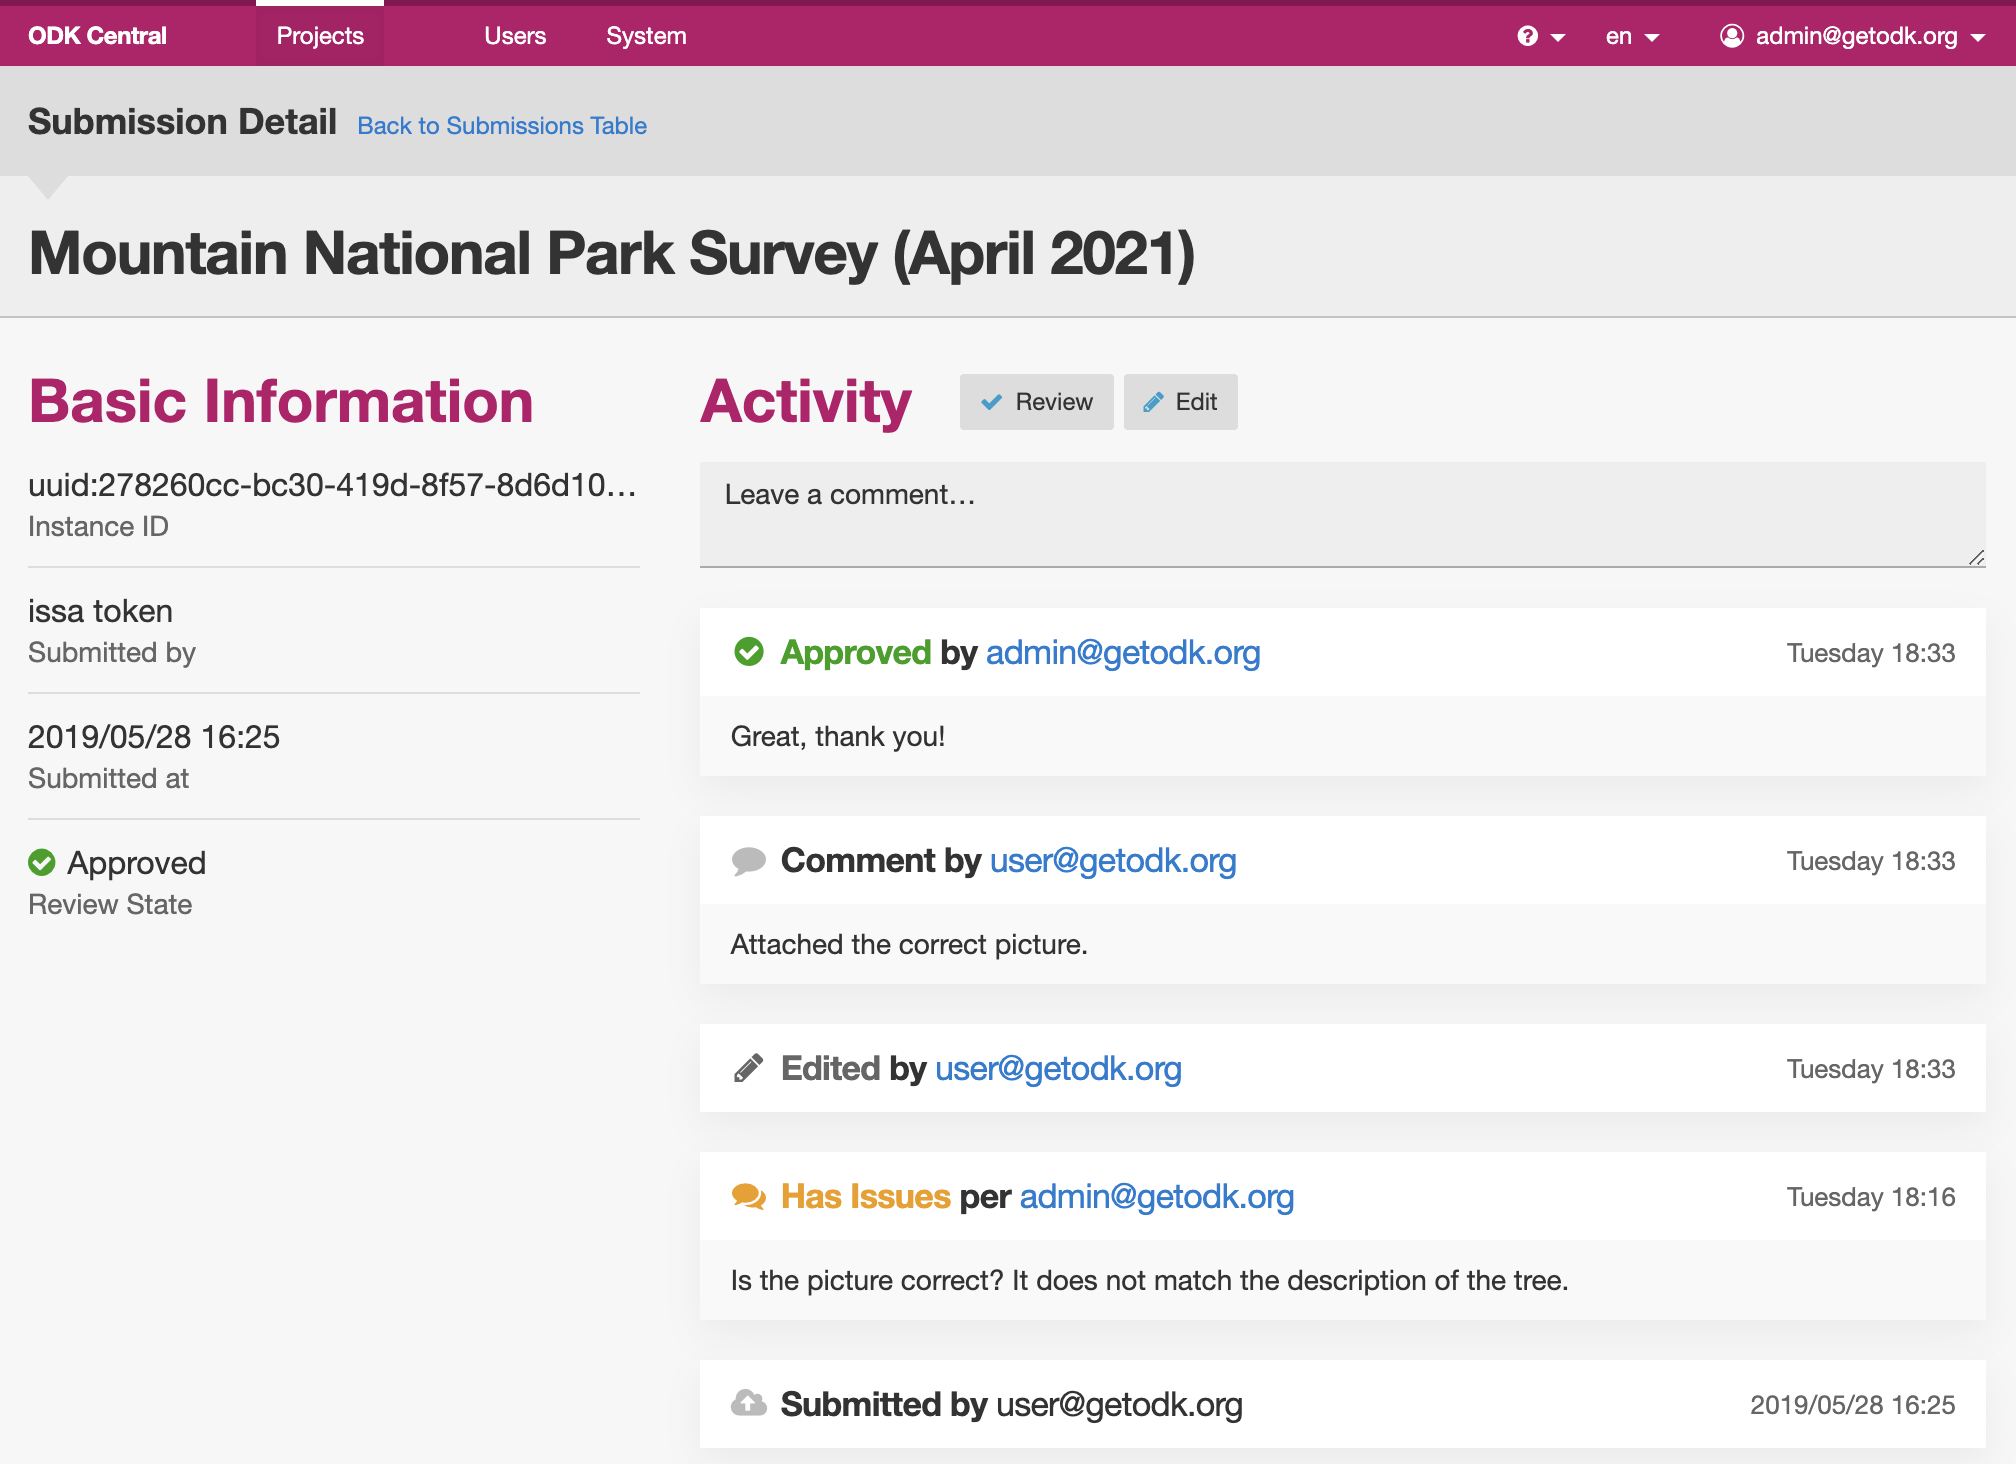
The title at the top is pulled from the instance_name if there is one, otherwise it will be the automatically assigned instanceID. We recommend you define an instance_name based on the data in each submission. This is especially important if you plan on using this page a lot, because it makes navigation much easier to have friendly names at the top of the page and in the web browser title and tab.
Basic detail can be found along the left. If there are expected media attachments for this submission, that status information will be provided.
The main activity feed on the right shows you the discussion and action history of the submission. Any review state changes, comments, and edits will appear here. At the top of the activity feed, you can Review a submission to assign a new review state, Edit the submission directly in your web browser, or type in the box to begin leaving a comment.
You can leave a note when you update the review state, to indicate why the decision is being made, or any other information you'd like saved.
Editing Submissions
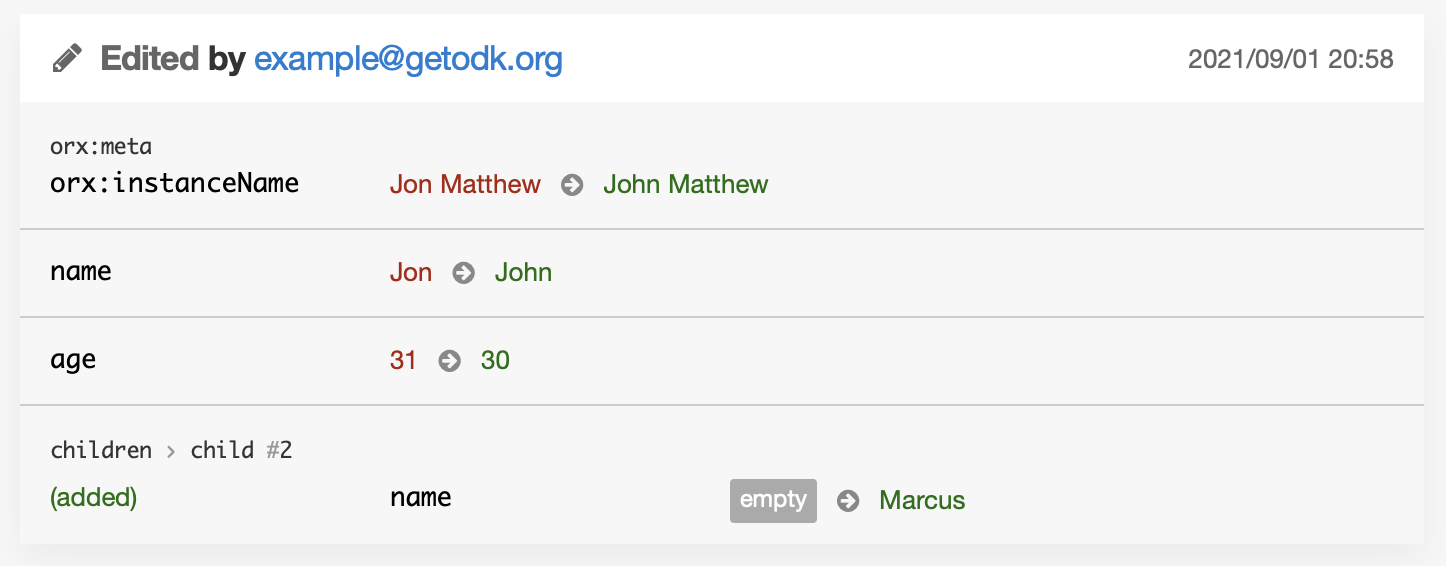
From the submission detail page you can press the Edit button to edit the submission in your web browser. When an edited submission is resubmitted, a new version of it is created, just like a form version. You will be able to see previous submission versions in a future version of Central.
Any time a user edits a submission, they will see a note when they are returned to the detail page suggesting that they leave a comment describing the edits they have made. This is optional but highly encouraged. In a future version of Central, greater detail will be automatically provided about the data values that were changed.
Finally, when edits are submitted, the submission review state will automatically be set to Edited, and (as of version 1.3) you will see the changes between versions in the Submission Detail activity feed. Please note that Central will show you the differences between versions, but it doesn't know the exact actions you took to cause those changes. Sometimes the differences shown are not the same as the actions taken, but the resulting data will appear exactly as edited.
Allowing web form users to work offline
Note
ODK Web Forms does not yet support offline use. If someone loses connectivity while filling out an ODK Web Forms form, they will be able to complete filling it out but will need an Internet connection before they can submit.
Enketo's offline-capable mode makes it possible to launch a form while offline, save drafts of that form, queue submissions to be sent to a server, and automatically send queued submissions once a connection is available.
Note
Queued submissions are automatically sent only if the form is open in a browser when a connection is available.
You can make an Enketo form offline-capable by changing the form's web address and sharing that modified address. The way to do this depends on your Central version but links from older versions of Central will continue to work in newer versions.
Offline-capable link that does not require logging in
Create a Public Access Link for your form. You can create a single shared link or repeat these instructions for each person filling out data so that you can track who is submitting.
Copy the link and paste it in a web browser.
Add
/offlineto the address right before the?st.Press
Enteron your keyboard, confirm that you are redirected to a new address, and make sure that you see an orange connectivity icon in the upper left of the form.Copy the link that you were redirected to and share it with your data collector(s).
Offline-capable link that requires logging in to submit
Give the Data Collector role to any individual who will need to fill out this form.
Go to the form filling page for your form by clicking the Add submission button.
You should see your form and the web address should end with
/new. Add/offlineto make the address end with/new/offline.Press
Enteron your keyboard, confirm that you are redirected to a new address, and make sure that you see an orange connectivity icon in the upper left of the form.Copy the link that you were redirected to and share it with your data collector(s). They will need to log in to first access the form and when they submit.
Go to a web form link by clicking the New button on the submissions page or by copying and pasting a Public Access Link.
Add
x/after/-/in the address. For Public Access Links, replacesingle/withx/.Press
Enteron your keyboard, and make sure that you see an orange connectivity icon in the upper left of the form.Copy the link and share it with your data collector(s)
Customizing end-of-form behavior
For Public Access Links, the default end-of-form behavior displays a generic thank you message. To redirect respondents to a custom page, provide a return_url. Additionally, to enable respondents or data collectors to make multiple submissions without refreshing the page after each submission, append &single=false to the Public Access link:
Default Public Access link: |
https://your-domain/f/<enketo-id>?st=<secret> |
Multiple submissions: |
https://your-domain/f/<enketo-id>?st=<secret>&single=false |
Adding &single=false to the URL also enables the use of the last-saved instance in your form definition for web-based data collection.
For Data Collectors, the default end-of-form behavior allows them to make another submission without refreshing the page. To display a custom page instead, append &single=true and provide the URL of your custom page using the return_url query parameter:
Default URL for Data Collectors: |
https://your-domain/projects/<id>/forms/<name>/submissions/new |
Redirect after submission: |
https://your-domain/projects/<id>/forms/<name>/submissions/new?single=true&return_url=http://some-domain/custom-page.html |
If you don't provide a return_url, a default thank-you message will be displayed.
Note
ODK Web Forms does not yet support the last-saved instance. Also, there is no impact of single query parameter on the behavior of ODK Web Forms.
For Public Access Links, the default end-of-form behavior displays a generic thank you message. To redirect respondents to a custom page, provide a return_url. Additionally, to enable respondents or data collectors to make multiple submissions without refreshing the page after each submission, remove /single from the Public Access link:
Default Public Access link: |
https://your-domain/-/single/<enketo-id>?st=<secret> |
Multiple submissions: |
https://your-domain/-/<enketo-id>?st=<secret> |
Removing /single from the URL also enables the use of the last-saved instance in your form definition for web-based data collection.
For Data Collectors, the default end-of-form behavior allows them to make another submission without refreshing the page. To display a custom page instead, add /single after /- in the URL and provide the URL of your custom page using the return_url query parameter:
Default URL for Data Collectors: |
https://your-domain/-/<enketo-id> |
Redirect after submission: |
https://your-domain/-/single/<enketo-id>?return_url=http://some-domain/custom-page.html |
If you don't provide a return_url, a default thank-you message will be displayed.