Using Offline Maps
You can configure Collect's location question types, select from map question, and filled form map to display different map data. The Maps Settings let you select an online basemap, as well as an optional offline layer to show on top of the basemap. These settings are shared between all maps in a single project.
The data for all the available basemaps comes from services on the Internet, so the basemap will only be visible to users who are online. To choose a basemap, select a Source and then a Style if multiple styles are available.
The offline layer setting lets you select a file from your device that will be displayed offline. Offline layers are useful to present custom geospatial data layered over standard basemaps or as basemaps for low-connectivity environments. Use them to display high-resolution imagery, annotated maps, heatmaps, and more. ODK Collect can display any map layer saved as a set of tiles in the MBTiles format.
If you want to select geospatial features and include their metadata as part of a form submission, see the select from map question type.
See also
Quick start
Typically, a project manager prepares offline layers for a project and then either imports them into all devices or sends them out to the project's Collect users. This section includes the minimal steps needed for this typical usage. For more details, see the sections below.
Prepare your MBTiles files.
Send the MBTiles files to the devices you want to use them on. You could use a file sharing service like Google Drive, send device-to-device with Quick Share, or send with a service like WhatsApp or email.
Download the MBTiles file to the device (for Google Drive, skip this step and import directly in the next step).
Go to Collect's offline layer settings and add your files from the device storage or from Google Drive.
Select the offline layer to use.
See the offline layer in a geopoint, geotrace, or geoshape question.
Note
If you don't see your expected offline layer, try zooming in and out. If you need to see your offline layer at different zoom levels, try using the Mapbox basemap source because it will allow you to zoom beyond the zoom level that the offline layer defines (with loss of quality).
While viewing the map, you can change the selected offline layer or import more layers using the button that looks like a stack of layers ().
Creating MBTiles files
To create MBTiles files, we recommend using QGIS or MapTiler. In general, you should build raster (.jpg or .png) MBTiles files.
Warning
Vector MBTiles files (with .pbf tiles) are only supported if Mapbox is selected as the basemap source and are currently displayed without configurable styling. Each layer's lines are displayed in a different color picked by ODK Collect. These colors will be the same across all devices using the same MBTiles file but they will not be meaningful. For example, roads may be pink, orange, etc. Shapes are not filled in.
In Collect, MBTiles files will be identified by the name specified in the MBTiles metadata. Make sure to use a descriptive name, especially if you will be using several different MBTiles files.
Offline layers are displayed on top of the configured online basemap. If you are working offline, you will generally want to include a basemap in your offline layer files. If your field team will have Internet connectivity, you can use offline layers with transparency and only include the custom data you need to display. You can do this with .png raster tiles or .pbf vector tiles, but keep in mind that when using vector tiles, you must use the Mapbox engine and each layer will be shown in a device-selected color.
MBTiles files typically contain metadata that specifies the range of zoom levels in which they are visible. Pick this range based on the kind of work your field team will be doing. For example, if the offline layer is used to navigate to specific points of interest, you will want to optimize for a more zoomed out view than if it is used to support capturing the location of building entrances at high accuracy. The larger of a zoom range you specify, the bigger your files will be. If you need a broad range of zoom levels and can tolerate some loss of quality, select Mapbox is as the basemap source because it allows zooming beyond the zoom level that the offline layer defines.
Tip
For non-commercial community mapping activities, Mapbox may be able to provide offline MBTiles files, including processed streets, satellite, and custom data. Contact community@mapbox.com.
See also
Watch a step-by-step video showing how to add offline tiles from QGIS into Collect.
Transferring MBTiles files to devices
Once you have the MBTiles files that you want to use, you need to get them onto the devices that will be used with Collect. The most appropriate method for doing this will depend on when and where the devices have access to the Internet, when and how you do the rest of your device setup, and the level of comfort your data collectors have with Android.
If all devices have access to Google Drive, you can share the MBTiles files from Google Drive. When devices are online, they will be able to select Google Drive from the file picker when they import layers to Collect. This will download and import the files directly. Depending on the devices that you use, you may be able to use a similar process for OneDrive, Dropbox, and other file sharing services.
If all of the devices using Collect will be in the same location, consider sharing the file(s) device-to-device with Quick Share, especially if they are large. For example, during a training, you can share the file with one trainee and then ask them to share the file(s) on to the next person and so on.
If your Collect users are remote and don't have access to file sharing services, you can send them a direct link to a file or the file itself via WhatsApp, email, etc. They will then save the file to their Downloads and import it from Collect.
If you are setting up multiple devices from a computer, you may want to manually place MBTiles in the layers directory in Collect.
Adding offline layers to Collect
Note
You can also manually place MBTiles in the layers directory in Collect.
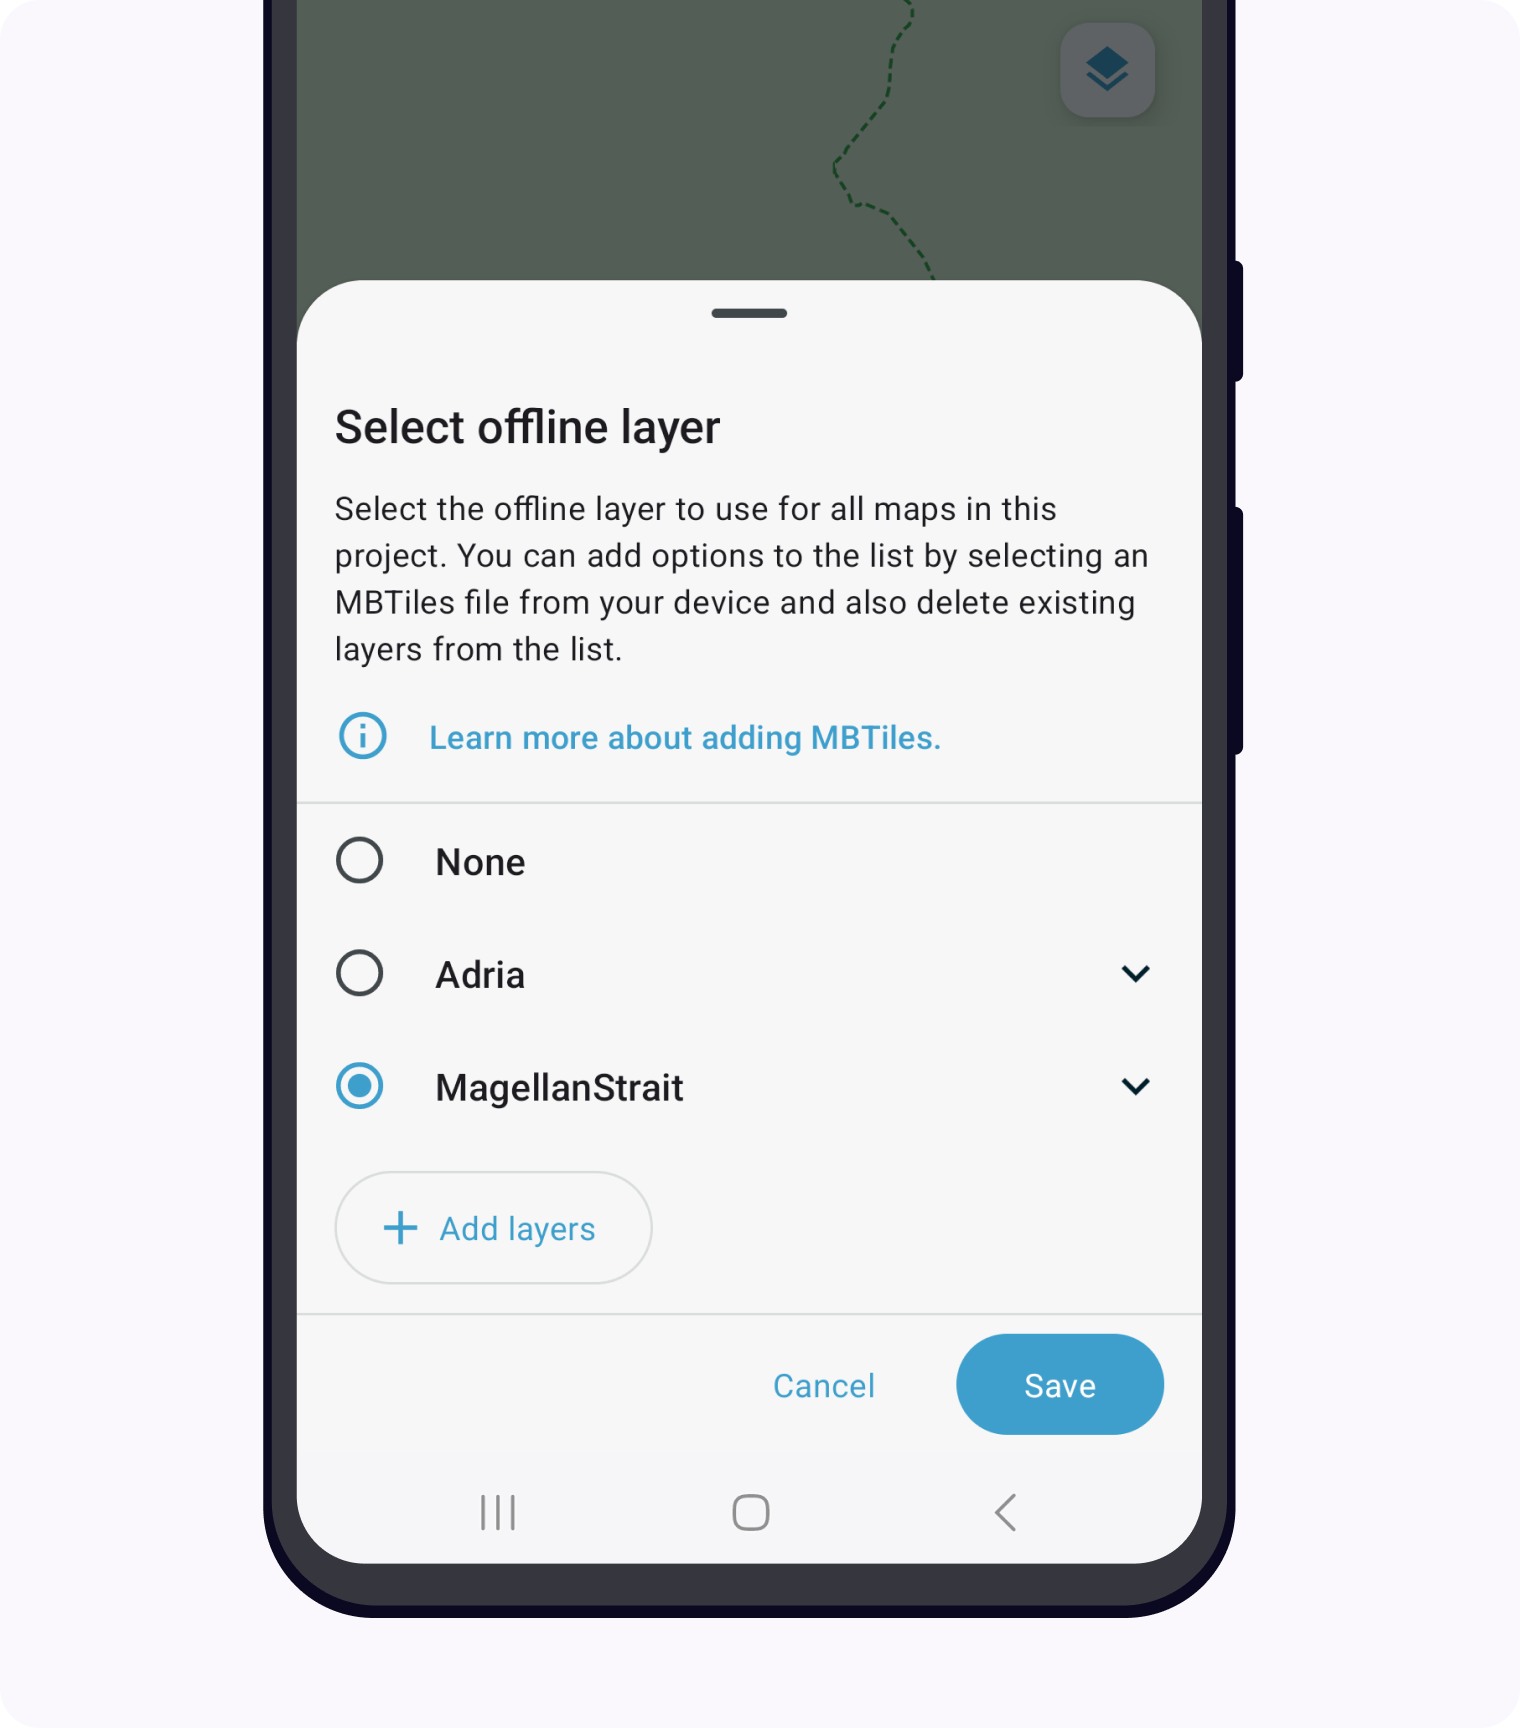
You can add offline layers to Collect from the Maps Settings or by tapping on the layers button () directly from a map. Both options give you access to the same menu which lets you configure the offline layer for all maps in the current Collect project.
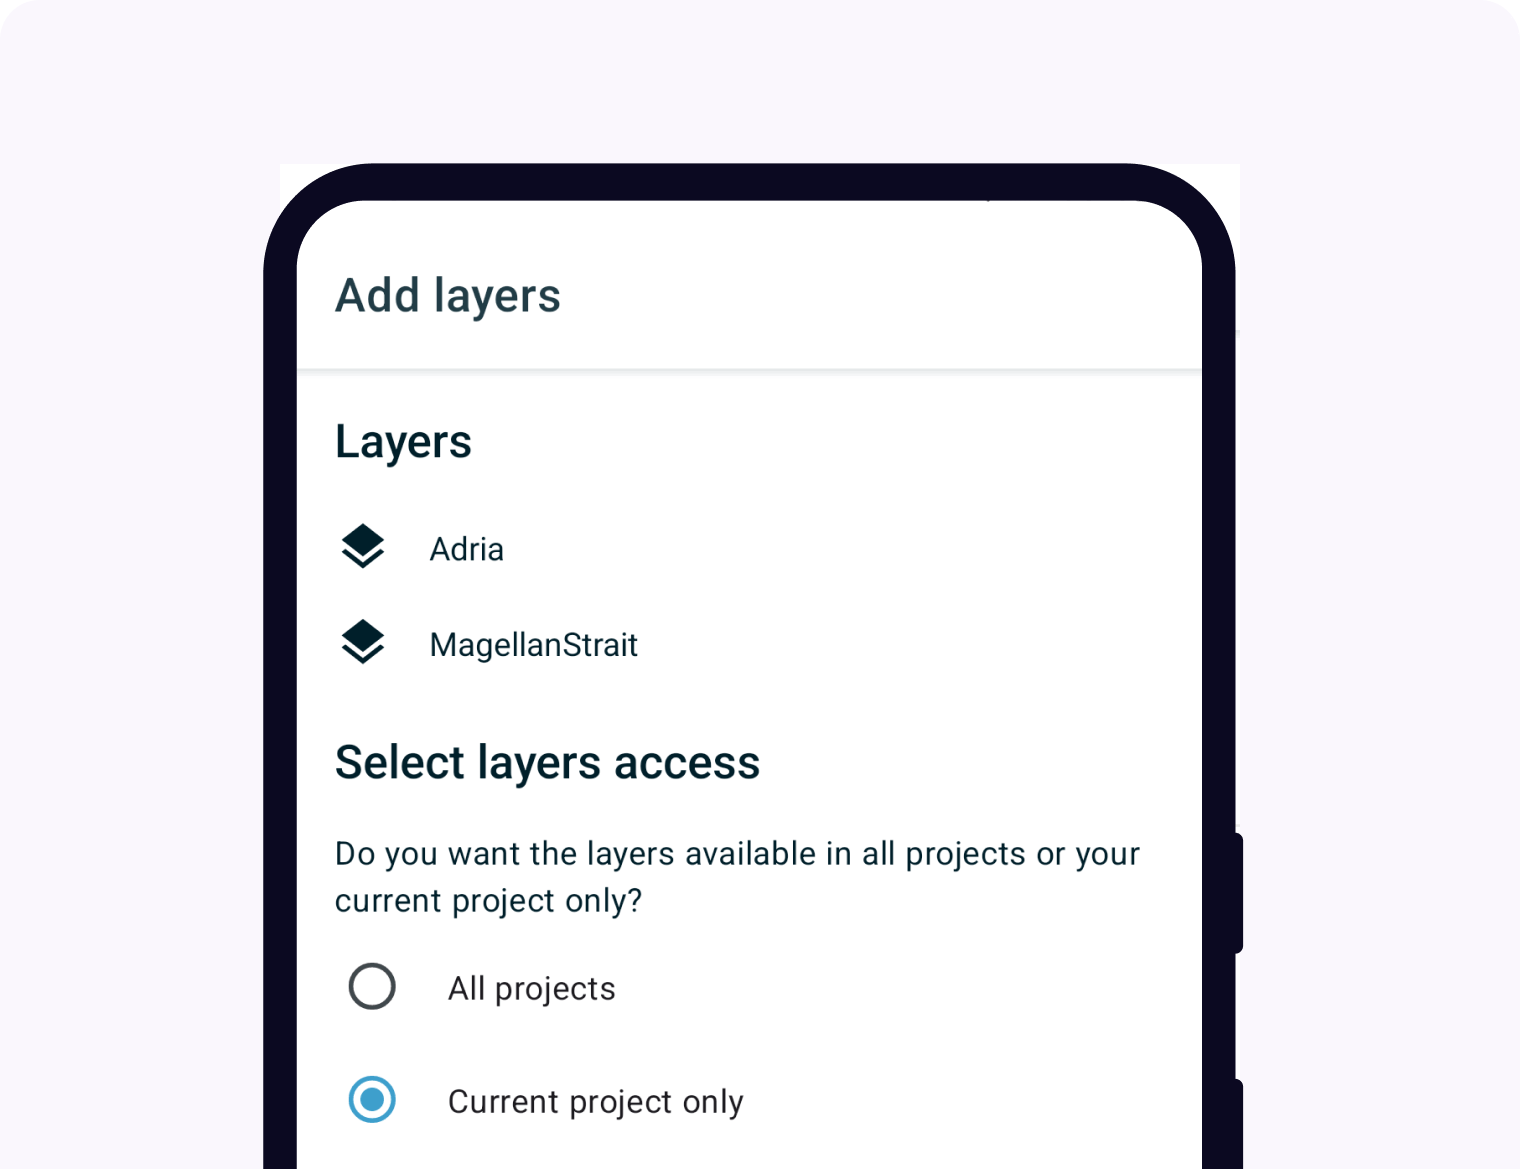
When you tap the Add layers button, you will see a file picker. To import a single file, tap on it and you will go back to Collect to finish the import process. If you need to import multiple offline layers, you can select multiple files. This process will vary by Android version and device type but it is usually done by tapping on their file type icon. After selecting multiple files, a select button will appear at the top or bottom right. Tap that button to confirm your selection and return to Collect.
Once you have selected the layer(s) that you want to import, you will see a confirmation screen showing the layer names and options for sharing the layer(s) between projects or not. This setting is only relevant if you use multiple Collect projects. If you use multiple projects and they use different offline layers, it can be helpful to import a different set in each individual project. Additionally, when layers are imported at the project level, they will be deleted when the project is deleted.
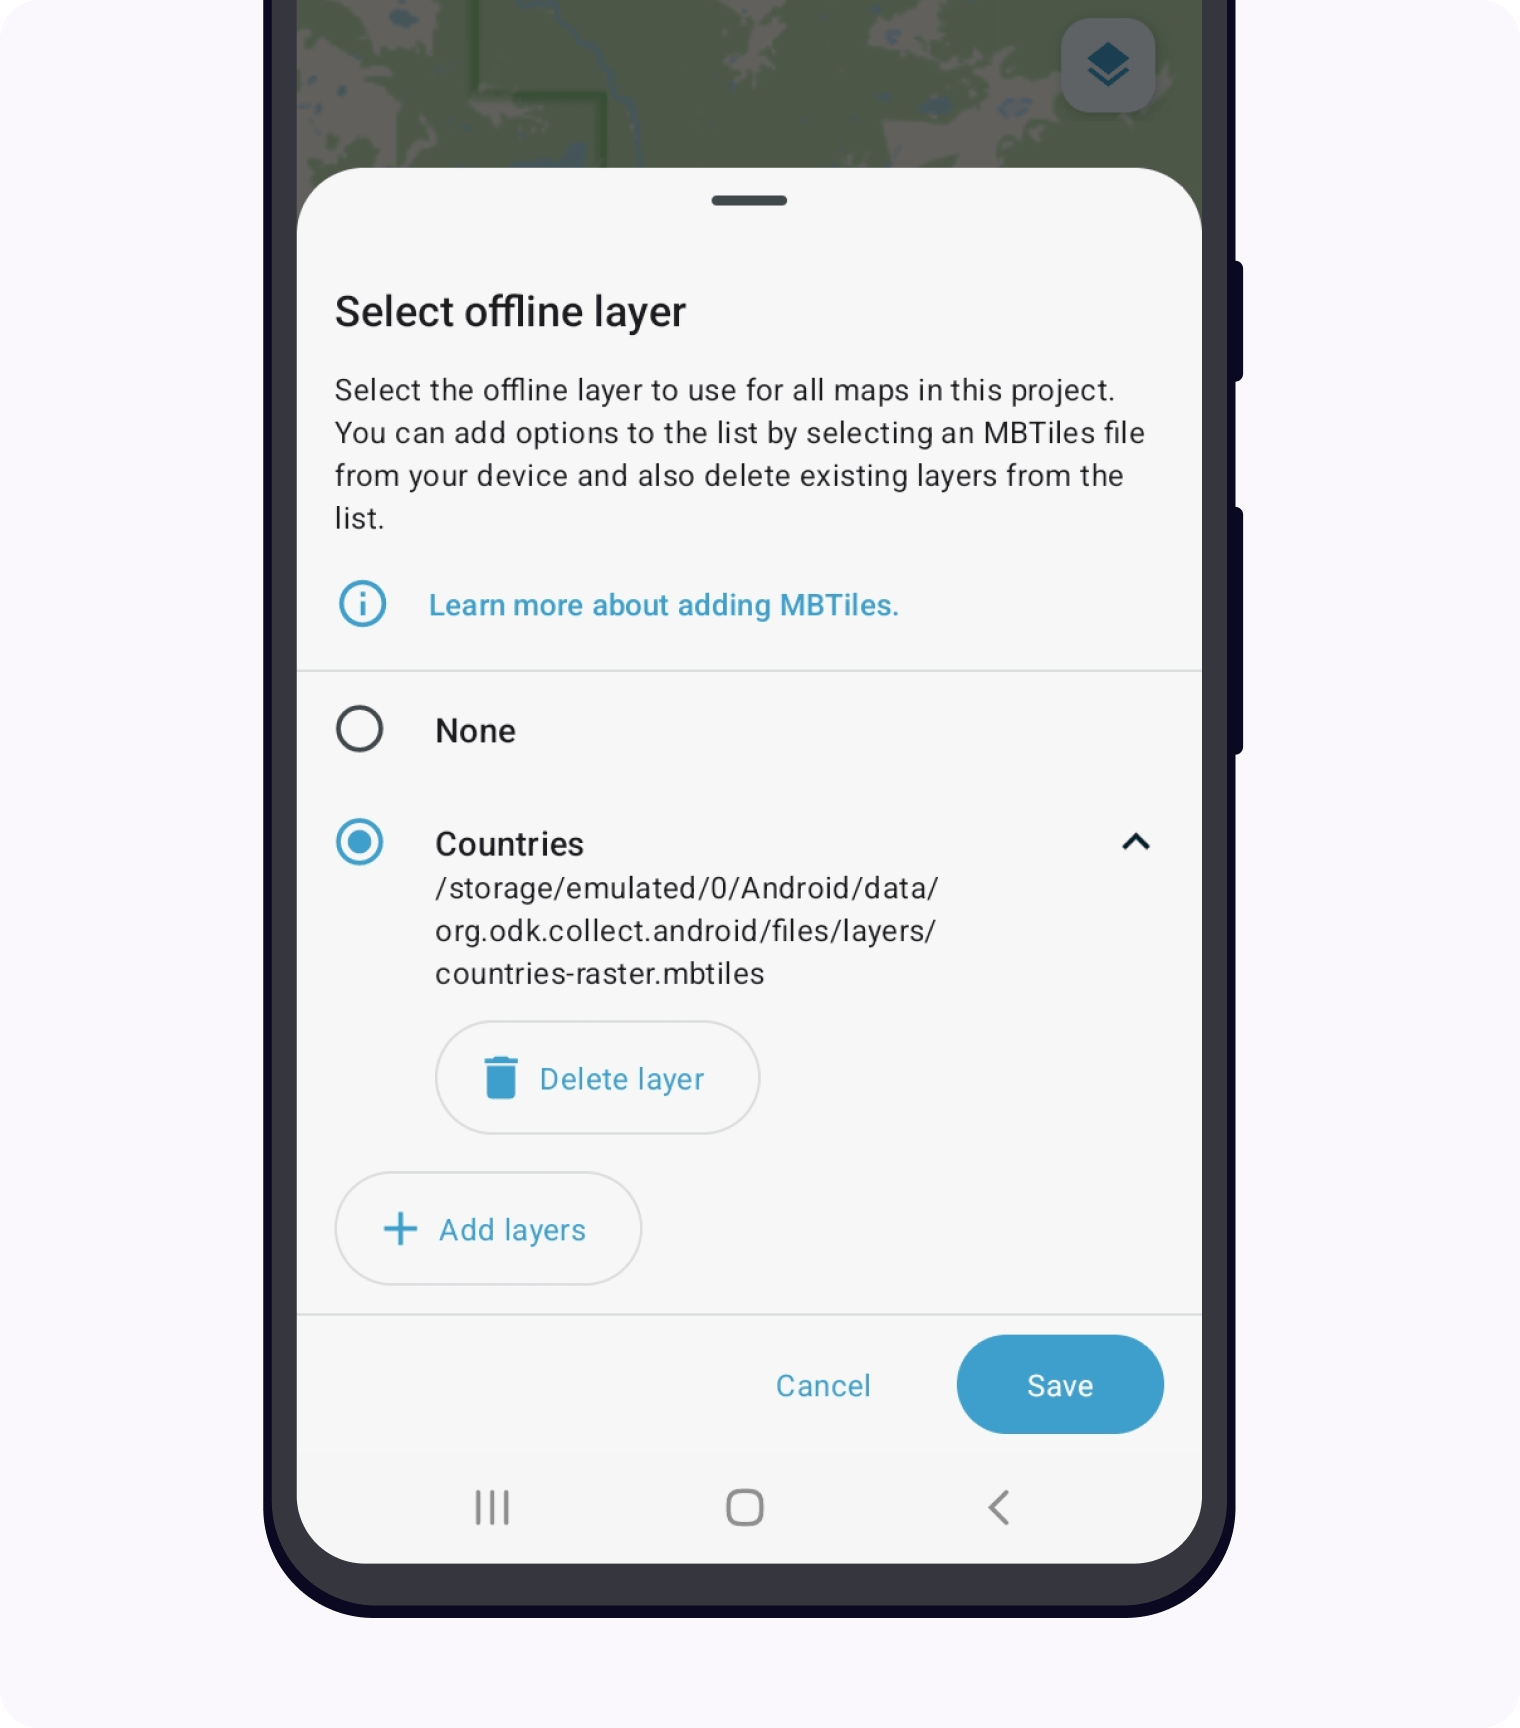
Once you confirm that you want to add the layer(s), you will see the newly added layer(s) in the layer selection list. The list shows the name specified by each MBTiles file. You can also see an offline layer's filename by tapping on its name to expand. This can be helpful if the filename is more descriptive than the embedded name.
When Collect imports MBTiles files from device storage, the files are copied, not moved. After they have been imported, it is safe to delete the source files from device storage, usually the Downloads folder, to free up space. Alternatively, you can keep source files and delete offline layers from Collect when they are no longer needed. To delete offline layer files, tap on the layer name to see an expanded view that includes a delete button.
Manually importing MBTiles files
Prior to ODK Collect v2024.2, MBTiles files had to be manually transferred to Collect's layers directory. This can still be done and may be a useful strategy when preparing multiple devices at once.
Place the MBTiles files in the layers subdirectory of the Collect directory, and ensure their filenames end in .mbtiles. You can do this by first downloading the files to the device and then moving them using the Files application (see the Play Store. Alternatively, you can connect the device to a computer and transfer the file(s) via USB or using adb.
Note
You can also add MBTiles files to a specific project by placing them in a project-specific layers folder: /sdcard/Android/data/org.odk.collect.android/files/projects/<project>/layers.
Selecting an offline layer
Once an MBTiles file has been imported into Collect, it is available for selection as an offline layer. An offline layer provides useful reference information in map views. An offline layer with no transparency acts like a basemap.
There are two ways to set the offline layer:
from Maps Settings
by tapping on the button that looks in a stack of layers () in a geopoint, geotrace, or geoshape question
Both options set the reference layer for all geopoint, geotrace, and geoshape questions in the current project. The choices in the Collect layer selection menu show the name specified in the MBTiles file.