Working with Docs in Windows using Cygwin
The main contribution guide :doc: contributing was built for *nix systems, and the same commands may not work in Windows. Cygwin is a Windows tool, equivalent to *nix bash terminal. This guide helps to set up ODK Docs platform from the default Windows command prompt (CMD).
The prerequisites
The following are software tools that you need in the first place. If it is already installed. Just follow the steps and apply what is missing.
Cygwin
Python 3
Virtualenv
Virtualenvwrapper-win
Git and GLFS
The requirements
These are a set of the main packages. ODK team combined them in a file such that all will be installed at once.
alabaster==0.7.10
Babel==2.4.0
docutils==0.13.1
imagesize==0.7.1
Jinja2==2.9.6
MarkupSafe==1.0
Pygments==2.2.0
pytz==2017.2
requests==2.14.2
six==1.10.0
snowballstemmer==1.2.1
Sphinx==1.6.1
sphinx-rtd-theme==0.2.4
sphinxcontrib-websupport==1.0.1
typing==3.6.1
update==0.4.4
Install Cygwin
Cygwin tool lets Windows users execute many *nix commands. Install Cygwin and add its path to Windows to work completely from the default command prompt. For instructions.
Warning
If you encounter any downloading problems, make sure to select a mirror site near you. The entire list is available on the Cygwin website.
Python 3
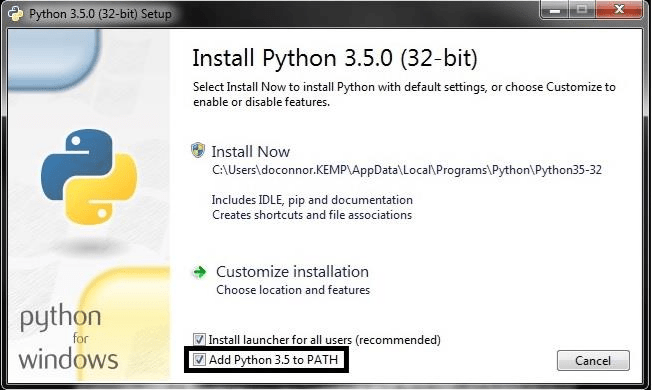
You need to install Python 3. Select Python installation that fits your system (32 or 64 bit). For instructions, see.
Make sure to select the option "Add Python to the Path", as shown below.
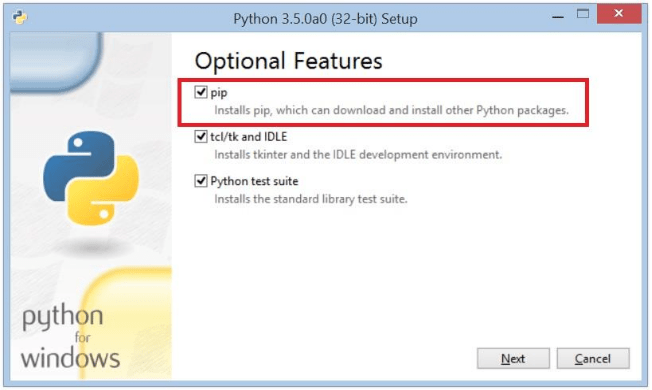
Next, make sure to select "pip", which is a package manager < https://pypi.python.org/pypi/pip>_ written in Python. We will use it to install packages. See the following image:
Alternatively, if you forgot to add Python 3 to the PATH, add it manually using the following command:
> set PATH=%PATH%;C:\Users\your username\python3
Tip
C:/Users/your username/python3 is the default Python 3 installation PATH. If you change it, please substitute the above path by the new one.
Virtual Environment
A virtual environment tool creates multiple Pythons environments, each has its packages and dependencies.
For easy installation, pip command can be used, which comes with Python 3 (as shown in Python installation).
> pip install virtualenv
Create a new directory for your odkdocs work:
> mkdir odk
To work with virtualenv, you have two options:
Use the native virtualenv.
Use virtualenvwrapper on the top of virtualenv.
Native Virtual Environment
Create a new Python 3 virtual environment, "odkenv" is the name of the virtualenv, you can choose any name.
> virtualenv -p <python path/python.exe> odkenv
After creating the virtualenv, multiple files are copied into the folder odkenv in your working directory.
> ls odkenv
The folder Scripts contains all virtualenv controls as ".bat" files.
To activate the odkenv:
> cd odkenv
.
.
.
> cd Scripts

> odk/odkenv/Scripts/activate.bat
To deactivate the odkenv:
> odk/odkenv/Scripts/deactivate.bat
Virtual Environment Wrapper
Tip
This step is not an alternative to virtualenv. You must install virtualenv first.
The Virtualenvwrapper <https://pypi.python.org/pypi/virtualenvwrapper-win> mediates between user CMD and virtualenv to ease management and working with multiple virtual environments. To install virtualenvwrapper, use the following:
> pip install virtualenvwrapper-win
Create a new virtualenv:
> mkvirtualenv odkenv
Once the odkenv is created, it is automatically activated:
(odkenv) /odk/docs
To deactivate the odkenv, write:
> deactivate
To activate the odkenv:
> workon odkenv
Git and GLFS
Install Git for windows. Make sure that git is installed properly by typing (git) in the CMD.
Install GLFS.
Android Tools
Install Android Debug Bridge <collect-adb> to learn more about ADB. ADB is part of Android studio, To download
To use ADB, you must run Android Studio once. The default location of ADB is C:/Users/your username/AppData/Local/Android/sdk/platform-tools. Add it to Windows PATH by using the following command:
set PATH=%PATH%;C:\Users\your user name\AppData\Local\Android\sdk\platform-tools
Fork and Clone the ODK Docs repo
From Github, fork the ODK Docs. This will create a copy of the docs in your Github account called origin. Move to the ODk working directory, and clone the ODk Docs into your local machine.
> git clone https://github.com/your-github-username/docs.git
Set the Upstream Remote
> git remote add upstream https://github.com/getodk/docs.git
Install the Requirements
This step will install a bunch of packages that are listed in the :file: requirement.txt file. ODK team prepared this file for you to ease the installation.
First, you need to activate your virtual environment (odkenv):
> workon odkenv
Make sure you are inside the docs folder, then run:
$ pip install -r requirements.txt
You completed the installation and you can start change and build ODK Docs.