Multilingual forms
community guide
ODK is used in data collection efforts worldwide, and its proficiency in handling questionnaires in multiple languages plays a crucial role in ensuring inclusivity and data accuracy. By offering survey forms in the preferred languages of both data collectors and survey respondents, we are able to dismantle language barriers, foster increased participation, and significantly enhance the quality and reliability of the data collected.
This guide will offer comprehensive, step-by-step guidance on developing a multilingual XLSForm template, equipping you with the essential skills needed to successfully incorporate this important feature into your ODK Forms. We will also suggest tools and best practices for designing multi-language forms, as well as describe different methods to identify the language used during data collection. In the final section, we delve into the difference between the questionnaire and ODK Collect app user interface language and how you can contribute to translating the latter to further enhance the app's accessibility and usability worldwide.
See also
Reference: Form Language
Building a multilingual XLSForm
All user-facing content in an XLSForm can be translated into multiple languages. This includes the label, hint, image, audio, video, constraint_message, required_message columns in the survey tab and label, image, audio, and video columns in the choices tab. In order to define multiple languages, you will need to follow a specific process to ensure that your form is properly configured for multi-language support.
You can also find a summary of this information in the XLForm template.
Step 1: add columns
Add columns for each of the languages you would like your form to support following the format: column name, two colons, the language name, followed by the two letter language code in parentheses. For example:
label::English (en)label::Español (es)

Keep in mind that it is important to be consistent with capitalization across language names throughout the form definition. For example, use English and Español with uppercase Es, as opposed to English and español, or label::English and hint::english.
We also recommend using the name of the language in that target language (e.g., Español rather than Spanish). For individuals who primarily identify with their native language, seeing the language name in its native form makes it easier to identify and select the correct language in the language selection menu.
Tip
Since adding translations can make copying and pasting between form definitions more challenging, if your organization or project requires developing multiple forms, it can be helpful to add common languages to your organization's XLSForm template, hide those language columns, and only display a specific language in forms in which that language is needed.
Step 2: fill in translations
Under each of these new columns, provide the translation for each field. Where you would normally have a label, hint, or other user-facing text, provide the equivalent in each language.

Keep in mind that blank cells in a language-specific column will be left blank in the form when that language is active, even if the "default" column has a value. In particular, if you are using media files, you will need to specify different files for each language even if using the same file for a question. For example, you will need an image::English (en) and image::Español (es) column even if you're using the same image for both.

Columns that are missing for languages will trigger warning messages when the XLSForm is being uploaded. As such, if certain translations or media files are not appearing as expected, reviewing the warning messages during the XLS upload process may help you identify the source of the problem.
A common issue that can lead to confusion for form developers when incorporating multiple languages is inadvertently omitting a specific language identifier in a column. For example, when there is a label::English (en) on the survey sheet, but in the choices sheet the column is simply named label with no language specification. To prevent such errors, double check that each language used is clearly marked with an explicit language label.
Note
When using custom form styling with Markdown or inline HTML/CSS, the formatting syntax should remain consistent and untranslated across different language versions.

The form's logic and calculations should also remain the same regardless of the language. The aspects that require translation are the user-facing elements, such as labels, hints, and other display texts.
Step 3: specify default language
In the settings sheet of your XLSForm, you can create a column named default_language to set the default language for your form when it's first opened on a device. This can be helpful if you know most of your data collectors will need to use the same language.

Note
The form_title is only in one language. At the moment, XLSForm does not support multilingual form titles. If you would like to have the title in multiple languages, you can add the form title with its translations within the single form_title field.
Step 4: test translations
Once you have added all the translations, you should test your form thoroughly in each language to ensure that all text and media appear as expected and that the form functions correctly.
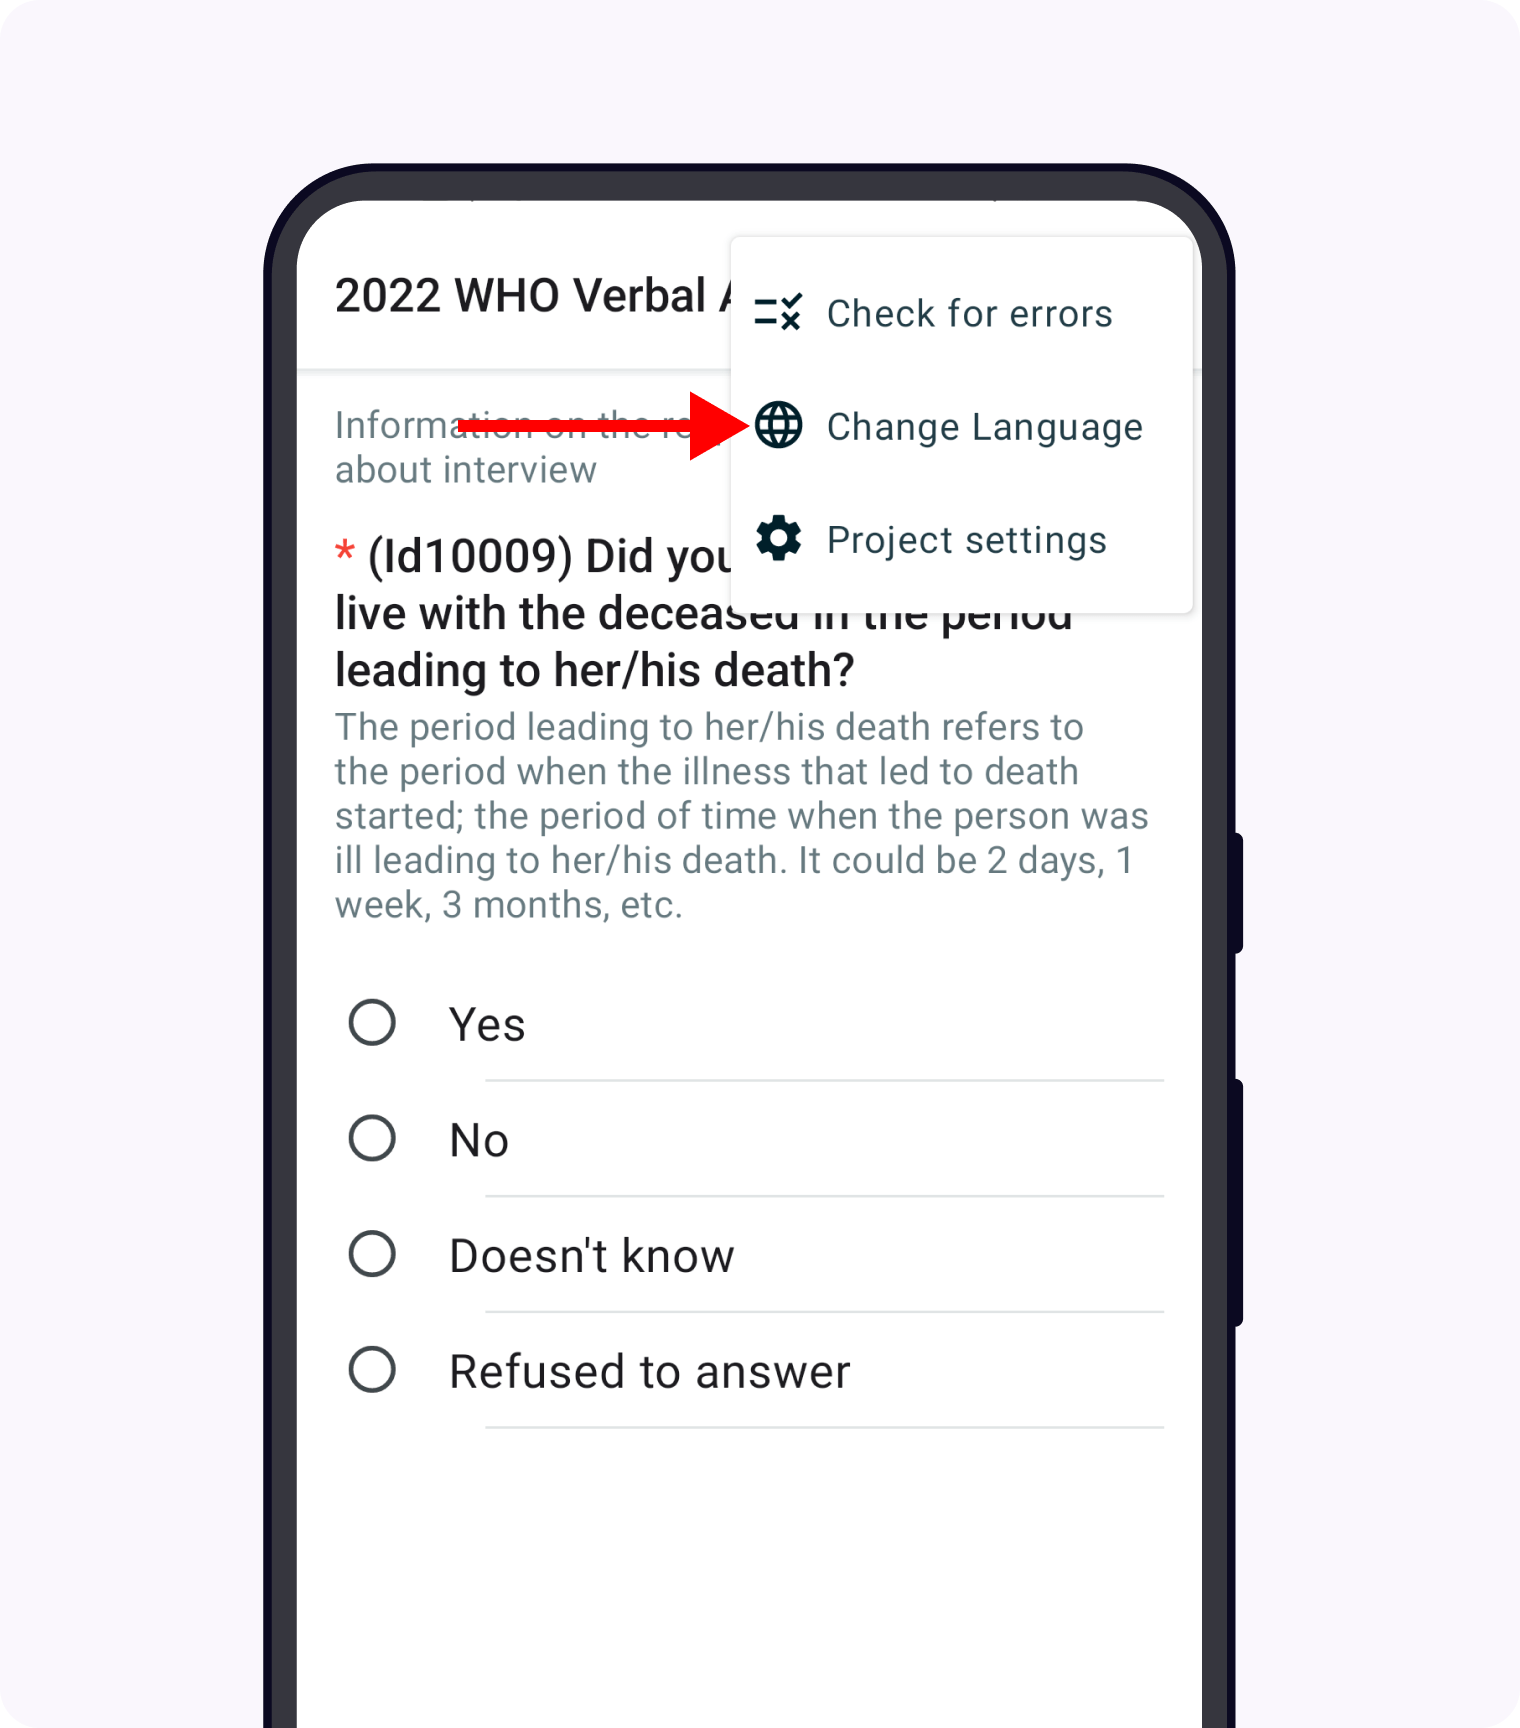
In ODK Collect, once you open a questionnaire form, click the menu with the three dots at the top right corner of the screen (⋮). A dropdown menu will appear with the selection Change Language as one of the options. Once selected, you will see a popup window with the form language options to select from.


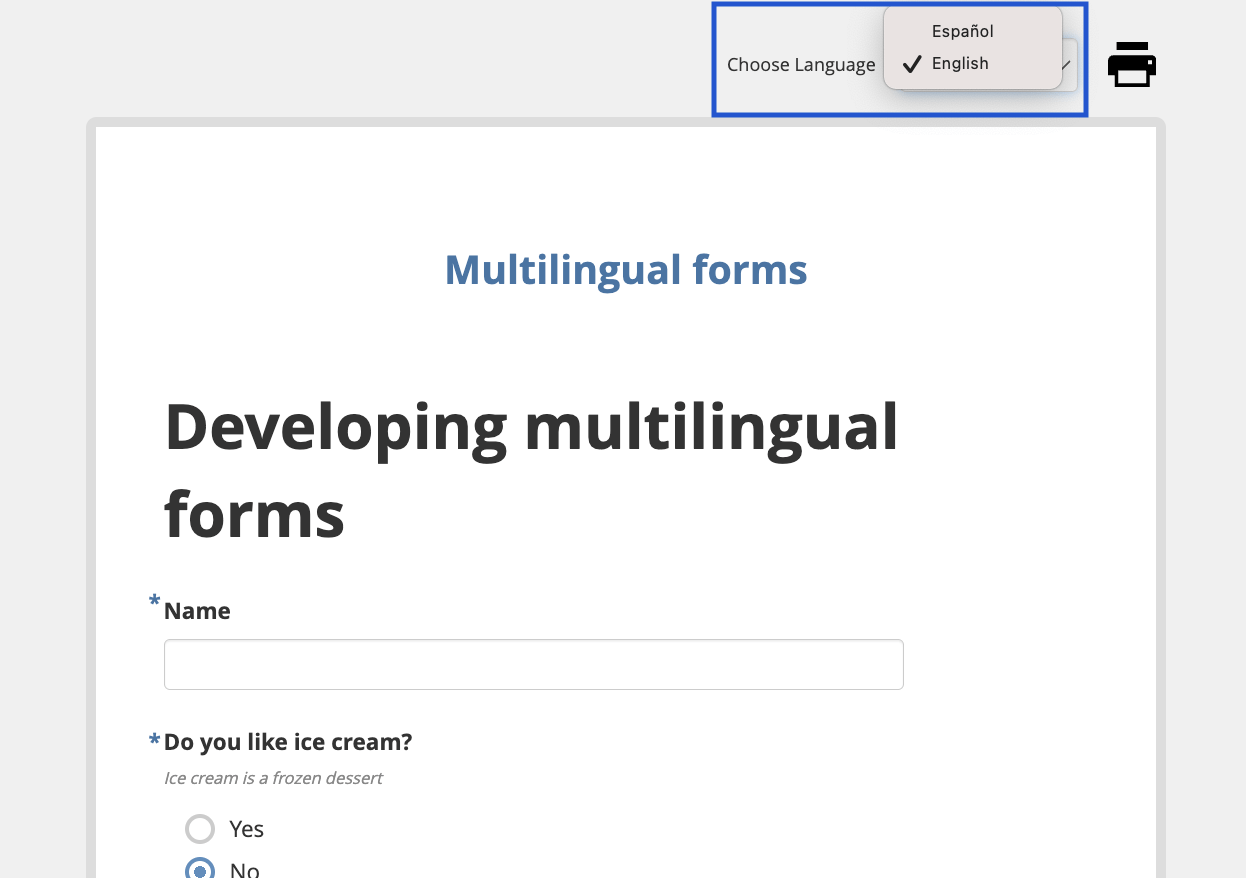
You can toggle between languages in Enketo using the Choose Language dropdown above the form.

Tips and best practices for designing a multilingual form
Now that you're familiar with creating a multilingual form, let's delve deeper into the tools and best practices essential for designing an effective multi-language form. The process of crafting multilingual questionnaires typically involves a blend of automated tools and professional translators to ensure accurate and culturally appropriate translations. By strategically planning your workflow and structuring your spreadsheet accordingly, you can streamline the translation process and enhance the overall efficiency and quality of your multilingual forms.
Tip 1: Prioritize primary language design and testing before translation
When creating a multi-language form, it's best to first focus on designing the form in your primary language. This allows you to concentrate on the form's structure, logic, and overall functionality without the added complexity of managing multiple languages.
Once developed, thoroughly test the form in its primary language. This testing should include reviewing:
Content (questions and choice lists are complete and clear)
Technical functionality (form logic, relevance, and calculations work as expected)
User experience (questions are understood as intended and the form is easy to navigate by data collectors). This step is crucial for identifying issues that might not be apparent from a form designer's perspective.
The primary objective during the initial phase of development is to ensure that the digitized form is complete, logically sound, and user-friendly. Any issues that exist in the primary language will only be magnified once translations are added. A well-designed and tested form in one language sets a solid foundation for a seamless translation process, and initiating the translation process only after the form has been rigorously tested prevents the need for re-translation following any post-testing modifications.
Tip 2: Consider different options for getting translations
Once your form is ready for translation, there are various tools you can use for translating your questionnaire and ways you can set up your XLSForm to facilitate the process.
Use the Google Translate function in Google Sheets
If you are designing your form in Google Sheets, you can use built-in access to Google Translate to get an initial approximation of the translated text. The function GOOGLETRANSLATE(cell, "source language code", "target language code") seamlessly converts content from the original to the desired language.

After translating the required cells, copy and then paste the translated column as "Values only." This important step converts the translated text into an editable format, allowing for further modifications if needed.
Tip
To efficiently translate only the non-blank cells in a Google Sheets column, apply this formula: =IF(CELL <> "", GOOGLETRANSLATE(CELL, "en", "es"), ""). After entering it in the first cell, drag the formula from the cell's bottom right corner down to the last cell you wish to translate. This method ensures that only cells with text are translated, skipping any blank cells for optimal efficiency.
This method can offer a convenient starting point for translation in your form development but should not be treated as final. It is highly recommended to have native speaker review for context and cultural sensitivity. Automated translation systems, while efficient, often lack the ability to fully grasp and convey nuances, idiomatic expressions, and cultural contexts inherent in languages. A native speaker can identify and correct potential errors, misinterpretations, or cultural insensitivities, helping to ensure that the translated content is both accurate and appropriate for the intended audience.
Get human translations
When working with human translators, consider the translation tools they are used to and how you can streamline their processes.
Regardless of the mechanism you use to share text to translate, you should remind your translators that formatting syntax and references to variable names – any text in ${...} – should not be translated.
Edit the XLSForm directly
You can organize your Form with the dedicated multi-language columns so that translators can edit the necessary cells directly. To streamline and facilitate their task, consider highlighting the cells designated for translation to provide a clear, visual guide that accelerates the process and reduces the likelihood of errors.

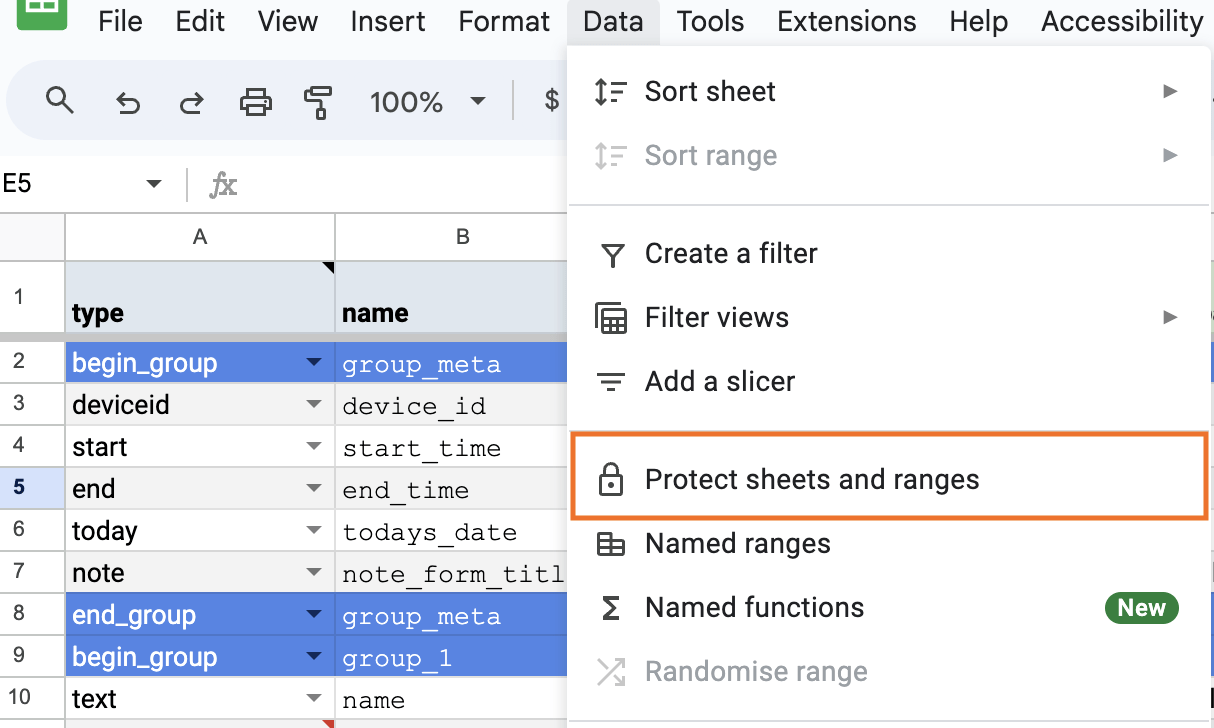
If you are are concerned that a translator might accidentally edit other cells in the sheet, you can protect all the sheets and/or cells that should not be translated. For example, to do this in Google Sheets, go to Data > Protect Sheets and ranges and restricting the editing of all other cells so that only those that need translation can be modified.

Use a dedicated tab in the XLSForm
Another way to safeguard your XLSForm file from unintended modifications during the human translation process is to create a new tab named "Translations" and instruct the translator to input their translations there. Once the translations are finalized, you can then carefully copy and paste the translated columns into their respective sheets.
Extract columns to be translated
If working with a human translator, one way to facilitate the workflow is extracting all the columns that need to be translated to share in a separate XLS file or Google Sheet and assign adjacent cells for the translator to input their translations. This structured approach allows you to easily copy and paste the translated text back into the XLSForm and also safeguards against accidental modifications to critical cells. You might also consider providing context or notes for complex phrases to ensure accuracy and clarity.
Some ODK community members and developers are finding ways to facilitate translation workflows through automating processes, such as the method shared in this ODK Forum thread to generate
.pofiles.Use a specialized translation platform
If you are translating a questionnaire into several languages or translating multiple survey forms, a tool like Transifex can be very helpful. Transifex is a cloud-based platform designed to facilitate the localization and translation of digital content and allows teams to collaborate efficiently on translation projects. Project managers, form developers, and translators can all contribute and manage their work in real time. It also has a marketplace of translators so that you can hire language experts.
Tip 3: Test the translated form with local language experts and data collectors
Oftentimes, a literal translation is not the best way to get the right data. Thus, it is important to go beyond a word-for-word translation to ensure the questions are culturally relevant, clear, and correctly interpreted by survey respondents. Some ways to achieve this include:
Collaborating with translators who are not just fluent in the language but also deeply understand the cultural context of data collection. Such individuals (e.g., fieldworkers, community leaders) can provide insights into local dialects, idioms, and cultural nuances that a direct translation might miss.
Conducting field tests with real data collectors who are native speakers of the language. Observing fieldworkers as they use the form in the field can reveal misunderstandings, confusing wording, or cultural misalignment.
In addition to capturing accurate data, it is important to be mindful of cultural sensitivities and taboos in data collection efforts. Phrases and questions that are innocuous in one culture might be problematic in another. This is where the support of local, native speakers and field testing can be invaluable.
Identifying the language used for data collection
Knowing the language a multilingual form was administered can itself be an important piece of data. There is currently no direct way to get this information when downloading data from ODK Central, but there are two methods you can use to achieve this.
The first way is to include a select_one question at the end of the survey asking for the language used by the respondent. This has the advantage of being explicit and can be used to capture situations in which multiple languages were used, for example if a respondent is bilingual and has different language preferences depending on the topic.
To automatically detect the language used, you can add a calculate field with the jr:choice-name() function to pull the label of a response to an existing survey select in the active language. You can then use that label to compute a language code.
XLSForm — Detect language used
type |
name |
label::English (en) |
label::Español (es) |
required |
calculation |
|---|---|---|---|---|---|
select_one yes_no |
like_icecream |
Do you like ice cream? |
¿Te gusta el helado? |
yes |
|
calculate |
yes_label |
jr:choice-name('yes', '${like_icecream}') |
|||
calculate |
language |
if(${yes_label} = 'Yes', 'en', 'es') |
list_name |
name |
label::English (en) |
label::Español (es) |
|---|---|---|---|
yes_no |
yes |
Yes |
Sí |
yes_no |
no |
No |
No |
In the example above, the calculate expression for the yes_label field gets the label value for 'yes' from the choices defined in the like_icecream question. The subsequent field language uses an if() statement that evaluates to en if the label for 'yes' is 'Yes' and es otherwise. You can nest if calls if you have more than two languages.
Warning
When picking a value to do a label lookup for, make sure to use one that has different labels across all languages! For example, "no" is the same in English in Spanish so would not be a good choice for this approach.
This creates a column in the submission data that indicates the language set at the time the form was submitted.

If your form does not use any select_one question, you can define one specifically for language detection and set its relevant column to false(). In that case, you can define a list with a single choice and the language name for each label value.
Form language vs. application UI language
Up to this point, our focus has been on the languages used within the questionnaire forms. However, it's important to note that the ODK Collect app and the Enketo web form interface both support multilingual functionality. This means that not only can the survey content be presented in multiple languages, but the app's user interface, instructions, and navigation elements can also be displayed in various languages. This feature makes it possible for data collectors to navigate the app in their preferred language.
By default, Collect uses the language set in the device settings and Enketo uses the language set in the browser settings.
You may want to change the ODK Collect UI language separately from device settings. You can do this from the main Project screen: (1) click the project icon at the top right. (2) Once the Project window popup appears, click "Settings". This will open the Project settings screen. (3) Select User interface, followed by Language in the next screen. You will then see a menu of all the Collect UI languages to select from.
Contribute to translating ODK
ODK uses the Transifex platform to facilitate translation of the ODK Collect app. You (yes you!) can play a pivotal role in expanding the app's language options and/or enhancing current translations through Transifex. To get started, follow the ODK Collect translation guide and if you have questions, post in the the translation category on the ODK Forum.
Empowering multilingual data collection
This guide aims to empower you with the knowledge and skills necessary to effectively implement multilingual capabilities in your ODK forms. The significance of linguistic inclusivity in data collection is crucial, as it not only enhances the quality and reliability of the data collected but also demonstrates respect for diverse cultures and contexts. By embracing multilingualism in your data collection tools, you can help build a more inclusive and globally responsive research environment.