Entities tutorial: Community reporting
Many kinds of organizations use forms to capture problem reports from their communities:
hospitals ask patients and nurses to report unclean conditions or missing supplies
student leaders ask other students to make suggestions to improve their schools
towns ask residents to report broken streetlights, fallen trees, etc
In this tutorial, you'll use Entities to build out a workflow in which town residents report problems and town employees address them.
See also
Behind the scenes video from the development of this tutorial.
Goals
Create Entities from form submissions
Access Entities in a follow-up form
Update Entities from form submissions
Capture problem reports with a simple form
See also
If you're not yet confident with building XLSForms, start with XLSForm tutorial: Your first form.
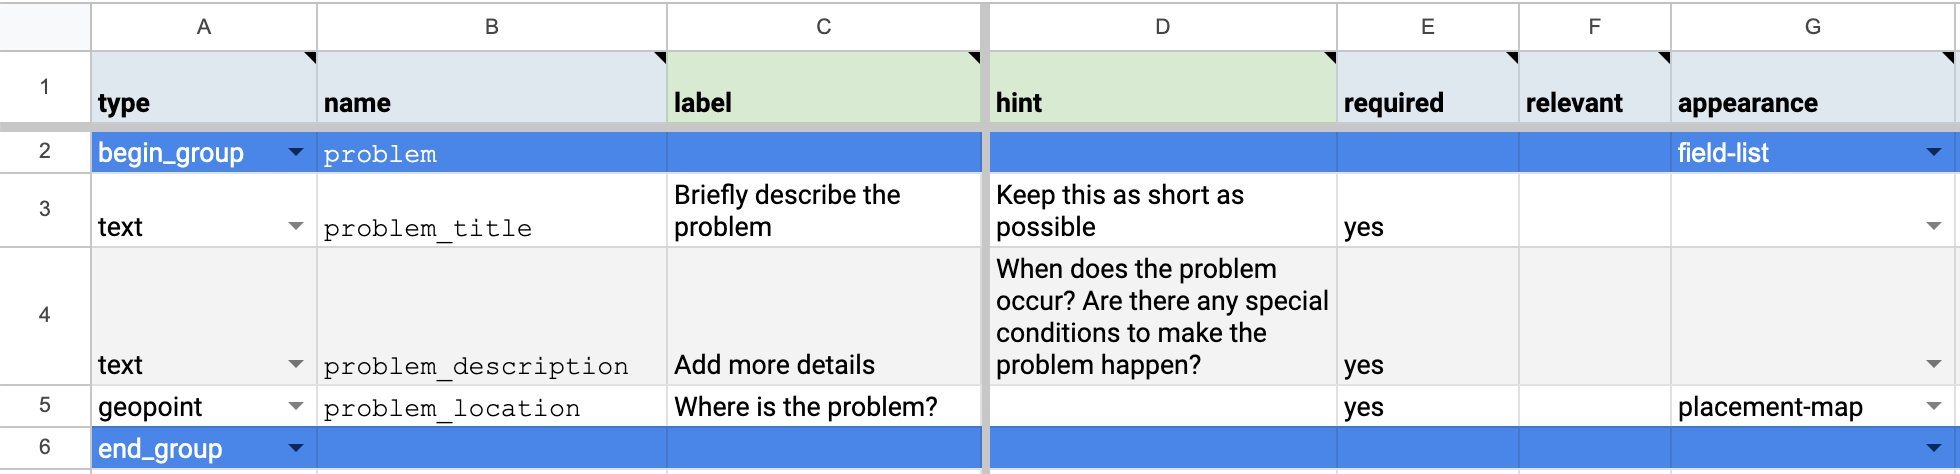
A problem report form can be very simple. All you must capture so that town employees can find and fix reported problems are a title, a description and a location. You can build a form to capture that information yourself or use our example.
You could stop here and build a workflow around this simple form. For example, you could publish the form as a Public Access Link, make a QR code from it (using a service such as Adobe's), and post it in public locations for community members to use. Then you could have town employees watch the form submissions in Excel and use additional columns in a shared spreadsheet to manage the process of addressing new problems.
This approach requires manual intervention and coordination through a spreadsheet, both of which can be time-consuming and error-prone. Let's instead use ODK Entities to help manage addressing problems in real time.
Create Entities for each reported problem
We'd like to have reported problems automatically become available in another form so that town employees can manage and address those problems. To do this in ODK, we can use Entities. An Entity represents a unique thing that can be shared between various forms (see Managing Entities in Central).
Let's start by taking our existing Report a problem form and have it create Entities representing problems.
Open or create the
entitiessheet in theReport a problemform.In the
list_namecolumn, put the name of the Entity List that you want to create Entities in:problems. This name will generally be a plural noun representing a collection of the things you want to share between forms.In the
labelcolumn, put an expression to define the label for each problem:${problem_title}. This label will be used in Central to identify each entity as well as in any selects you define in follow up forms.
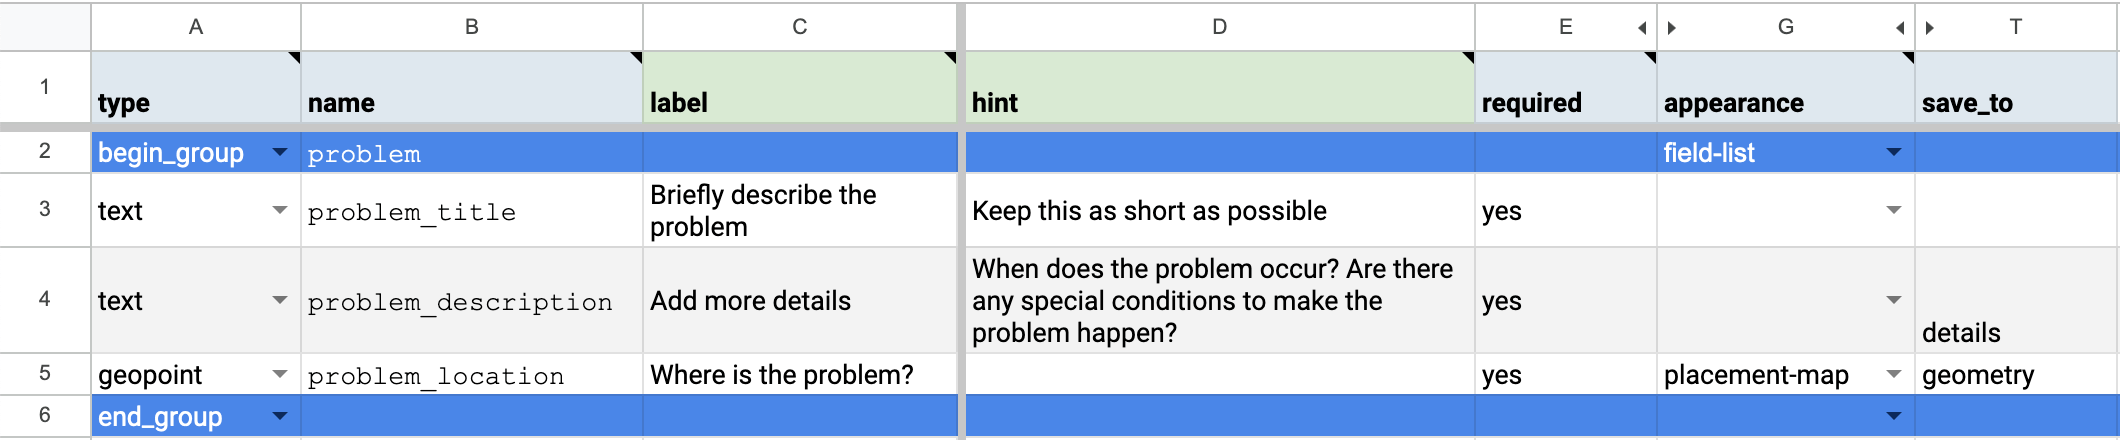
These additions will make submissions for this form create problems with a user-defined label and a system-generated unique identifier. In this case, you also want to make the problem details and location available to follow-up forms.
Open the
surveysheet in theReport a problemform.Find or add the
save_tocolumn (it is not included in the XLSForm template by default).In the
save_tocolumn for the form field that captures the problem description, put the name of the Entity property to save the value to:detailsIn the
save_tocolumn for the form field that captures the problem location, put the name of the Entity property to save the value to:geometry. Using the special property namegeometrywill allow you to show allproblemson a map in a follow-up form (see select one from map).
See the working Report a problem form.
Verify that Entity creation works
Entities aren't currently created as part of form draft testing so you will need to work in a real project to test your form.
Navigate to or create a Central project that you will use just for tutorials and testing (see the guide on testing forms).
Warning
You can use an existing project that has real forms but note that entity lists can't yet be deleted so the
problemslist you create will exist until entity list deletion arrives in Central.Click on the New button and upload your new form. Depending on how you are authoring XLSForms, you may first need to download or export the form as XLSX.
Fix any form conversion errors and then publish the form.
Click on the Submissions tab and then the New button to use a web form to create one or more new submissions.
Refresh the submissions table to see the new submission(s) and then click on on More on one of the submissions to see the submission details page. You should see that this submission created an Entity in the
problemslist: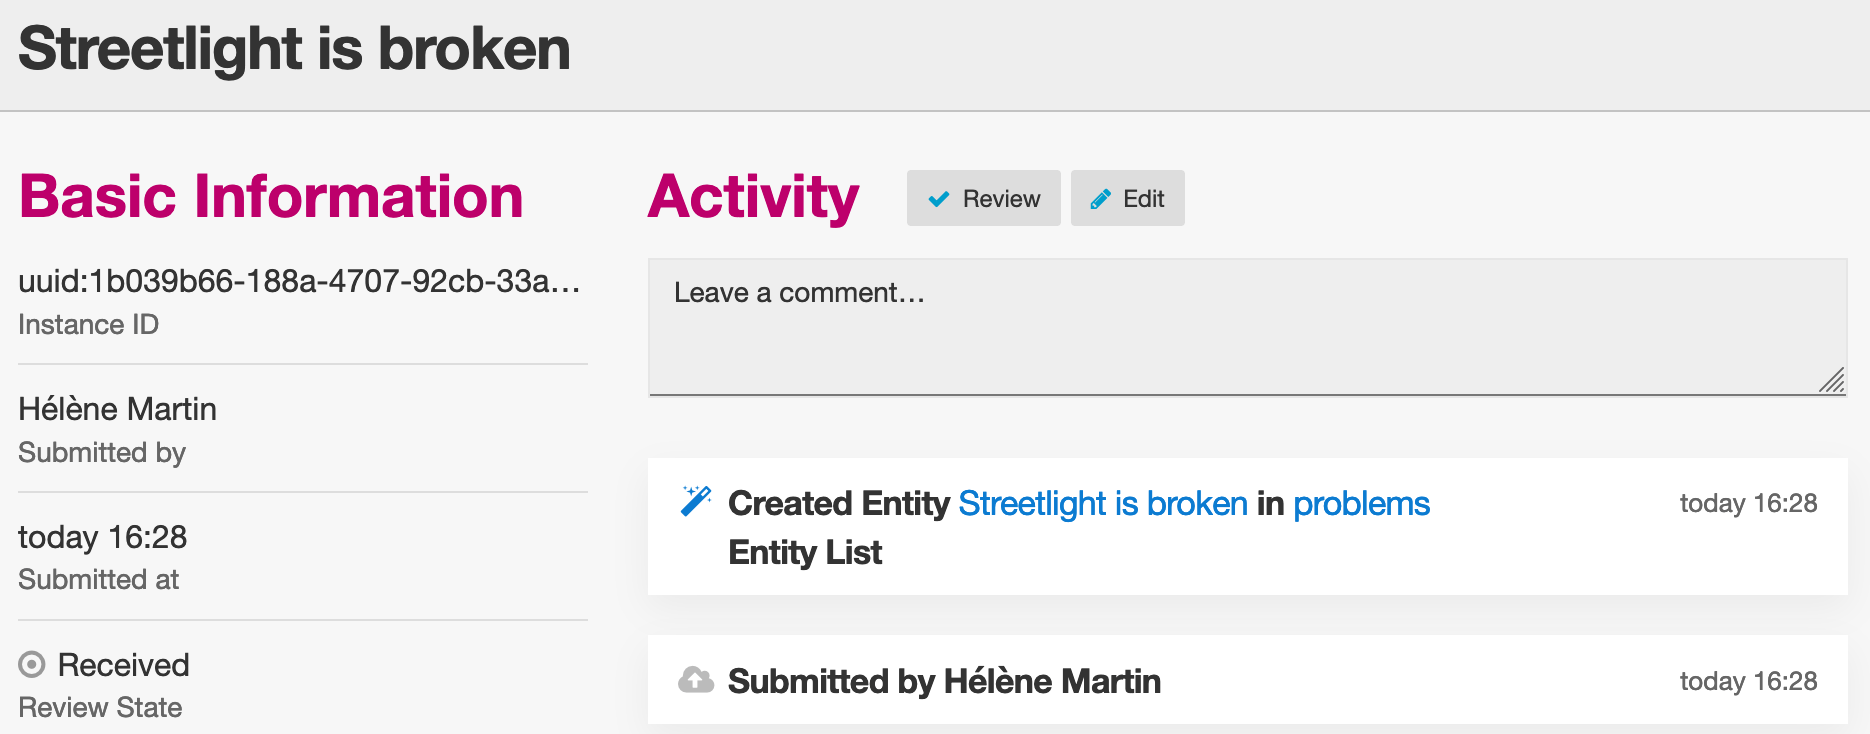
View reported problems on a map
Let's now create a second form which will be used by town employees to view reported problems on a map.
Create a new form by copying the XLSForm template. Give it the filename
Address a problem.Go to the
settingssheet.In the
form_titlecolumn, put a title that people who interact with this form should see:Address a problemIn the
form_idcolumn, put an ID that uniquely identifies this form:address_problemAdd a field list group to show multiple questions on a single screen:
Go to the
surveysheet.In the
typecolumn, putbegin_groupIn the
namecolumn, putentityIn the
appearancecolumn, putfield-list
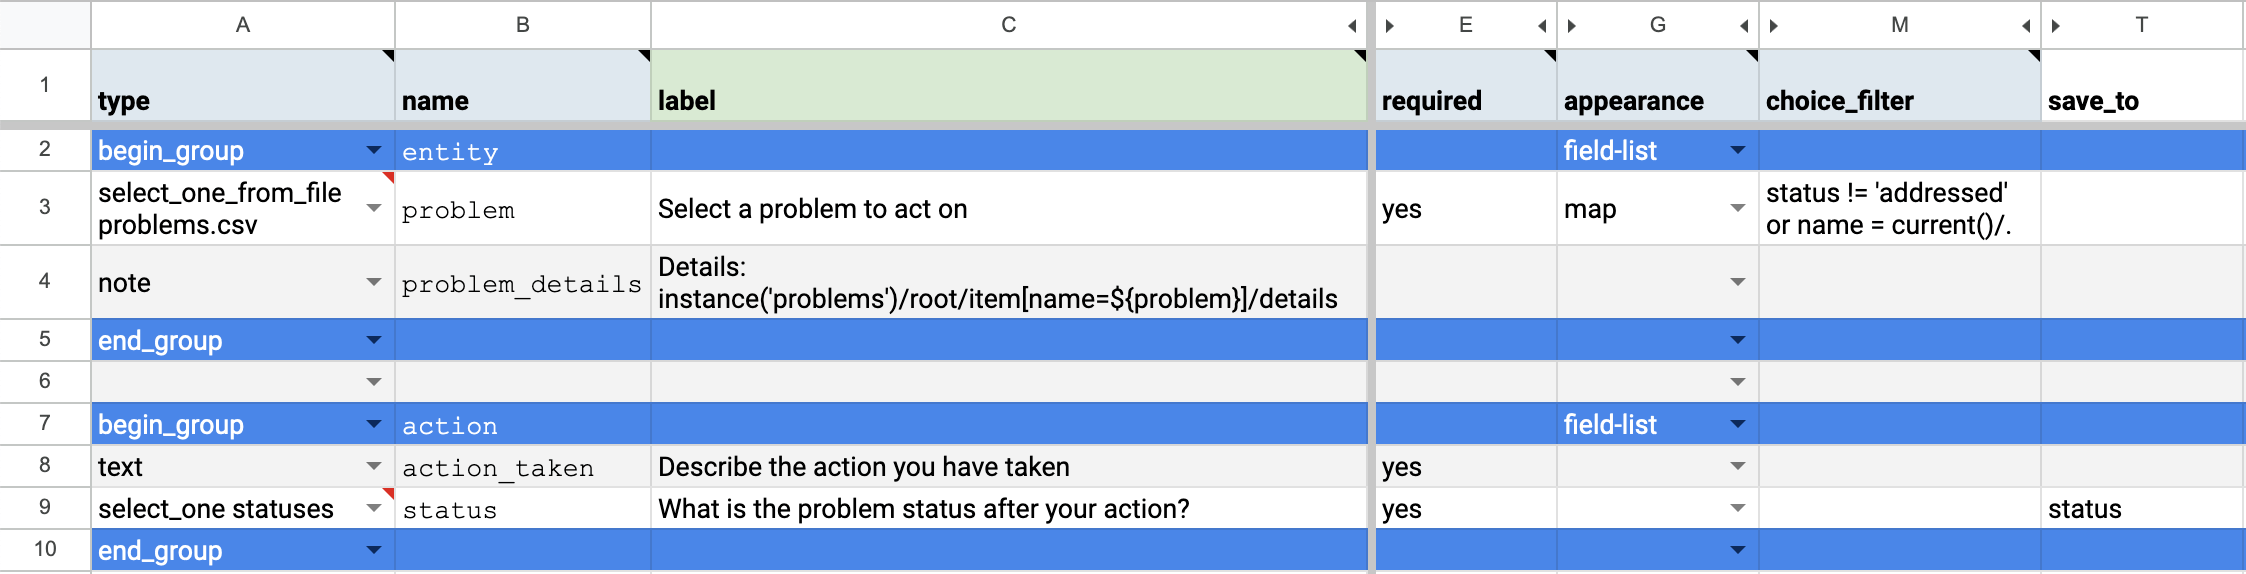
Add a select question that shows all reported problems on a map:
In the
typecolumn, putselect_one_from_file problems.csvwhich will automatically link to theproblemsEntity List because of theproblems.csvfilename.Warning
The filename specified is case-sensitive and it must exactly match the Entity List name specified in the problem reporting form or the two forms will not share Entities.
In the
namecolumn, putproblemIn the
appearancecolumn, putmap
Add a note question to show the selected problem's details:
In the
typecolumn, putnoteIn the
namecolumn, putproblem_detailsIn the
labelcolumn, putDetails: instance('problems')/root/item[name=${problem}]/detailsNote
Don't worry if this part looks unfamiliar. Copy it as is, and after you finish the tutorial, you can learn more in the
List lookupssheet in the XLSForm template.
Close the field list group:
In the
typecolumn, putend_group
Upload the form to Central in the same project as the
Report a problemform and try its draft. If you use the draft QR code in the Collect mobile app, you will see a map of all reported problems. If you use a web form for testing, you will see a list of reported problems by label (because select from map is not yet implemented).
You can now view reported problems! When a new problem is reported, it will appear in the follow-up form the next time the form is updated. If you're online, updates typically happen automatically every 15 minutes.
Capture information about the action taken
You can now add to the Address problem form to capture information about any actions that the town employee takes.
Add a field list group to show multiple questions on a single screen:
Go to the
surveysheet.In the
typecolumn, putbegin_groupIn the
namecolumn, putactionIn the
appearancecolumn, putfield-list
Add a text question to get a description of the action taken:
In the
typecolumn, puttextIn the
namecolumn, putaction_takenIn the
labelcolumn, putDescribe the action you have taken
Add a select question to get the new status of the problem:
In the
typecolumn, putselect_one statusesIn the
namecolumn, putstatusIn the
labelcolumn, putWhat is the problem status after your action?
Go to the
choicessheet.Add a choice for actions that address the problem:
In the
list_namecolumn, putstatusesIn the
namecolumn, putaddressedIn the
labelcolumn, putAddressed
Add a choice for actions that don't fully address the problem:
In the
list_namecolumn, putstatusesIn the
namecolumn, putneeds_followupIn the
labelcolumn, putNeeds follow-up
Update your draft in Central and try it out to make sure it works as intended.
Update a problem's status
You can now capture information about problems that are addressed or that still need action. However, this is not that useful because problems that have been addressed are still visible from the Address problem form which could lead to confusion and duplication of effort.
We need to filter out addressed problems from the select in Address problem so that it only shows problems that require action.
Let's update a problem Entity's status when the Address problem form is filled out about it. We'll then be able to filter out problems with a status of addressed.
Declare that this form's submissions should update Entities in the
problemsEntity List:Go to the
entitiessheet of theAddress problemform.In the
list_namecolumn, putproblemsDelete the
labelcolumn if it exists because this form does not need to update the label ofproblemEntities.In the
entity_idcolumn (you may need to add it), put${problem}to indicate that the value of theproblemform field represents the unique identifier of theproblemEntity to update.
Update the value of the
statusEntity property:Go to the
surveysheet.In the
save_tocolumn (you may need to add it) for thestatusfield, putstatus
Filter out problems with a status of
addressedIn the
choice_filtercolumn for the row of the question namedproblem, putstatus != 'addressed'to indicate that only problems with a status other than'addressed'should be included.
Note
Using a filter like this means it will not be possible to edit submissions on the server because the selected Entity that was addressed by the submission will be filtered out on edit. In many Entity-based workflows, submission edits are unnecessary and can be avoided. In this workflow you can allow them by changing the choice filter to status != 'addressed' or name = current()/..
Fix any form conversion errors and then publish the form. Entity updates currently only work with a published form, just like Entity creation.
See the working Address a problem form.
Try out the full workflow
Let's report a few problems using the web form.
In Central, go to your project or the server landing page and then click on the
*icon to the right of theReport a problemform. That icon and the number next to it represent the total number of current submissions. Clicking it will jump directly to the Submissions tab.
Click the New button to initiate a new submission.
Report a few problems in different locations.
You could also address problems using the web form but to get the map view, let's use the Collect mobile app.
Go to your project page in Central.
Click on the App Users tab.
Create a new App User with name
Employee1.Scan the App User QR code from Collect.
Click on the Form Access tab.
Give
Employee1access to theAddress a problemform. You can optionally also given it access toReport a problem.Open the
Address a problemform and address some problems! Make sure to tap the refresh button in Start new form before each problem resolution (⟳) to get the latest status updates.
You now have two forms that work together to support a problem reporting and resolution workflow that can be applied to many different environments.
Note
Addressed problems are filtered out of the Address a problem select but they are still sent to all devices. This will become impractical after tens of thousands of problems. In a future ODK version, it will be possible to archive Entities that are no longer needed.
Your turn
Can you set a
marker-colorEntity property to#FFFF00(yellow) if the status is set toneeds_followup? (hint: use acalculationwithif)Can you set a
marker-symbolEntity property to❗️if the status is set toneeds_followup?Can you show addressed problems on the map with a ✅ symbol instead of filtering them out?
Can you specify a constraint to show an error when an addressed problem is selected? (note: this is incompatible with server-based submission edits, just like the original choice filter)