Entities tutorial: share choices across forms
If your project uses multiple forms that reference the same households, sites, products, other shared choices, keeping those lists in sync across forms can become difficult. With Entity Lists, you update shared data once and every connected form automatically stays in sync, saving you time and helping field teams collect more accurate data.
In this tutorial, you will:
Convert existing choice lists to Entity Lists
Configure select questions to use choices from Entity Lists
Add Entities directly in Central and with forms
We recommend working in a Central project for tests and tutorials.
Example scenario: program sites
Let's say that you run a multi-site program. You may have forms to:
Register new participants
Take attendance at events
Record service delivery
Each of these forms includes a question to select a site:
Here are some minimal forms you can try yourself:
We recommend uploading each form to your test project in Central and publishing it. You can also create an App User that has access to each form to try them in Collect.
Let's say that a new site gets added. With the way these forms are structured, you would need to update all three of them! Instead, we'll move the lists out of the forms and replace them with a shared Entity List.
Create a new Entity List
Open any one of the forms for editing in your spreadsheet software. Start by copying the name and label columns from the choices sheet into a new spreadsheet document.
Rename the name column to code. For Entity Lists, name is reserved for the automatically generated Entity ID, so we'll store our own site code in a separate code property instead. Save this sheet as sites.csv.
In Central, navigate to your project, go to the Entity List tab, and click on the New button. Name your new Entity List sites.
Once you have created the list, you will need to tell Central the properties that each Entity in the sites Entity List should have. Go to the Properties tab, click the New button, and add a code property. Every Entity must have a label so you don't need to explicitly add it.
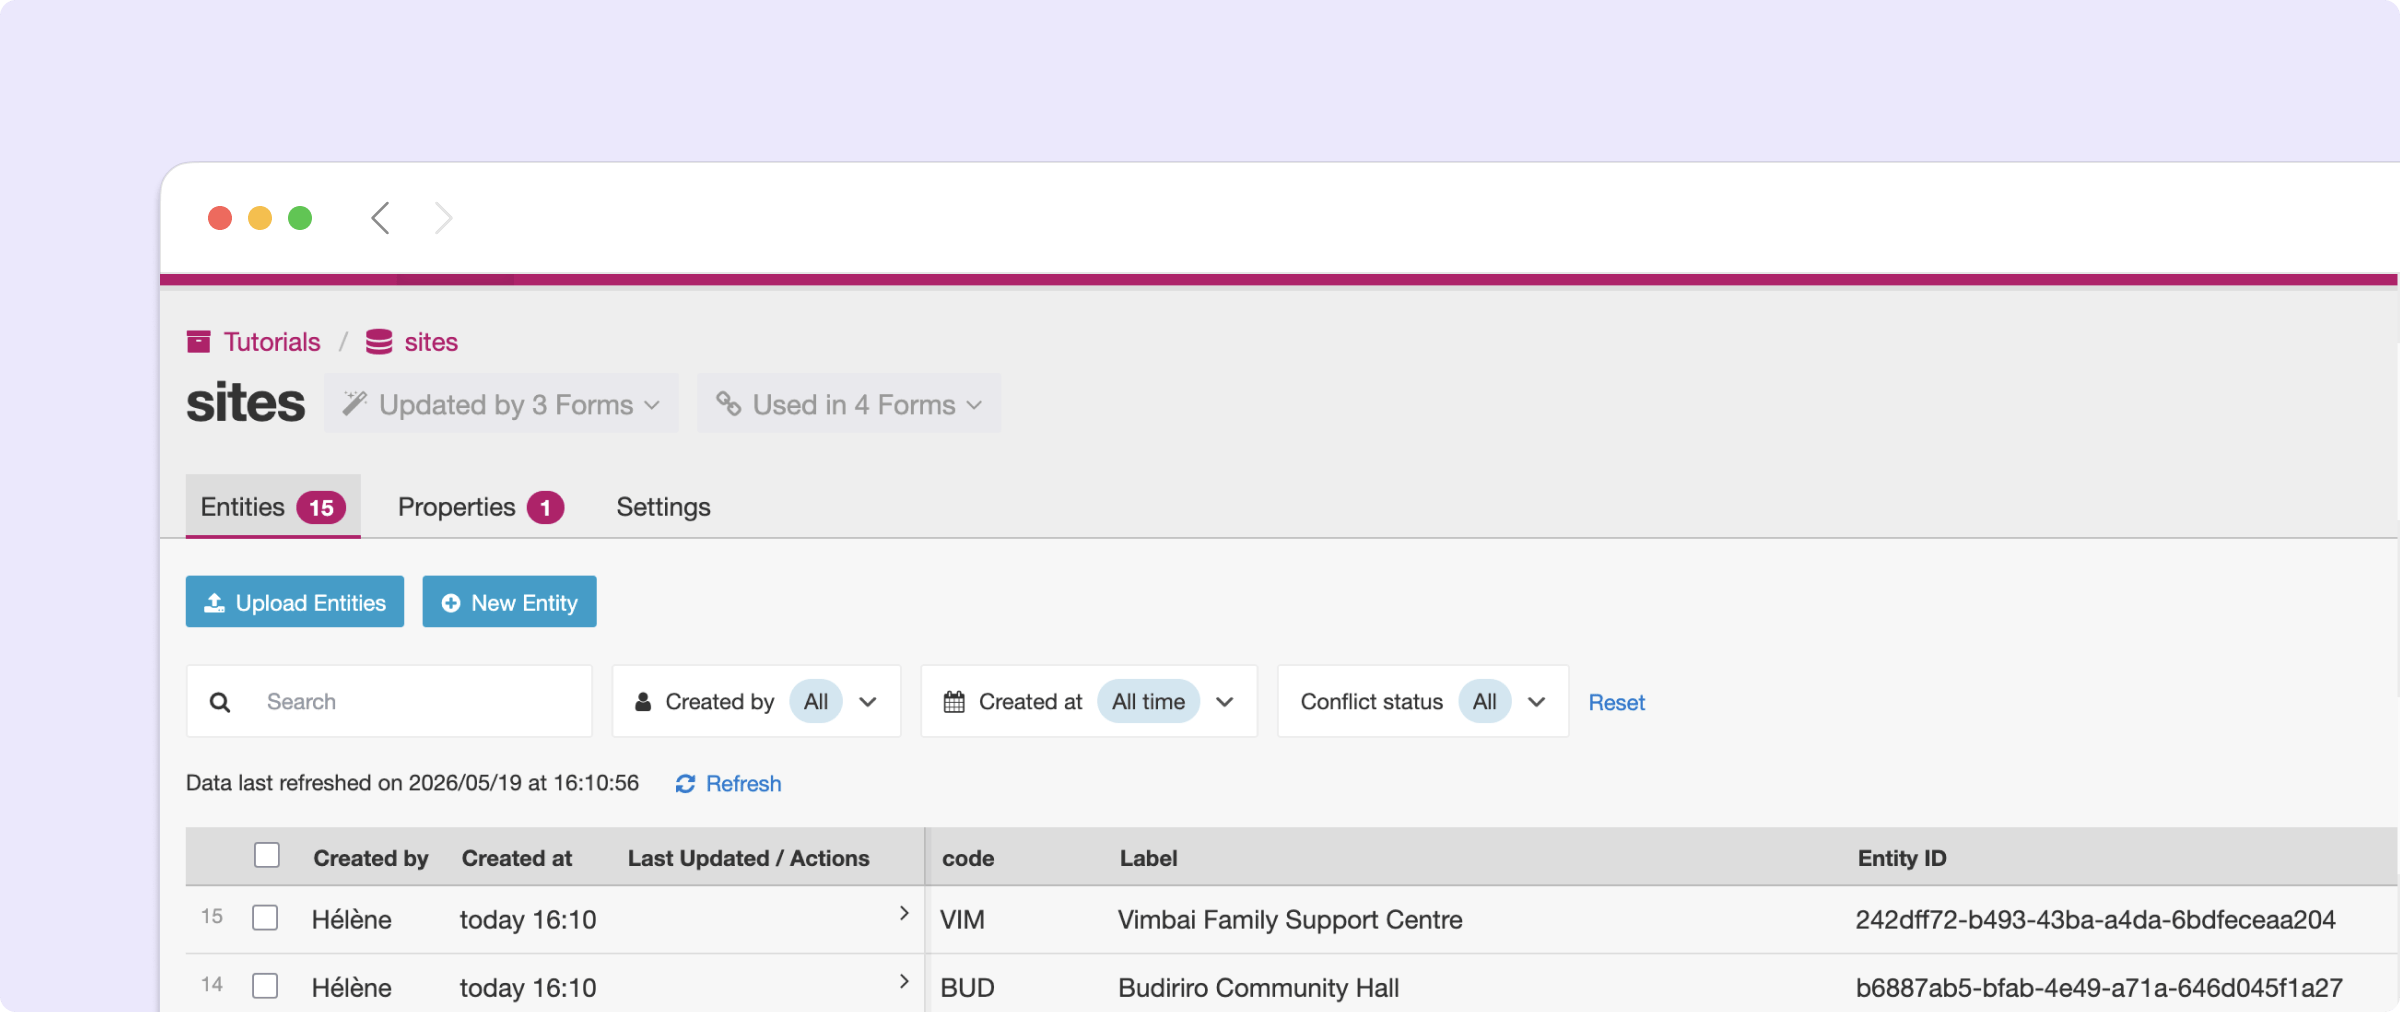
You are now ready to upload the CSV you saved earlier. Go back to the Entities tab and click on the Upload Entities button. After you upload the Entities, you should see your 15 sites:
Use the sites Entity List in a form
You are now ready to update each of your forms to use the Entity List rather than the internal choice lists.
For each form definition:
On the
choicessheet, delete thesiteschoice list to avoid a conflict with the Entity List name.On the
surveysheet, changeselect_one sitestoselect_one_from_file sites.csvso the form loads choices dynamically from the linked Entity List.Add
value=codeto theparameterscolumn. This will save the site code to submissions rather than the site Entity ID.Warning
Each site needs to have a unique code or you won't be able to know which one was selected. As the project manager, you are responsible for making sure they're unique. Central does NOT currently enforce uniqueness for any user-defined property.
Create a new draft in Central.
In the Attachments section, click the "Link Entity List sites" button in the
sites.csvrow.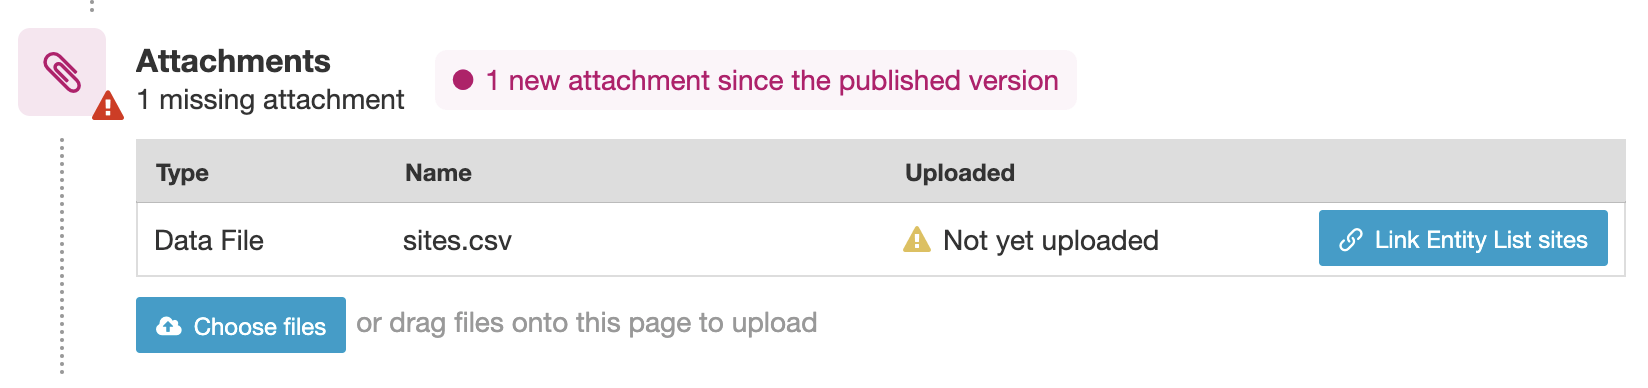
Publish the draft.
Your three forms now use the same shared Entity List to define site selection. Make a few submissions and verify that the site codes are saved in the form submissions. To use Collect, make sure you have an App User with access to all three forms.
Add a site from Central
The benefits of a shared Entity List become clear when changes need to be made to the list.
Let's say that you need to add a new site called "Tinotenda Primary School." You can now make this addition once in the shared Entity List:
From your Central project, go to the Entity Lists tab and click into the
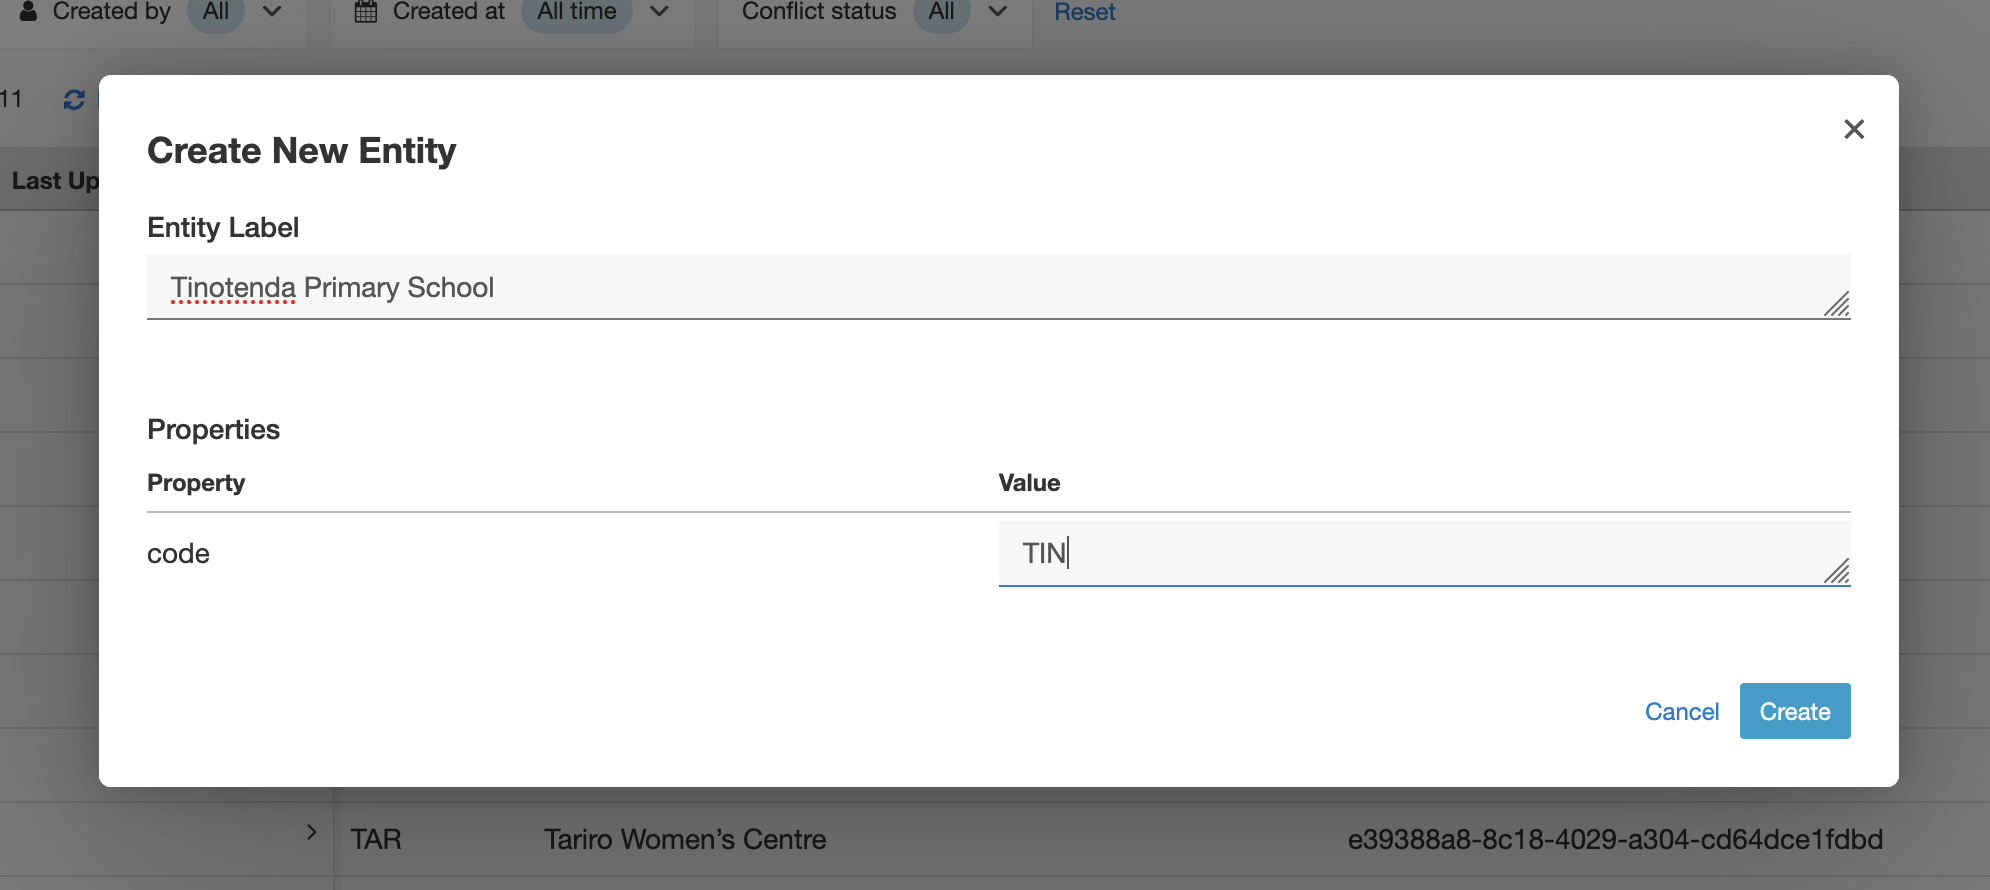
sitesEntity List.Click the New Entity button.
In the field for Entity Label, enter "Tinotenda Primary School".
In the field for code, enter "TIN". As previously described, you're responsible for making sure that this is a unique ID.
Refresh your web forms or form list in Collect and you should now see the "Tinotenda Primary School" site in all 3 forms!
Create a form to add sites
Making changes to an Entity List in Central is convenient, but it requires project manager access, which is not always appropriate to grant. Another downside is that it does no validation on entered values.
To let more people add Entities without giving them Central project manager access, use a form that creates Entities in the sites Entity List:
Make a copy of the XLSForm template, name the file
Add site, and open it in spreadsheet software of your choice.On the
settingssheet, set the form title toAdd siteand the form id toadd_site.On the
surveysheet, add required text questions for the label (site_label) and the code (site_code).
This form captures information about new sites but it doesn't yet give us a way to make that data available to our other forms. To do this, we'll need to update the form so it creates new Entities in the sites Entity List:
On the
entitiessheet, putsitesin thelist_namecolumn and${site_label}in thelabelcolumn.On the
surveysheet, add asave_tocolumn to the right of therequiredcolumn.In the
save_tocolumn for thesite_codefield, writecode.
A big advantage of using forms to create or update Entities rather than editing them directly in Central is that you can use form logic to validate new inputs. For sites, it's important for codes to be 3 characters and unique so we can add a constraint for this:
Start by connecting the
sitesEntity List to the form. In thetypecolumn, putcsv-external, in thenamecolumn, putsites.Now that the
sitesEntity List is available, you can countsitesEntities that matchsite_code. If that count is greater than 0, the code is already taken:In the
typecolumn, putcalculate.In the
namecolumn, putmatches_found.In the
calculationcolumn, putcount(instance('sites')/root/item[code=${site_code}]/label).
Then update the
constraintexpression for thesite_codefield:string-length(.) = 3 and ${matches_found} = 0Add a
constraint_message: "Code must be unique and 3 characters long."

Warning
ODK can only check against sites that were synced to the form the last time the device was online. If two data collectors are offline, both could still register the same site.
Good field protocols can greatly reduce this risk. For example, require data collectors to update forms before registering new sites and only register sites they are physically visiting after confirming another staff member is not already there. You can also introduce a server-side review step before new sites are available for other forms (see Central Entities Settings).
To test Entity creation, you will need to first publish the "Add site" form in your project. In Central, create a new form, upload your XLSForm, and publish it. You can then give an App User access to it or try the web form.
In Collect, any new site added will be immediately available to other forms, even when offline.
Use an existing form to add sites
If you want data collectors to be able to quickly add new sites without interrupting their primary action, you can add the option to create a new site directly in an existing form.
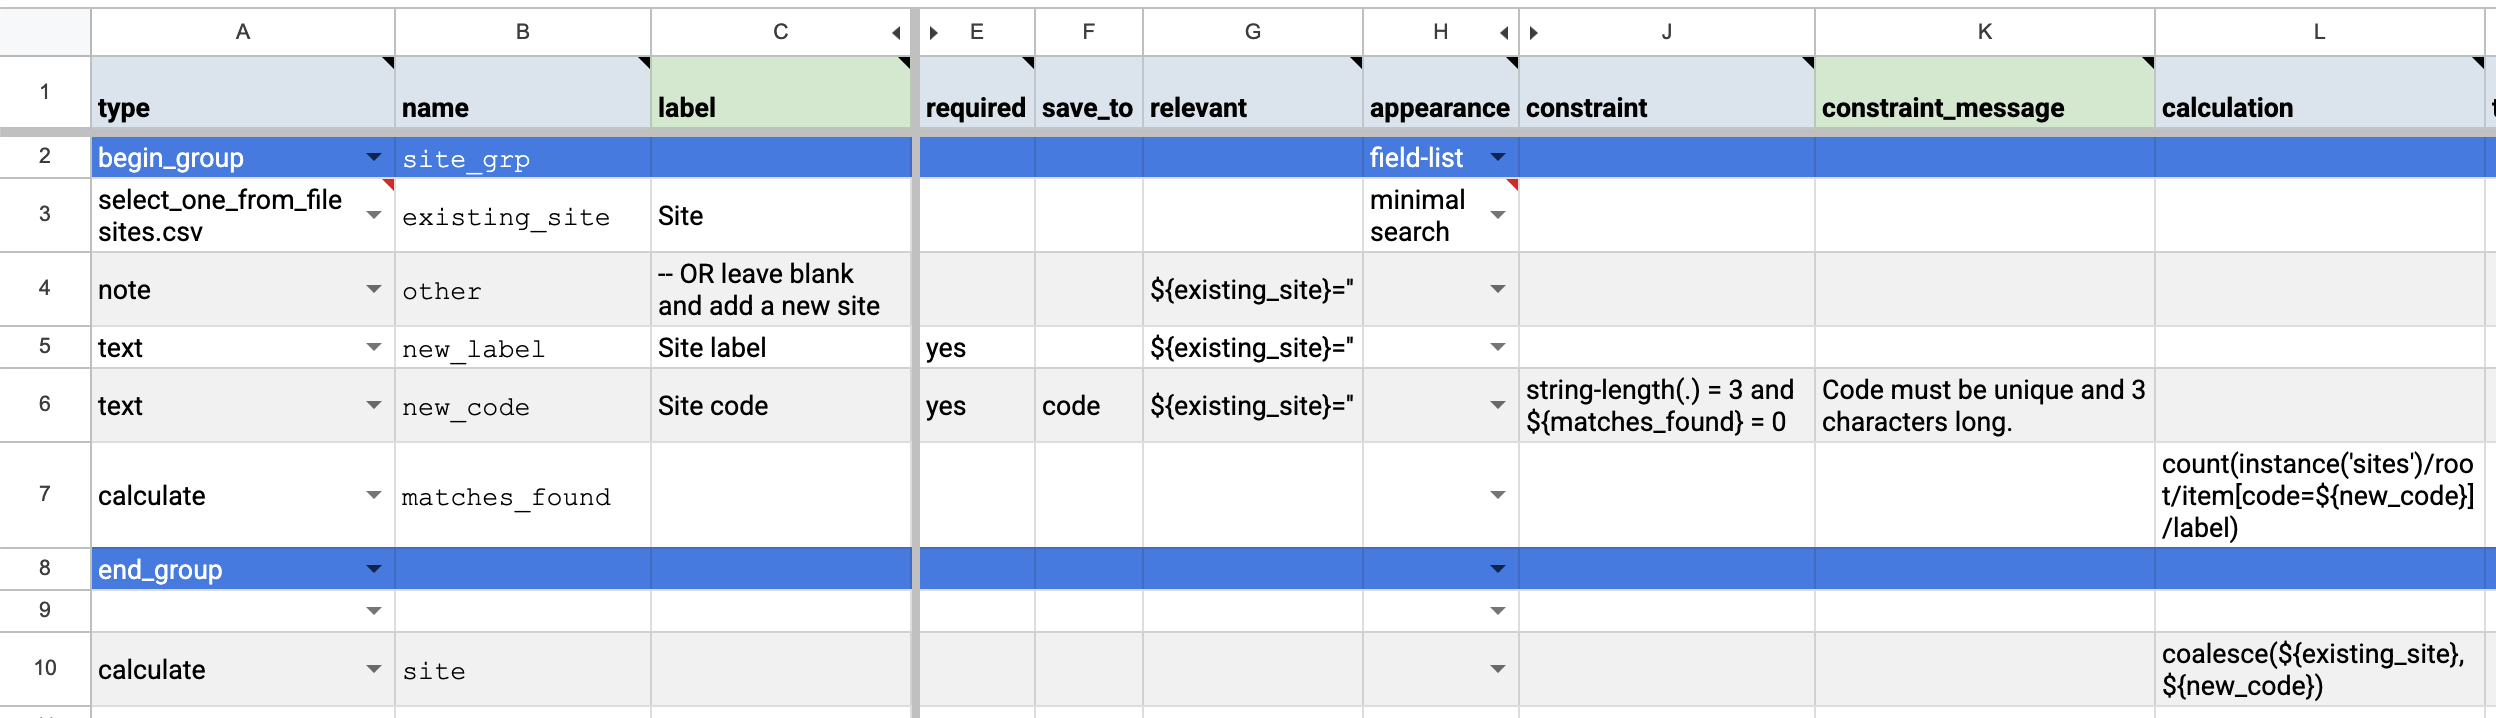
For example, start from the "Register participant" form. Add a group around the site selection and text questions for new_label and new_code in that group. The text questions should only be relevant if no existing site has been selected.
The rest of the logic is the same as in the "Add site" form above, including the save_to column for the new_code field. Your survey sheet should look like:
On the entities sheet, indicate that an Entity only needs to be created if no existing site was selected:

You can see the completed form here.
Site selection now behaves like an open select: new values can be dynamically added to the choice list instead of selecting an existing option. This is very similar to adding an "Add site" form like we did above. For Entities like sites that don't have a lot of properties, the choice between the two form design options should generally be led by what feels more comfortable for the field team. For Entities with many properties, you will generally find it easier to have a separate form for adding new ones.
Key takeaways
In this tutorial, you used Entity Lists to centralize shared choices across forms, keeping data consistent and reducing maintenance. You also saw how Entities can be created either through dedicated forms or directly within existing workflows, giving you flexibility to design experiences that fit your field teams and data collection needs.
Your turn
Add a
capacityproperty to sites to keep track of how many people each site can accommodate. Addcapacityvalues for existing sites using the Central interface. Extend the "Add site" form so that a capacity can be specified. Update the "Take event attendance" form so that the number of attendees is capped by the site capacity.Challenge: extend the "Add site" form so that it can also be used to update a site label. It should not be possible to change existing site codes. You'll need to learn how to write forms to create or update Entities (see quick reference). After giving it a try, see an example.